Automatically Add your Sent Emails as Activities
There are two methods for tracking sent emails as activities. One is by using a BCC email address. When this email address is BCC’d, the email gets recorded as an activity in the system. The downside, is that the BCC email address must be added for every email sent. The other option is a bit more involved to set up, but pulls in emails as activities automatically. Read below to learn about both methods.
BCC Email
You can add a BCC email to your system. This is set up on a system-wide level. Go to Settings > Integrations > IMAP Accounts to set up the feature. Connect to an email account using the popup form, and choose BCC Activity Creation for the Account Process Type. Once connected, your users can BCC this email address on any email they send that they wish to record as an activity within the system. As long as the email address matches a contact, the activity will get recorded.
Connect an Email through My Preferences
If you don’t want to add a BCC for every email sent, and want all emails from specific folders to be created as activities within the system, you can link your email account to your system and set it to record all of your emails from the selected folders as an activity automatically; this removes the need to add a BCC email every time.
Warning
You MUST have a default email activity type for this to work. All emails captured by this feature will get set to the default email category. If you don't have one set, the system can't save the email. Go to Settings > Sales > Activity Categories to edit or add a new category and make it the default.
Make sure to either add or edit an existing email activity category in your system:
Go to Setting > Sales > Activity Categories.
You can create an entire category just for Automated Emails or set one of your current categories to the system default. Either way, you must have a default.
To connect your account, you must have your email providers IMAP settings. We will go through the process to find and enter settings for Outlook and Gmail. If you use another provider, you will need to make sure your Inbox can allow IMAP to be enabled and get the server name and port, e.g., imap.PROVIDER.com/993. You do NOT need SMTP setup to use this feature. SMTP is just for sending emails; IMAP is for receiving.
Warning
You MUST connect the SAME email address that a user logs into the system with.
No matter which provider you use, you can specify what folder from your Email Client you want the system to pull from. Once your email is successfully connected, you can use the dropdown to pick and choose which folders you would like the system to create activities from. The typical workflow uses your ‘Sent’ mail.
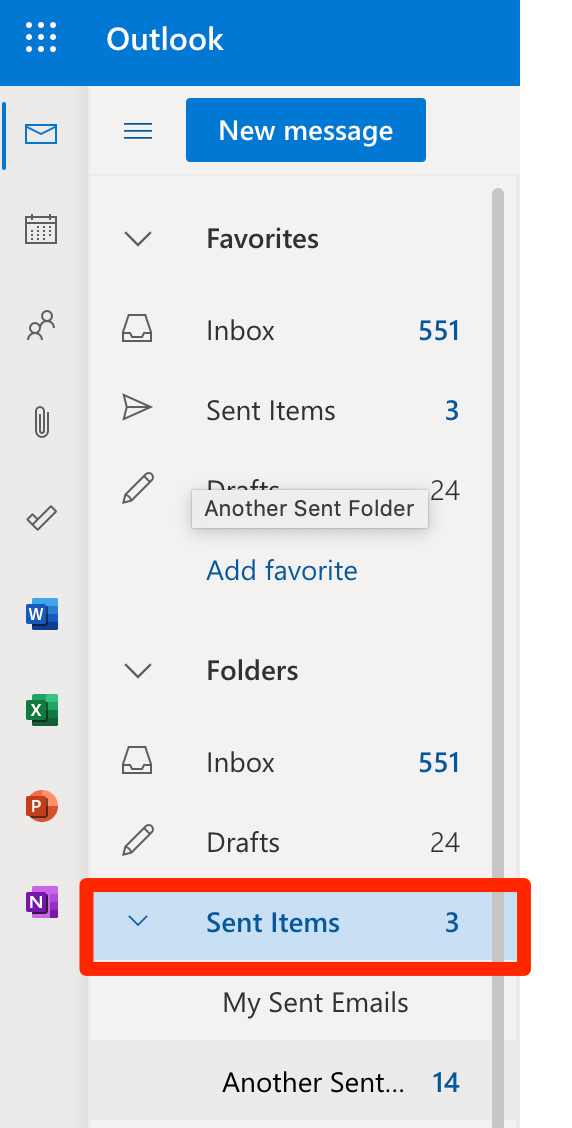
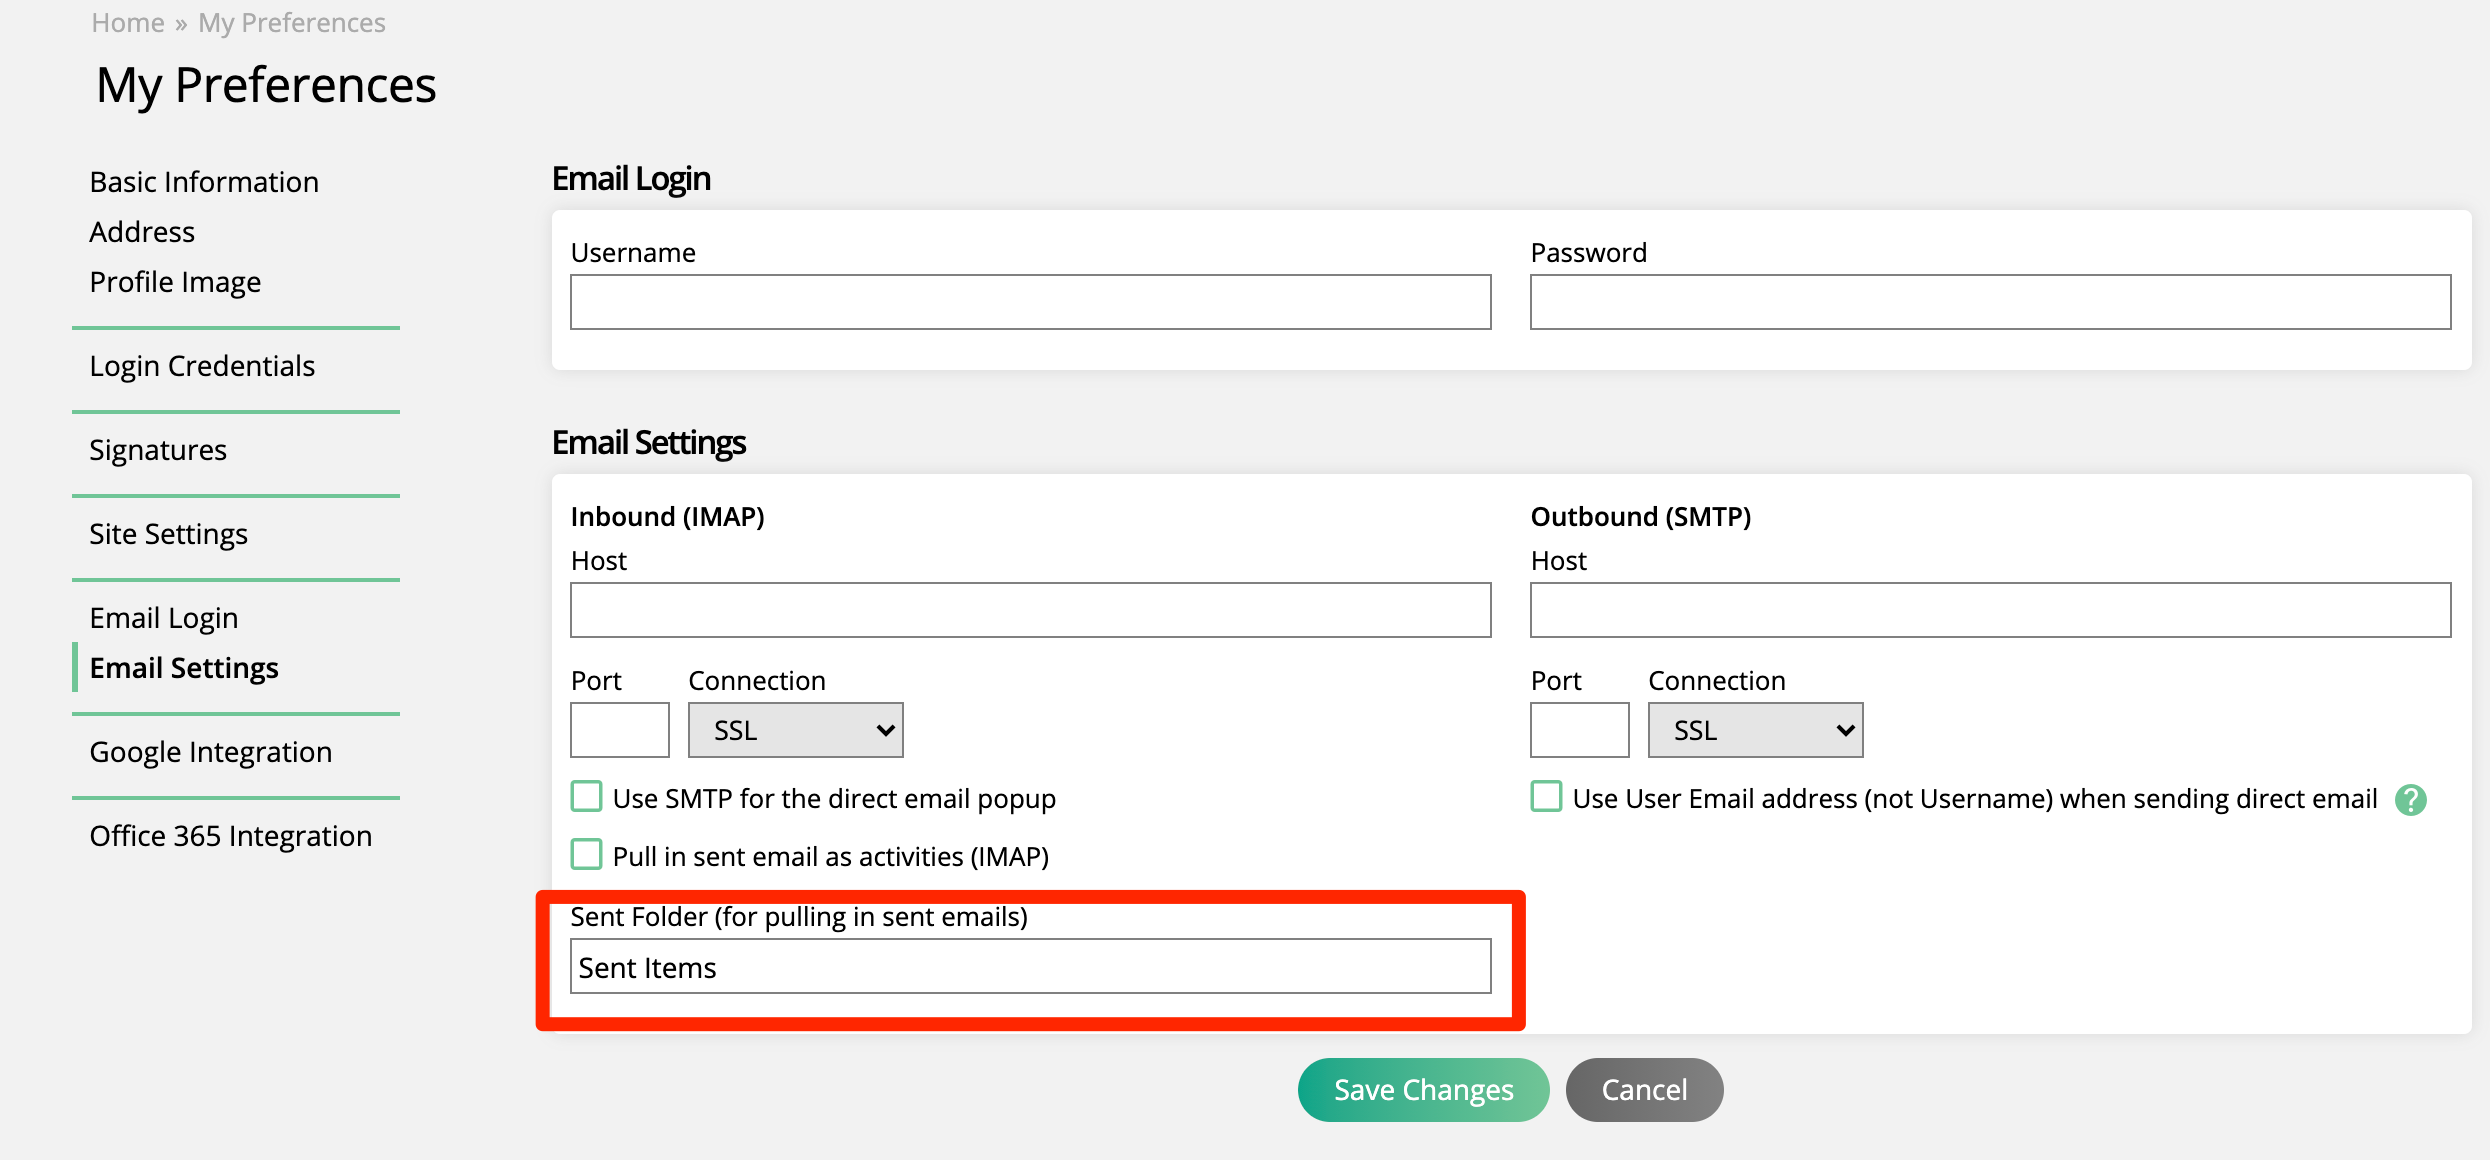
If you want to send or receive emails from your Outlook Inbox from the System you need to login to your Email Account and add IMAP and/or SMTP settings depending on if you want the system to read, send, or read and send emails from your inbox. Below we will go through what you need to setup a standard Outlook inbox and what each setting will do.
Start by getting the SMTP and IMAP information from Outlook. Here is a link to their standard settings.
Important
Your company may have different settings. If these settings do not work, please check with the system administrator of your Email Provider.
Go to My Preferences and click on Email Settings.
Now enter your Outlook email address and password. This is NOT for your internal system email and password; they do not need to be the same for this feature.
Enter the SMTP and IMAP settings and than enable the features you want to use.
Use SMTP for the direct email popup: You can send an email from the system interface that will show up in your Inbox sent folder and appear to be sent from your inbox.
Pull in sent email as activities (IMAP): The system will record all your sent emails from your Inbox into the system as an activity. Activities will only record to a contact if the email matches and you own the contact.
If you are pulling in sent emails as activities, you will also be required to choose which folders to create activities from. If you want to use your ‘Sent’ Outlook folder, for example, then simply choose your ‘Sent’ folder in the dropdown.
Note
If your Outlook email account uses two-factor authentication, you cannot pull in sent emails as activities.
For both Gmail and Outlook, there is an option to choose your Inbox as a folder to use to create activities in the system. If you use your Inbox, then activities will be created when you receive emails, as long as the sender’s email address is a contact you have access to in the system. If you also have an outgoing folder selected to use, then both your incoming mail and sent mail will be recorded as activities. It’s important to note that if you configure your folders this way, if you have an email thread where you are replying back and forth with a contact, each reply from you or from the contact will be created as an individual activity.
Use User Email address (not Username) when sending direct email: This is only relevant if your email address is different than your user email address and is only applicable to Outlook users.
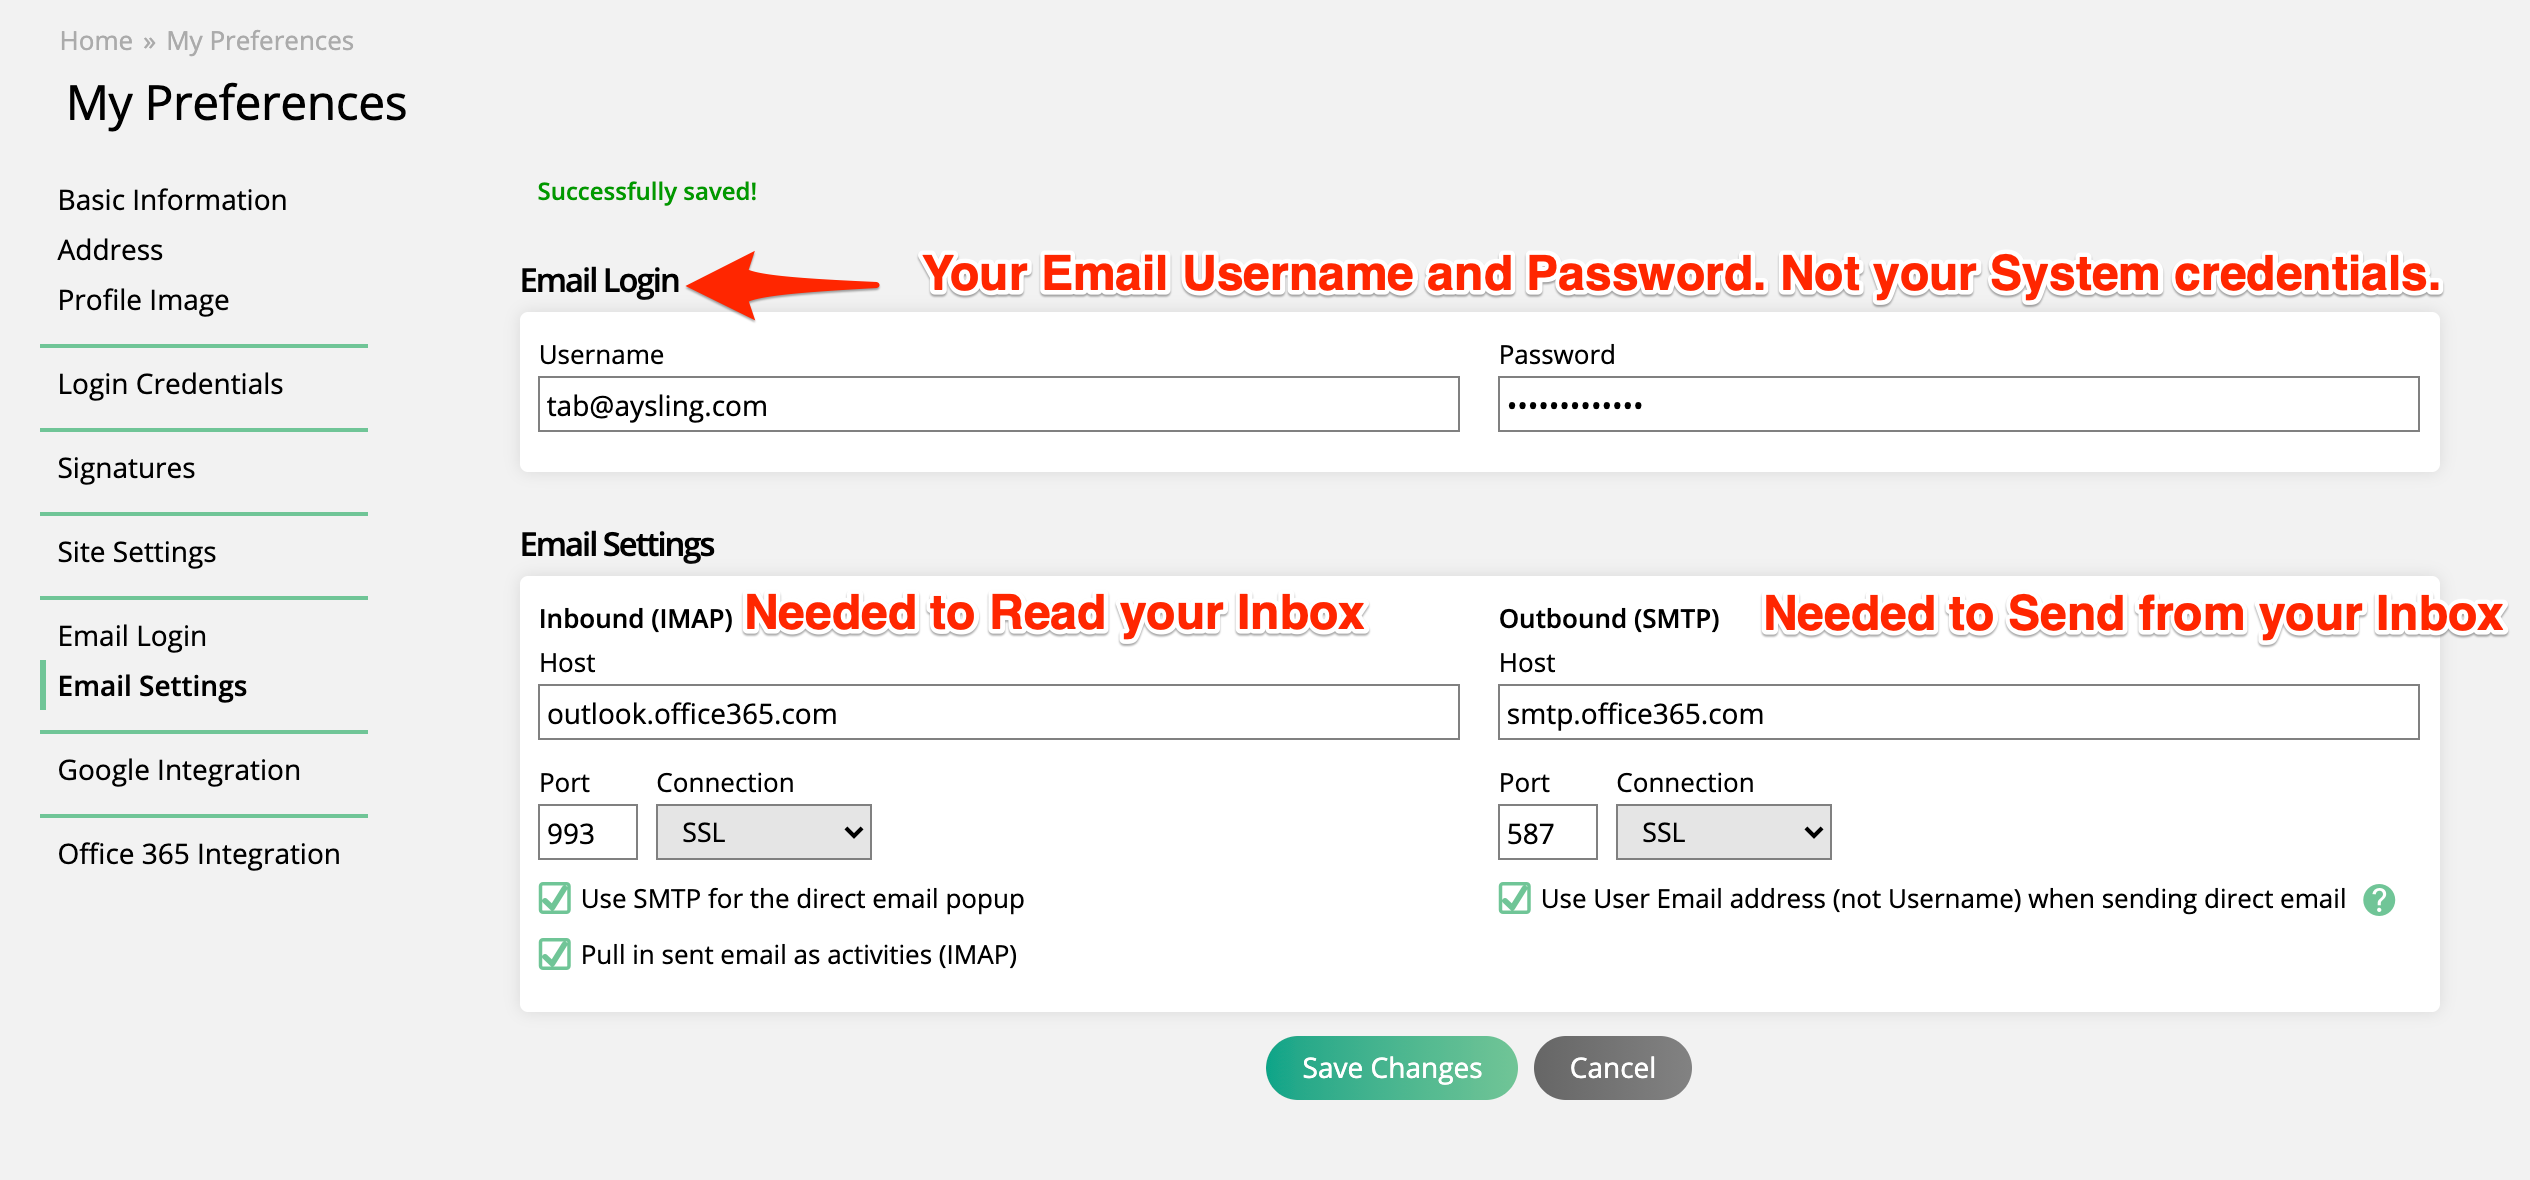
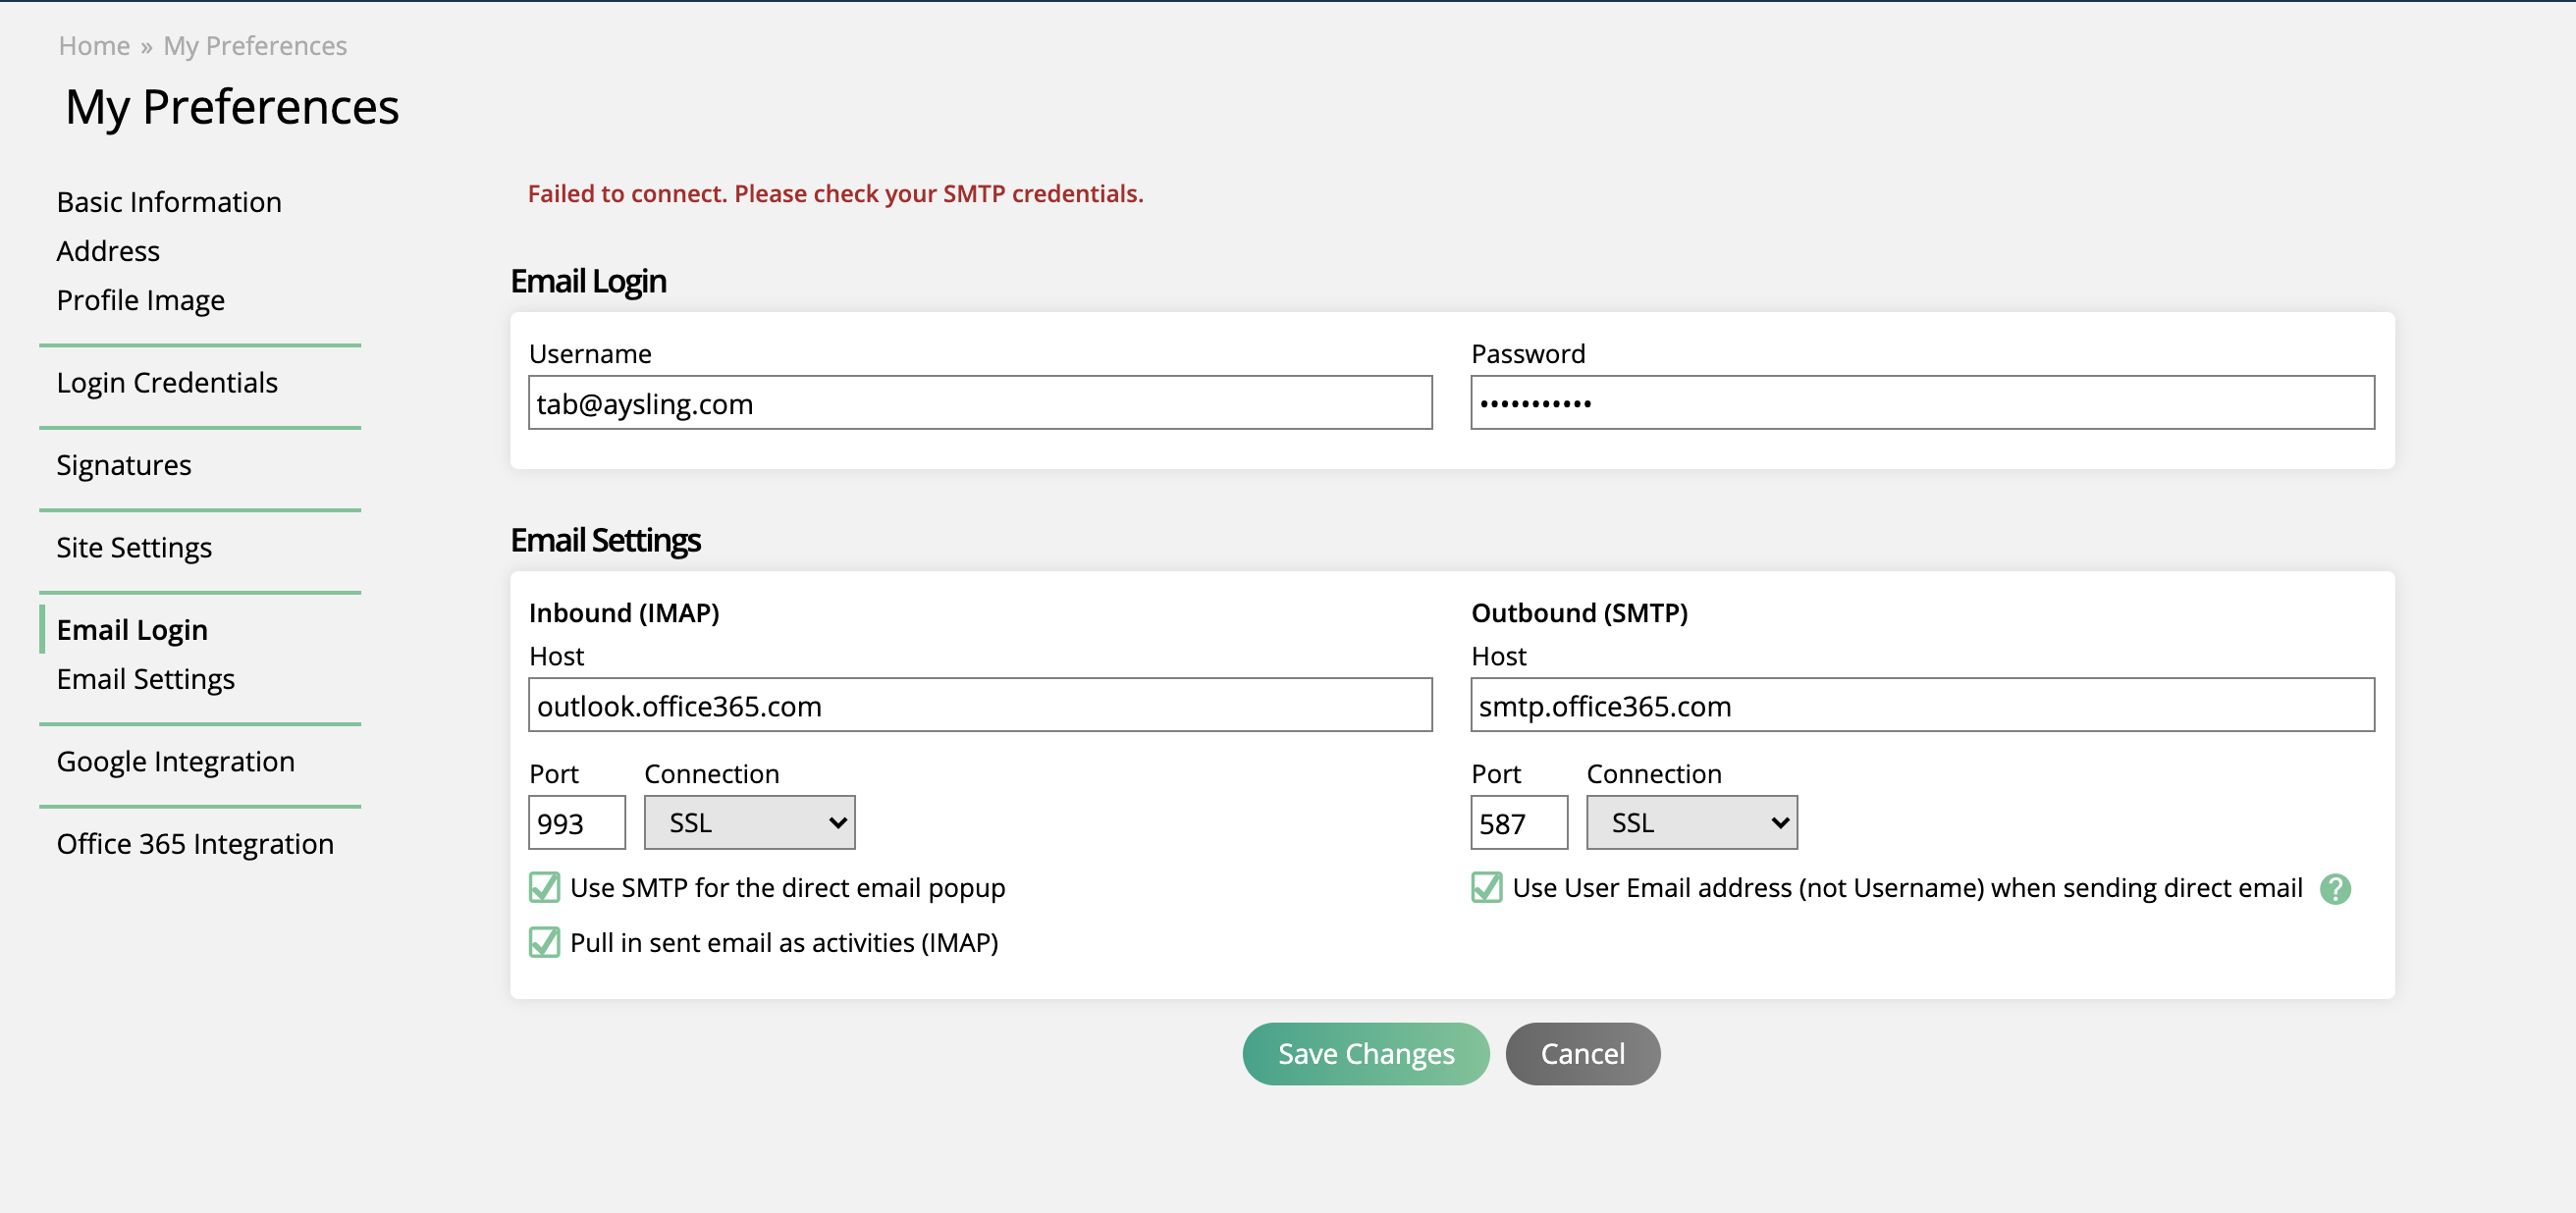
You will either get a success or fail message when you hit save. If your email doesn't sync, please make sure your password and email are correct. Then double check your IMAP/SMTP settings are correct and you are allowed to connect to your server. If the problems persist, please contact our support team.
You can now start sending emails from the system using our Direct Email action and record sent emails from your Inbox.
If you want to send or receive emails from your Gmail Inbox from the System you need to login to your Email Account and add IMAP and/or SMTP settings depending on if you want the system to read, send, or read and send emails from your inbox. Below we will go through what you need to setup a standard Gmail inbox and what each setting will do.
Note
Due to changes that Gmail and other email providers are planning on implementing, we have been required to change how the system connects to email accounts. We have created an integration with Nylas to resolve the issue, however, the integration needs approval from Google before it can be used within the system. In the meantime, you can connect to your Gmail accounts by taking advantage of their two-factor authentication and app passwords functionality. Read through the document below to learn how to set up these items and connect your Gmail account.
Enable Two-Factor Authentication
First, you will need to enable two-factor authentication (2FA) in your Gmail account that you are connecting to the system.
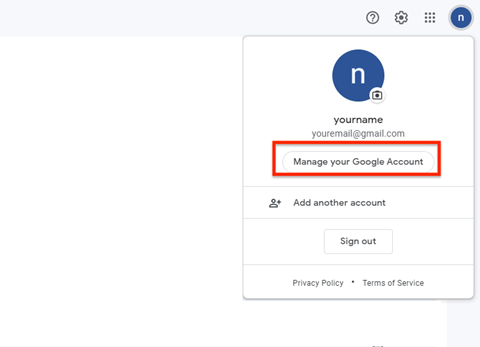
To do this, go to your Gmail account, click on your profile icon in the upper right corner, then click ‘Manage your Google Account’. This will open a new page with additional Gmail settings that can be edited, including enabling 2FA.
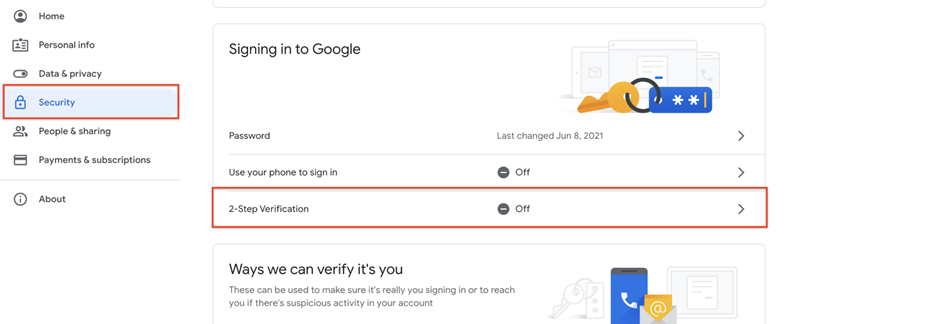
Click on the ‘Security’ tab, and scroll down until you see ‘2-Step Verification’ under the ‘Signing in to Google’ section.
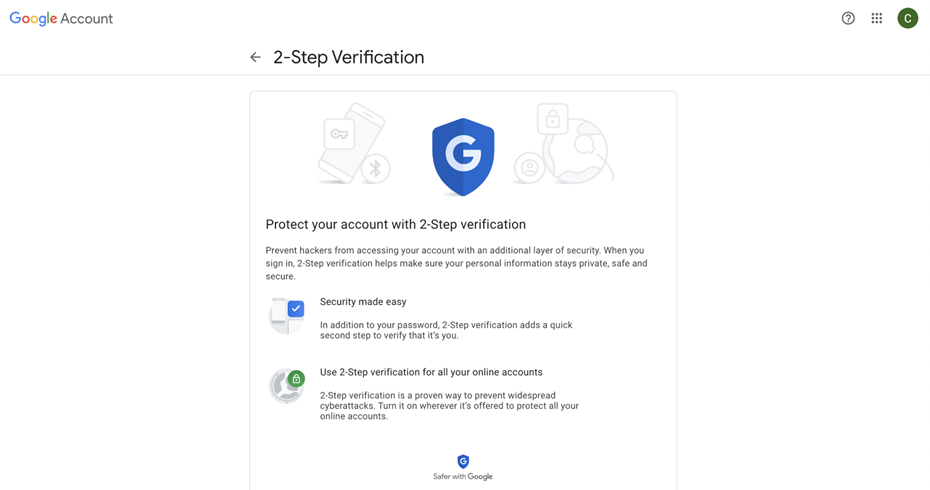
On the 2-Step Verification page, you can set up various methods of a secondary authentication method. The most common is to receive a text message or phone call with a code needed to log in to your email account. Complete the verification process, and 2FA will be enabled for your Gmail account.
Generate an App Password
The next step is to generate an App Password.
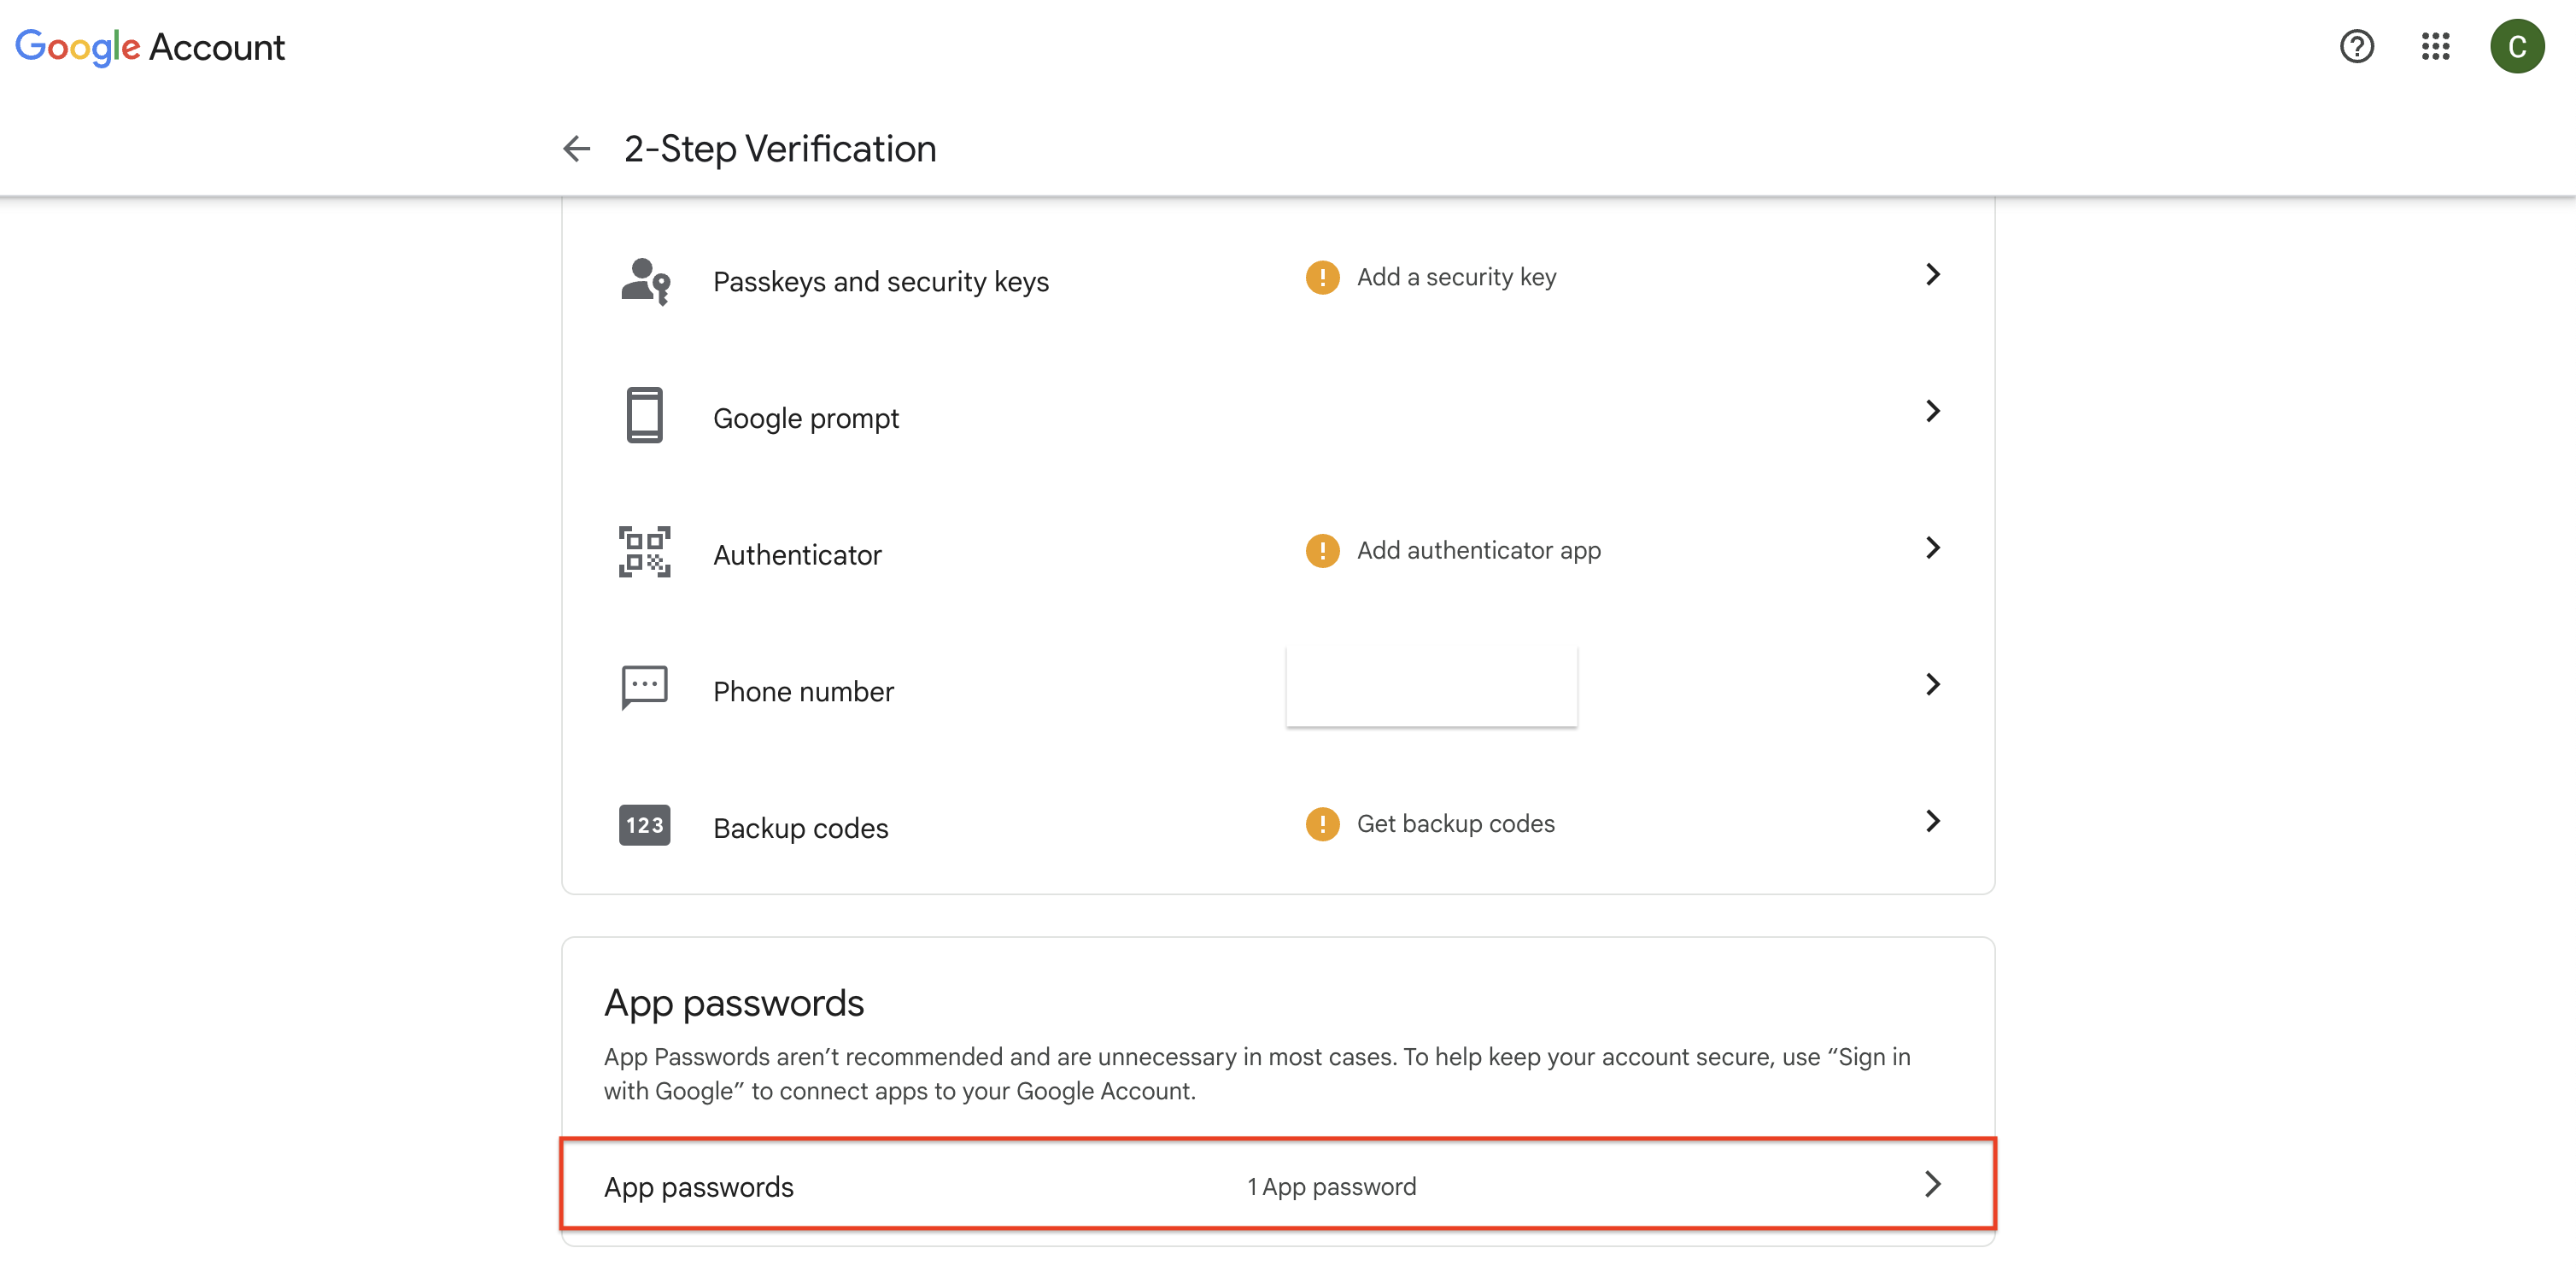
Stay on the 2-Step Verification page. Then, click on ‘App passwords.’
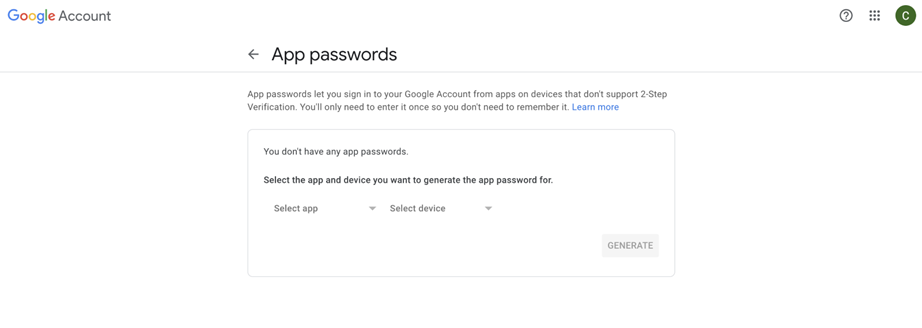
On the App passwords page, click the dropdown for ‘Select app’, and choose the ‘Other’ option.
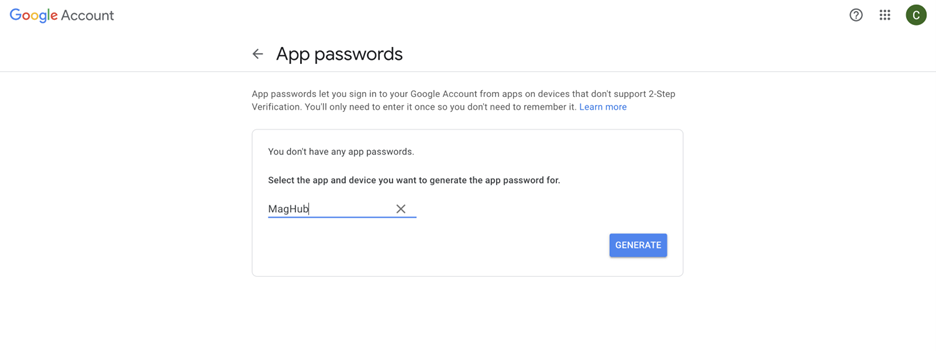
Enter a name that makes sense to you for your connection to the system. For example, you could simply name the App password ‘Internal’. Once you’ve added a name, click the Generate button.
You will receive a popup that contains the password.
Important
This password will only be shown once. After it’s been generated, you cannot return to the password and view it again. Make sure to copy the password when it appears in the popup and use it immediately so it does not get lost. If needed, you can delete the app password and generate a new one.
Copy your app password, and go to the My Preferences page. Click on the Email Configuration tab.
Enter your Gmail email address in the Username field, and paste the app password you just generated into the Password field. Complete the other Host, Port, and Connection information, and click Save Changes.
Note
Here is a link to Gmail’s standard IMAP and SMTP settings. Your company may have different settings. If the standard settings do not work, please check with the system administrator of your Email Provider.
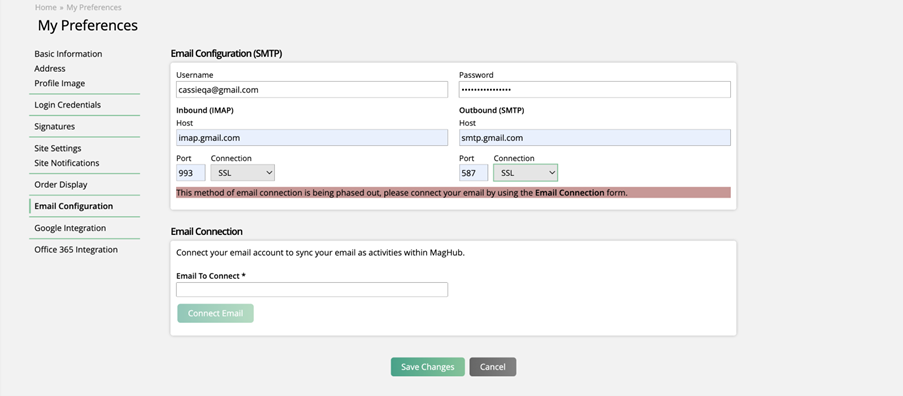
You should receive a success message, with new options appearing to use the connected email for the direct email popup, and to pull in sent emails as activities.
If you receive a failure message, please make sure your password and email are correct. Then double check your IMAP/SMTP settings are correct and you are allowed to connect to your server. If problems persist, please contact our support team.
Once connected, you’ll see a few options that you can enable depending on which features you want to use.
Use SMTP for the direct email popup: You can send an email from the system interface that will show up in your Inbox sent folder and appear to be sent from your inbox.
Pull in sent email as activities (IMAP): The system will record all your sent emails from your Inbox into the system as an activity. Activities will only record to a contact if the email matches and you own the contact.
If pulling in sent emails as activities, you will also be required to choose which folders to create activities from. If you want to use your ‘Sent’ Gmail folder, for example, then simply choose your ‘Sent’ folder in the dropdown.
For both Gmail and Outlook, there is an option to choose your Inbox as a folder to use to create activities in the system. If you use your Inbox, then activities will be created when you receive emails, as long as the sender’s email address is a contact you have access to in the system. If you also have an outgoing folder selected to use, then both your incoming mail and sent mail will be recorded as activities. It’s important to note that if you configure your folders this way, if you have an email thread where you are replying back and forth with a contact, each reply from you or from the contact will be created as an individual activity.
Updated 8/31/2022
The system will check your Inbox every 4 hours to find emails that were sent since the last time there was a sync. When the system check the inbox, it will look at the recipients email address and see if there is a contact in the system with that same email. However, the system will only record that activity to one contact and only if you have access to that contact.
The system will also only record the activity to one contact with that email. This means if the same email address is in the system multiple times the system will determine which contact gets the activity. The system will use the earliest created date and assign the activity to the contact.
Will Record
You are the contact owner and the email is in the system on your contact.
You have permission to all contacts and the email is in the system.
Will NOT record
The email is in the system but you do not have permission to that contact.
The email is in the system, but two contacts have it and the 2nd contact was created after the first contact.
You do not have a default email category set up.
Updated 8/31/2022