Company Overview Pages
The company overview pages contain relevant information about a specific company’s contacts, orders, invoices, and projects, as well as providing you with a company summary. You can get to a company’s page by using the Company Search page and clicking on a company name, or by using the global search bar. There are also other locations throughout the site where the company name is a quick link, which will also bring you to that company’s page, including from many of our reports. This document will give you a brief overview of the company pages as well as some ways you can customize how you view your companies. Check out the help center documents about each tab if you need specific information about what a tab does.
Company at a Glance
At the top of each company page, you will see important notes or warnings, such as if the company has a past due balance, or if there is a similarity index. These warnings will display no matter which tab you are on.
You will also always see an ellipsis icon from which you can perform certain actions, such as creating activities for the company or editing fields.
Next to the company name, you will see an indicator of their sales status. There are four potential statuses a company could be at.
New – A blue circle icon indicates that the company is new and/or does not have any order history.
Actively Running – A green check mark icon means the company has orders with line items that extend beyond the next 30 days.
Expiring – A yellow clock icon means the company’s last line item is expiring within 30 days from the current date.
Expired – A red triangle icon indicates that the company has an order history, but no active line items.
You can customize the display of the company’s tabs by dragging and dropping them to rearrange the order. There is also the ability to pick and choose which tabs you want displayed. For instance, if for your role you never need to see artwork information for a company, you can hide that tab so it does not show up. To enable or disable tabs, click the edit icon in the tab header bar, and use the toggle buttons to turn tabs on or off. Click the check mark when you are finished with your changes.
These changes will apply to every company in the system when logged in as your user.
Note
The Company Overview tab cannot be moved or disabled.
Each tab on the company page contains different information relating to the company. Review the help center pages on each tab to help you decide which tabs you would like to see on your company detail pages.
Company Overview Tab
When you first navigate to a company, you will always see its Overview tab. Depending on your permissions, on this page you will be able to deactivate, delete and merge companies, and view a popup or PDF summary of the company information. You may also be able to edit the company from this tab, by clicking the edit icon in the Company Info box.
The company info box contains information such as company ID, primary rep information, as well as company type and categories.
The company overview tab also shows sales rep information, including primary, secondary, and support rep names when applicable.
If you utilize company dynamic attributes, you will be able to see these here as well. You can easily find attribute names or values by using the search bar in this box.
The page also shows relevant billing information, as well as any saved credit cards or ACH accounts for the company. The billing information section also allows you to generate a statement for the company and link to the invoice and payment search pages.
The External Reporting Links section allows you to create and manage embeddable links for the company that your contacts can see in their Client Center. Any links here that show as embedded are visible in the Client Center for the company. Any links that are not embedded will not be visible for your contacts.
Finally, the company overview tab displays radio buttons showing whether or not the company is exportable or is set to export.
Pinning Company Data
To further customize what you can see on your company records, we allow you to pin certain information to the company overview tab. This pinned information is specific to your user account, and each company, and will show up to the left of the Company Info box. Pinning helps you easily reference information that otherwise you may need to do some digging to find.
To add an item to the pinned section, simply use the ‘pin’ icon that shows up next to the item. If an item is pin-able, the icon will display when you hover over the item.
The following are the items that you can pin, and the information that will be included with each item:
Complete and Pending Orders
Order Number
Rep Name
Amount
% Approval
Contacts
Contact Name
Email
Phone
Contact Type (primary, billing, artwork, distribution)
Invoices
Invoice Number
Amount Due
Due Date
Last Payment Date
Forecasts
Forecast Title
Rep Name
Amount
Type
Tickets
Ticket ID
Current Status
Description
Activities
Type
Activity Creator
Contact the activity is with
Date
Description
Dynamic Attributes
Attribute Name
Attribute Details (for example, if the attribute is yes/no radio buttons, then you would see either Yes or No show up here).
Unlike the other items that can be pinned, dynamic attributes will apply to all companies in your site, they are not company specific.
The pinned section is easily editable. You can rearrange the order that the pinned items show up by using the arrow icons to move the item up or down in the list. Pinned items can be removed by using the x icon, or by clicking on the pin icon on a pinned item.
The contacts tab displays all of the contacts for your company.
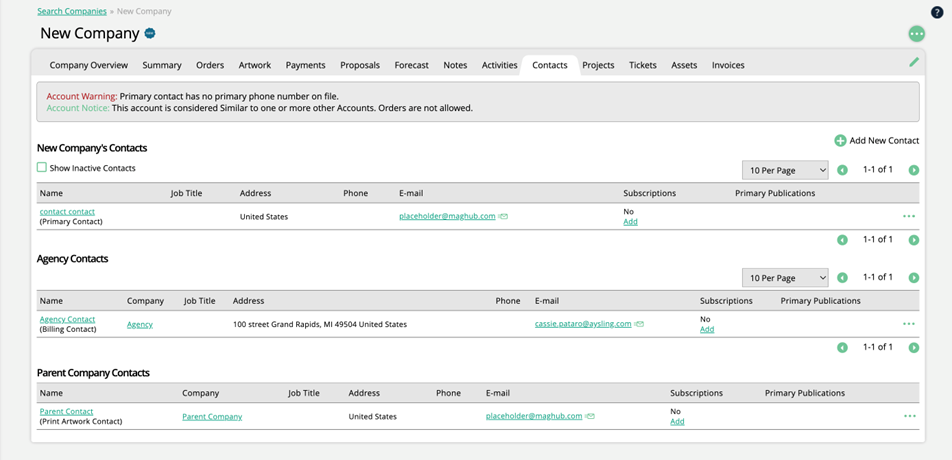
You can click ‘Show Inactive Contacts’ to show any deactivated contacts associated with the company in the table.
There is some information displayed about each contact, including job title, address, email and phone numbers. If the contact is a primary, billing, or artwork contact this will be noted.
Depending on your permissions, you may be able to add new contacts, deactivate contacts, or edit contacts from this tab.
You can also add activities for your contacts from this page by using the ellipses icon on a contact.
Click on the contact’s name to go to the contact’s overview page.
If your company has an agency or parent company with contacts associated, these contacts will show up on the Contacts tab as well.
The orders tab shows all of the fully approved and signed, pending, and incomplete orders for the company, with the option to include deleted orders in each table. Each section will show different information about the orders, and you’ll be able to perform different actions. From this page, you can also create a new order for the company.
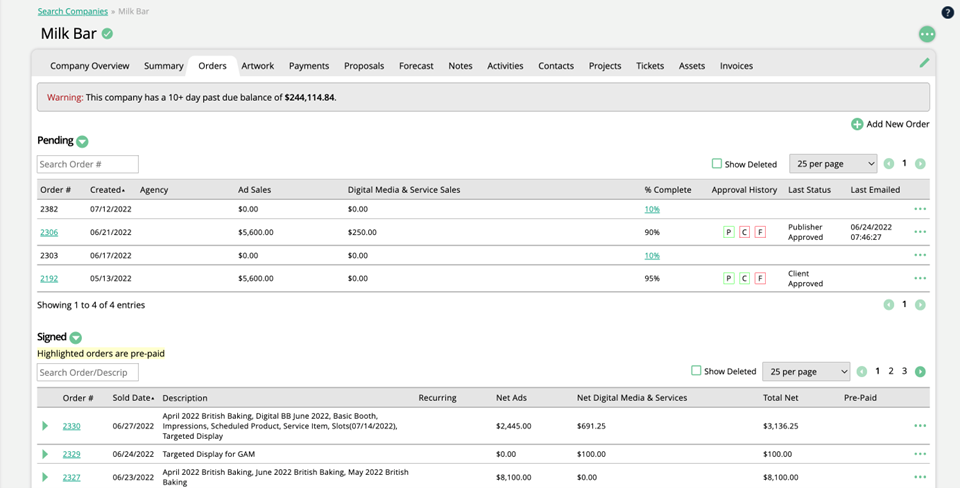
Pending Orders
The pending orders table shows all orders awaiting some level of approval, as well as incomplete orders. Each order shows the order ID, created date, and order totals.
Any pending order ID is a quick link that will open the contract PDF, and will show the level of approval the order is currently at. Depending on your permissions, you may be able to approve the order from this page.
If the order is incomplete, which means the rep has not finished entering information for the order, the order ID will not be a quick link, and there will be no approval history that shows up. The only actions available for these orders is to edit or delete the order, it cannot be submitted for approval.
Use the arrow icon next to ‘Pending’ to expand or collapse the table, depending on what information you want to see.
Signed Orders
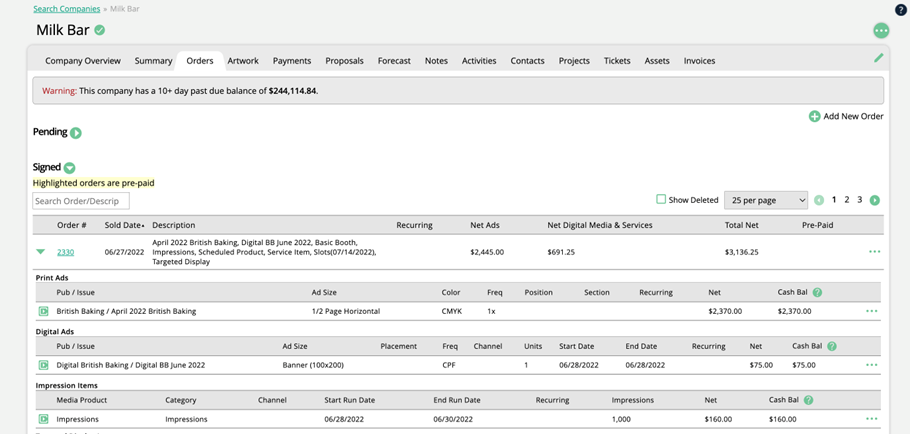
You will see the ID, created date, description, and totals for each order. By using the arrow icon on an order, you can open up the line item details for that order.
There are many actions you can take in this table, depending on your permissions, such as editing the order, viewing commissions, adding items to the order, creating an ad hoc group or installment billing.
Use the arrow icon next to ‘Signed’ to expand or collapse the table, depending on what information you want to see.
If an order has an installment schedule on it, you will see an installment schedule icon next to the order number.
If you have both the Astro and DataWarehouse integrations enabled, you'll be able to access 'Sales Insights' from this page. Sales Insights will open in a popup, where you can filter by publication, and sales dates. When you generate the results, Astro and the DataWarehouse work together to build you a summary of Sales data for the company. Depending on the available data, you'll see information such as items with large discounts, items that have high sales numbers and net amounts, and a table that breaks down the data based on ad sizes or products.
Order Display Preferences
We allow you to personalize how your Orders tab appears, including which fields display, and what they are named. To customize the Orders tab, go to your My Preferences page, and click on Order Display.
On this page, you will see different sections for the components of the Orders tab, including Signed Orders, Pending Orders, and each line-item product type such as Service Line Items. Each section shows the available display fields for that section with checkboxes and an edit icon.
Use the checkboxes to select which fields you want displayed. By default, all fields will display, but you can uncheck them to hide the field. For instance, if you only use advertising in your system and no services, you can uncheck the Net Services field since it is not needed.

Click on the edit icon next to one of the headers to change the display names of the fields.
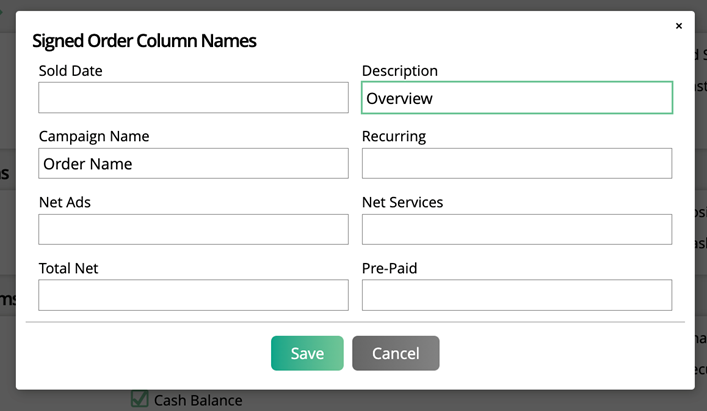
These changes only affect your user account. They will not affect the Orders tab of other users in your system.
Example:
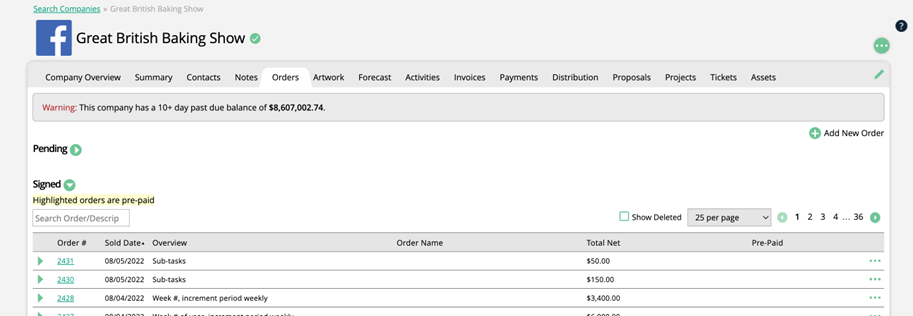
Under the Signed Orders section, I have disabled the Recurring, Net Ads, and Net Services fields. I have also renamed ‘Campaign Name’ to be ‘Order Name,’ and ‘Description’ to ‘Overview.’

You can see these changes reflected on my Orders tab.
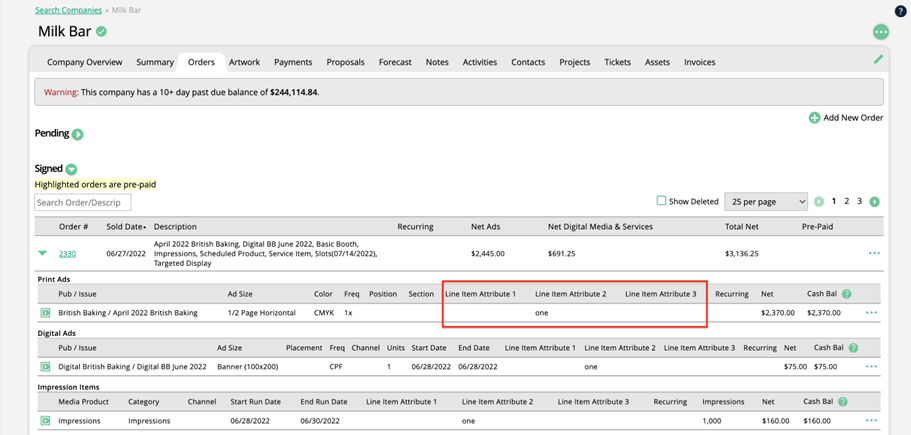
Show Line Item Attributes
If you wish, you can set up your system to view line-item dynamic attributes on the Orders tab. You must submit a support ticket to enable this configuration.
When the setting is turned on, the first step is to set up ticket dynamic attributes to show on your line items. Go to Settings > System Design & Info > Dynamic Attributes, and click the Tickets tab. When adding or editing a ticket dynamic attribute, check the ‘Show on Line Item’ option. This will turn the attribute into a ‘line item attribute.'
Then, you’ll be able to view these line item attributes on the Orders tab when viewing the line item details for a Signed order.
The image below is what your Orders tab will look like without the setting enabled:
And this is what your Orders tab would look like with the setting enabled:
The artwork tab displays thumbnails of the artwork uploaded to the company or to a specific ticket for the company. You can change the sort, the results displayed per page, and which artwork is included by clicking the ‘Filter Results’ button.
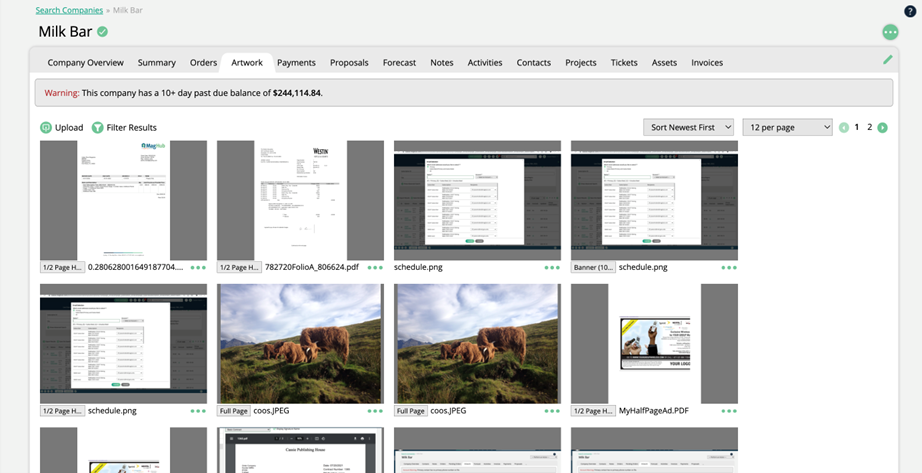
Hovering over a thumbnail will display information about the item, including artwork status and ticket information if relevant.
Depending on your permissions, you may be able to upload new artwork from this tab or assign unassigned artwork to an issue or product.
To upload new artwork to the company, click on the Upload action at the top of the page.
To assign artwork to an issue or product, use the ellipses icon underneath the image. If the artwork is already assigned, you’ll be able to view the ticket from here. If it is not assigned, you’ll see a ‘Pick-Up Artwork’ action, which allows you to assign the asset to a product or issue, with the option to mark the artwork as final.
The forecast tab shows all of the opportunities for a particular company.
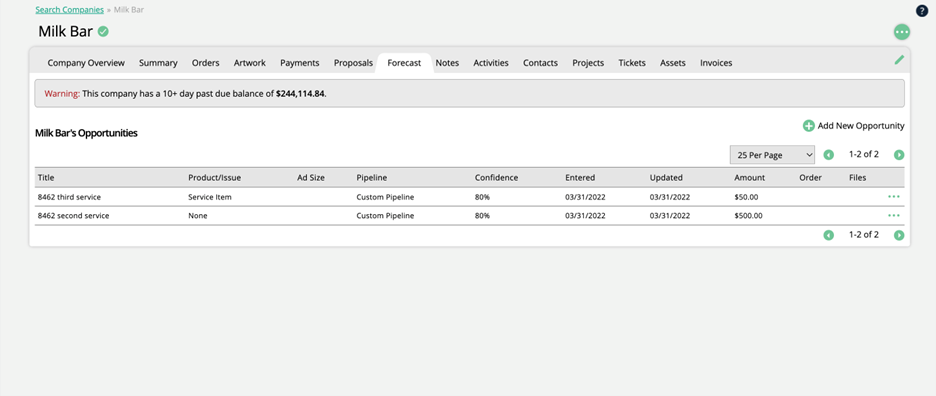
Each opportunity will show a title, the confidence level and pipeline of the opportunity, as well as the amount.
Any deleted opportunities, or opportunities used on orders will show up with a strikethrough.
Depending on your permissions, you may be able to add new, edit existing, or delete opportunities from this page.
The activities page displays all of the activities created for a company, including appointments, calls, emails, and to-do's. This includes activities created for any contact tied to the company, and are always associated with a sales rep.
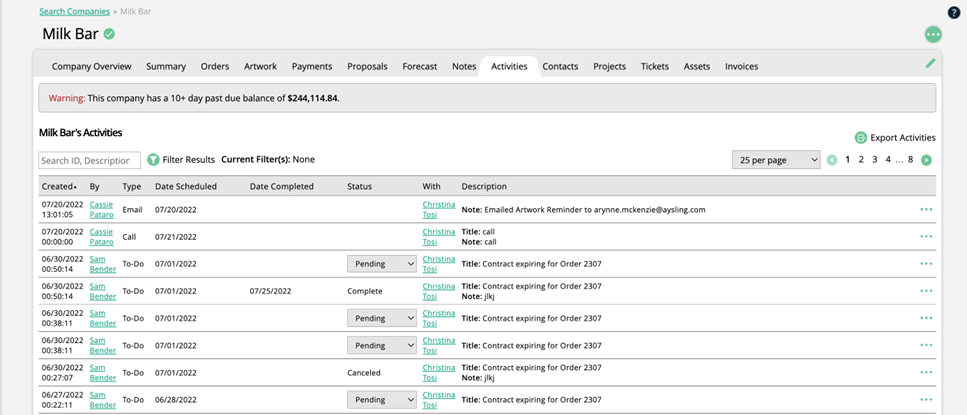
You can filter the activities by rep, activity status, activity type, or time period to narrow down your results by clicking on the filter icon at the top of the table.
Each activity shows the created date, the date scheduled and date completed, when applicable. You will also see the activity type, the contact the activity was for, and a description.
Certain activity types allow you to change the status of the activity. Click the dropdown in the status field to change the activity from Pending to Complete or Canceled.
Depending on your permissions and the activity type, you may be able to edit or delete activities, or view attachments or analytics by clicking on the ellipsis icon on the activity.
The tickets tab shows all tickets in the system for the company, broken down into category (service, digital media, etc.), with the option to include tickets marked as done in your results.
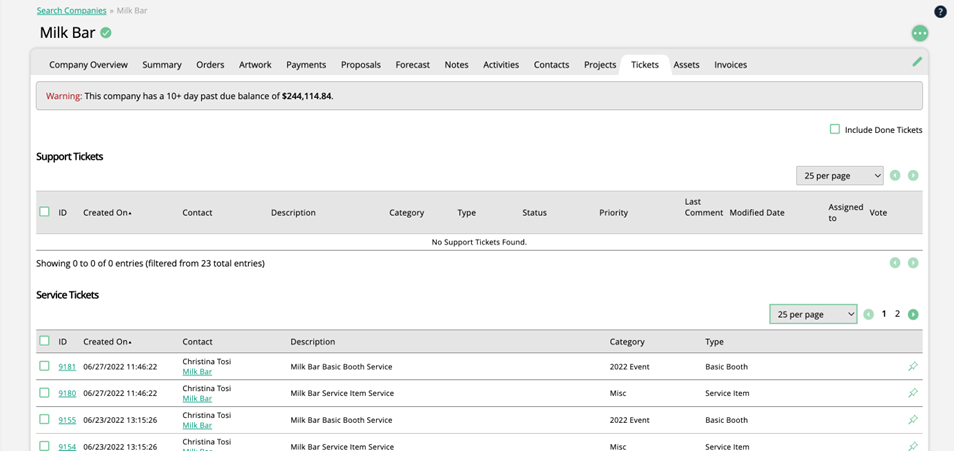
Each category will show relevant information about the ticket such as description, ticket ID, and created date. You can link to the ticket page by clicking on the ticket ID.
Use the checkboxes on the left side of the table to make bulk updates on the selected tickets.
The billing tab includes everything you need to know about the company’s invoices and payments, as well as any credit memos or trade account balances. You can link to the company’s statement or invoice search page from here.
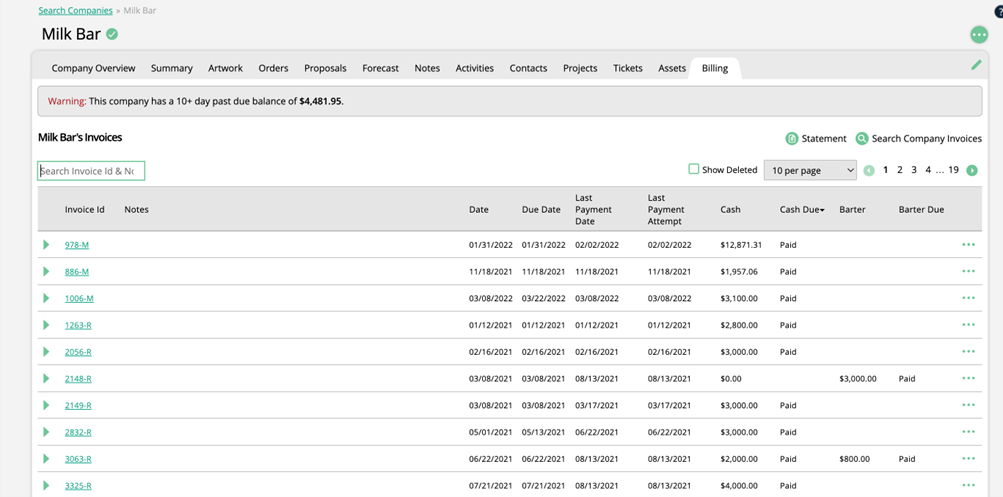
Under the Invoices section, each invoice will show the invoice number, any notes, relevant dates, and cash and barter due amounts. You can also choose to include deleted invoices in your search if you wish.
Depending on your permissions, you can edit, email, and view the invoices, as well as make a payment, by clicking the ellipsis icon on the invoice record.
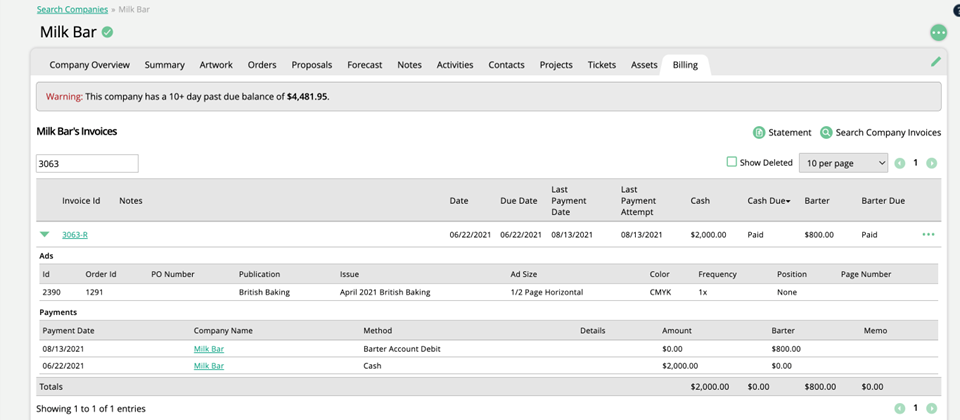
Use the arrow icon on the left side to expand or collapse the line item details for the items that are on an invoiceand view any recorded payments against that invoice.
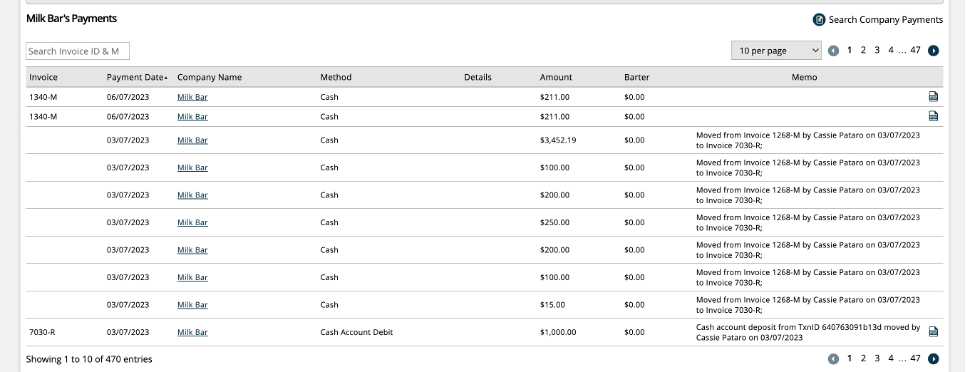
The payments table includes information such as the payment method, date, and amount. If there were multiple payments made on the invoice, you’ll see multiple payments listed here.
To view all payment information for the company, you can view the Payments table. The records here will show information about each payment including which invoice it was applied to, the payment method, date, and amount. You can view the invoice PDF and link to the payments search page from here.
The credit memos section shows the credit memo ID, the rep who recorded it, and any notes. You will also see the credit memo type, credits applied, and open credits.
Click on the credit memo ID to open the credit memo PDF.
The Cash & Trade Account Balance box displays the total credits, the applied credits, and the balance for the company for both cash credits and trade, allowing you to quickly get a summary of this information.
There is also a cash account transaction section which displays information about all payments made to or from the company’s cash account. These payments show the dates, invoices the payment was applied to if applicable, as well as totals and relevant notes.

This tab shows the company’s location and distribution information, when this has been configured in your Distribution module. The location box shows the company’s category, distributor, and display, as well as contact information and notes. There is also a map box which shows additional address information. Use the edit icon in either box to quickly navigate to the distribution module and make changes.
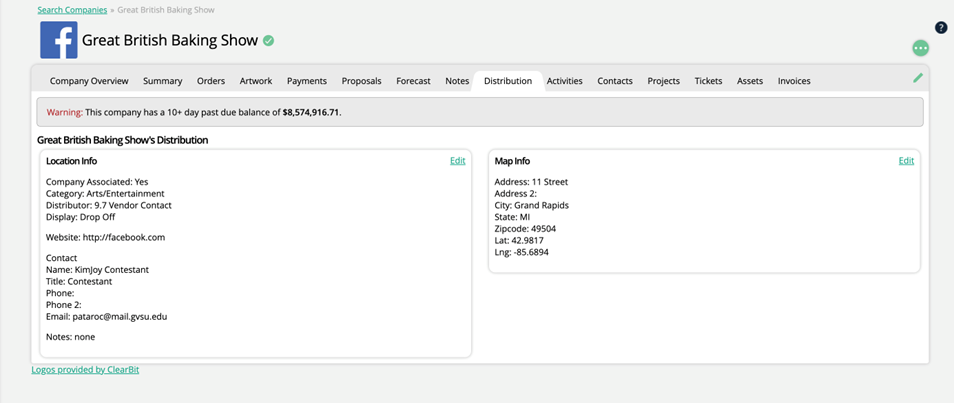
The proposals tab includes data for all proposals tied to the company.
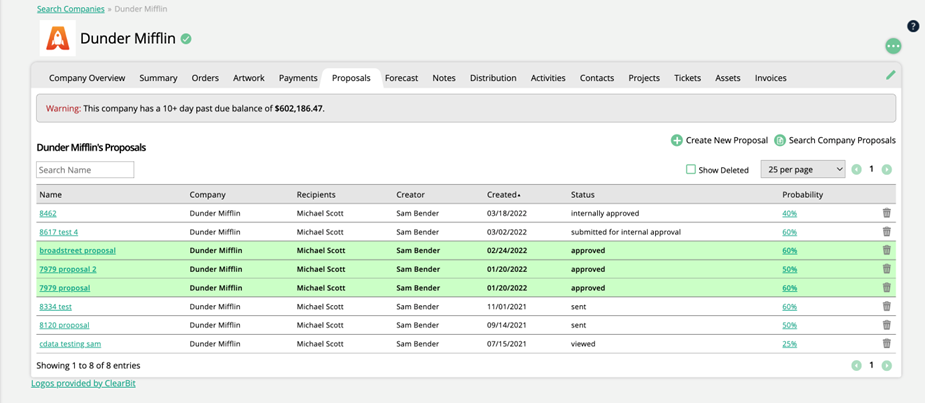
For each proposal, you will see the proposal name, recipients, who created the proposal, its status and probability.
Approved proposals will be highlighted in green, and declined proposals will be highlighted in red.
Depending on your permissions, you can link to the proposal details by clicking on the proposal name, or proposal search page by clicking Search Company Proposals. You may also be able to create a new proposal or delete existing proposals.
The projects page contains information about any project associated with the company.
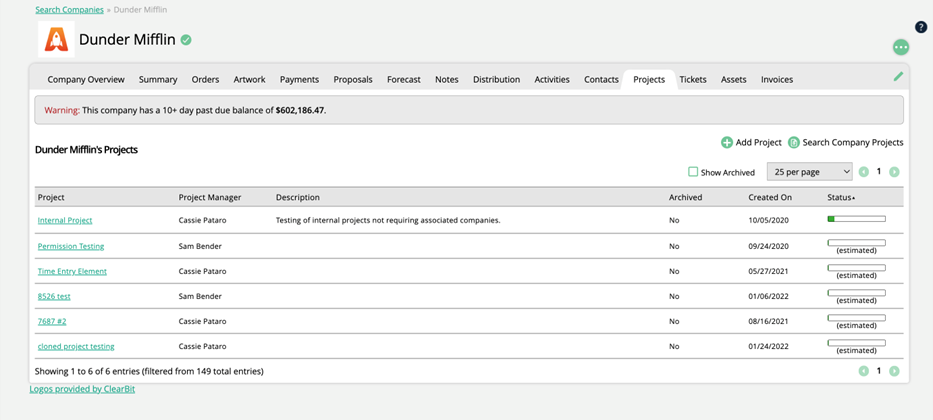
Each project will show the project name and manager, its description, archived status, created date, and project status along with a completion bar.
Click on the project name to navigate to the project page.
With the correct permissions, you can click on the status bar to change the status of the project directly from this page.
You may also be able to go to the project search page or add a new project from this page. If you click Add Project from here, the company name will be automatically filled out on the Add Project page.
This tab will display any placement note specifications or assets on the company level.
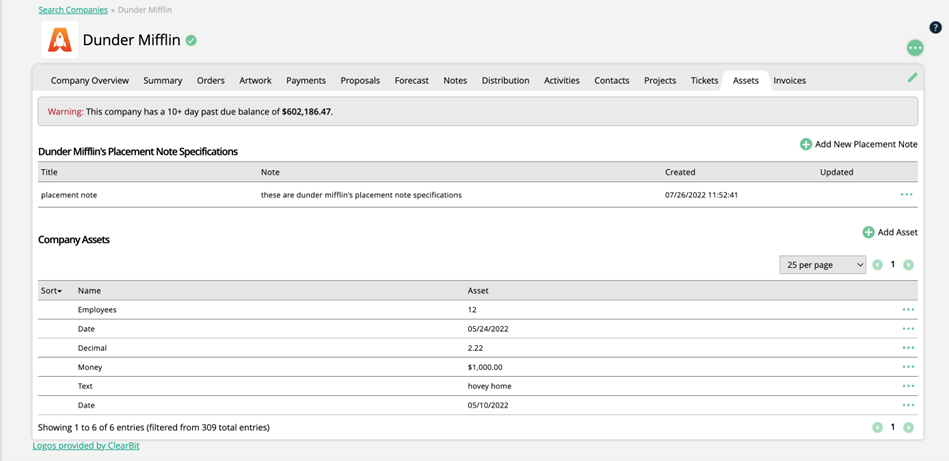
The placement notes section shows the title and note.
The assets section of this page displays the name and the asset. Depending on your permissions, you can add and edit assets from this page.
Note
Company Asset Types can be created and edited by going to Settings > Contacts > Company Asset Types.
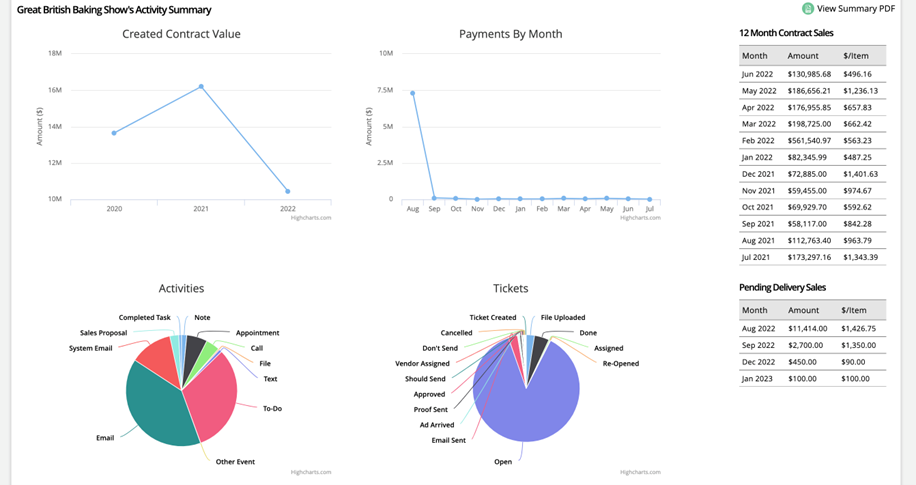
The summary tab shows high level, overview information about the company in graph and table formats.
At the top of the page, you will see charts for created contract values as well as payments by month.
Underneath these, there are pie charts displaying activity and ticket data for the company. For all of the graphs, you can see additional information by hovering over one of the data points.
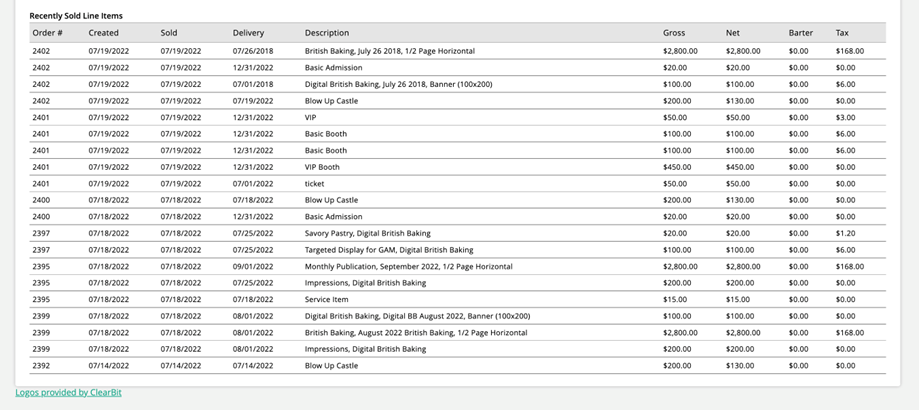
The tab also shows 12 month contract sales, pending delivery sales, and recently sold line items, all in table formats.
Click on ‘View Summary PDF’ at the top of the page to open a PDF version of this information.
If you have both the Astro and DataWarehouse integrations, you can also view company insights from the Summary tab. Company Insights will open in a popup, and shows information generated by Astro based on the company's URL. Depending on what Astro can find using the URL, you'll see information such as a general overview of the company, their markets, recent press releases, and sales data.
Updated 12/4/2024