Adding Companies
Before you add a company in the system, you must first have at least one Market and Company Category set up in your system. To review these settings, go to either Settings > Contacts > Markets, or Settings > Contacts > Company Categories. You must also have the User Permission ‘Add Company.'
Once you’ve reviewed your settings and made sure you have the necessary permissions, you can create a new company in the system. There are a few places throughout the site you can do this from. One option is to use the + icon at the top of the page, and select the ‘Add Company’ option. Another possibility is to go to Contacts > Companies, and click the +Add New Company action at the top of the page. Either of these actions will redirect you to the Add Company page, where you can begin entering information for your new company. Check out the documents below to learn more about each step of creating a company, along with some additional information and helpful tips.
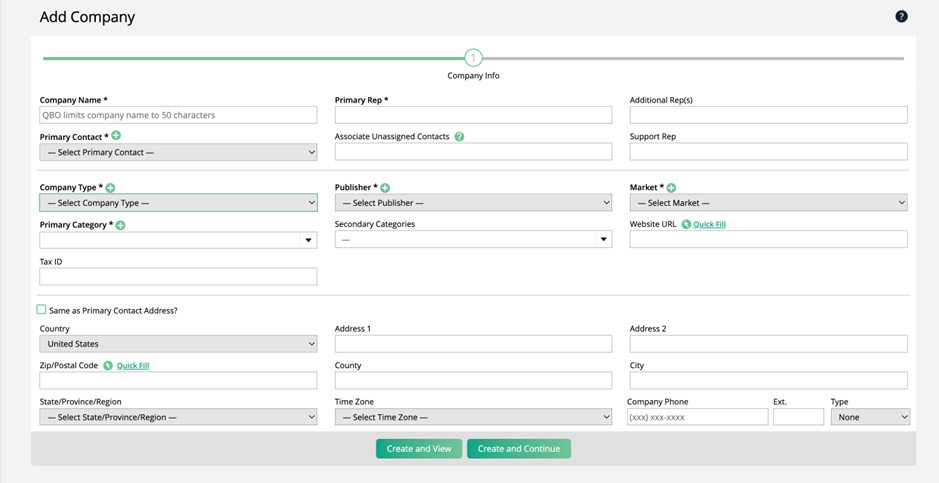
The first step of the Add Company process has all of the fields required to create a company. To create the company, you will need to fill out all of the required fields, and you can choose whether or not to enter information for the other fields on this step. In this document, we will walk through what each field on this step does.

Enter the company name to get started. If you have the Similar Company Hold Threshold on, you may get a warning that the company is too similar to another company in the system. You can then choose to continue to enter the company anyways, or edit one of the suggested companies.
Note
If you are using QBO, your company name length is limited by QBO settings.
Continue by adding all the people associated with the company. You can add the primary rep, additional reps, primary contact, and any additional contacts. If you have support tickets enabled, you can also add a support rep. The system will assign all support tickets entered by the company to their rep.
You may need to create a new contact on this step to use as the company’s primary contact. To do this, click the + icon on the Primary Contact field, and you will get a popup to create the contact.
The next section includes required fields to help organize your company and classify their sales into a category.
The Company Type determines whether or not you can enter an order for the company. Some company types are set to allow orders while others will prevent a user from entering orders. There are two default company types you can't modify. One of the types is Agency. Agencies have a unique feature where you can associate an agency with an order company and discount the order using our agency discount feature.
The Publisher field associates the company with your business. Most groups will have one Publisher, but you can have more than one Publisher if you need to create a system that restricts access to users based on business units.
The Market and Primary Category fields are required for all companies. Markets are meant to organize companies by physical location and categories by their business type. Both are valuable filters for finding companies or orders on our search pages.
You are only required to select a primary company category, but you can choose to add multiple secondary categories if you wish.
The Website URL field is exactly what it sounds like – you can add the company’s website here for reference later on.
Tip
You can use the quick fill on a company’s website URL to find information about the company based on Clearbit's data. When you click quick fill, you will get a popup that asks if you want to use Clearbit’s information to populate the company record. If you choose to use the quick fill information, it will override what is already entered. If you use the quick fill option, it will also find the company logo and add it to the company’s overview page. You can click on this logo to go to the company’s website.
The Tax ID field may be referred to as EIN or TIN depending on where the company is located, but this field allows you to add a Tax ID for the company in any format. When added, the ID will show up on the company’s overview page, and can be found in searches or on your templates depending on your system’s settings.
By default, this field is optional, but you can make it required by changing your System Configuration ‘Require Tax ID for every Company’ to yes.
The Broadstreet ID field will only be visible if you have the Broadstreet integration enabled, and you have the User Permission 'Broadstreet'. When a company sync with Broadstreet this field will be automatically filled out. However, if you need to manually connect an Ad Orbit company with a Broadstreet company, you can specify the Broadstreet company ID here.
Lead Source is an optional field that can be used for various searches and reports throughout Ad Orbit. There is also a Lead Source field on your contacts. The Lead Source field on your companies is for the company as a whole.
The address field may or may not be required based on your system configurations. If your primary contact's address is the same as the company’s, you can check the ‘Same as Primary Contact Address’ box which will auto-fill your company’s address fields based on your primary contact’s address.
Note
There is a connection between the company address and contacts. You can use the company address to populate a contact's address and anytime the company address changes, the system will ask if you also want to update the company's contact address. If you choose to also update the contact addresses, any contact matching the company’s original address will get updated with the new information.
Last but not least, you can enter a company phone number. This is a good option if you have a phone number for the company that is not tied to a specific contact at the company.
When you have finished filling out at least the required fields on this page, you have two options. You can either click ‘Create and View’, or ‘Create and Continue’. All of the necessary information to create a company is on this first step, so if you click Create and View, the record will get created in your system, and you will be brought to the company’s overview page. If you click Create and Continue, the company record will still be created, but you’ll be brought to the next step of the company creation process. The information on the following steps is not required, but can be helpful for further customizing your company and making sure all of its contacts and billing information is set up properly.
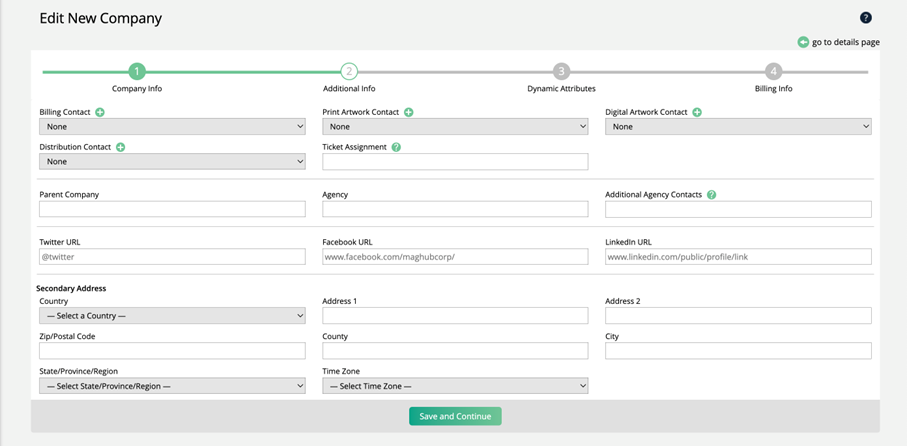
The second, ‘Additional Info’, step of the Add Company process allows you to start assigning roles to contacts associated with the company, as well as create parent or agency company relationships.

You can set the Billing Contact, Artwork Contacts, and Distribution Contacts for the company. The main purposes of these contacts are to receive system notifications, and show up on invoices and contracts. Use the dropdown under each contact type to choose from contacts already associated with the company, or use the + icons to create and associate new contacts for the role.
The Ticket Assignment field allows you to choose a user within your system to be automatically assigned to all tickets created for the company. This level of assignment will override all system, publication, and product level ticket assignments. It does not need to be a user assigned as a rep on the company.
This step also allows you to associate parent companies and agencies. Both can be helpful if an order goes through one company for invoices and artwork, but the actual order is for a different company. For example, you may run a service for a chain of restaurants. The work is for one location, but the invoice goes to the parent company.
For more information about parent companies and agencies, check out the help center documents ‘Managing the agency relationship’ and ‘Managing the parent relationship’.
After you’ve assigned a parent company or agency, you can assign the parent or agency contacts to contact roles for your company, such as setting an agency contact as your company’s billing contact.
The social media links are optional, but can be helpful for further customizing of your company. They can be referenced later on from the company overview page.
Many companies will not have secondary addresses, but it is an option here if needed.
Finally, you can create and manage External Reporting Links for the company from this page. These can also be managed from the Company Overview page if needed. External Reporting Links can be embedded in the Client Center for your contacts to view on their Analytics page.
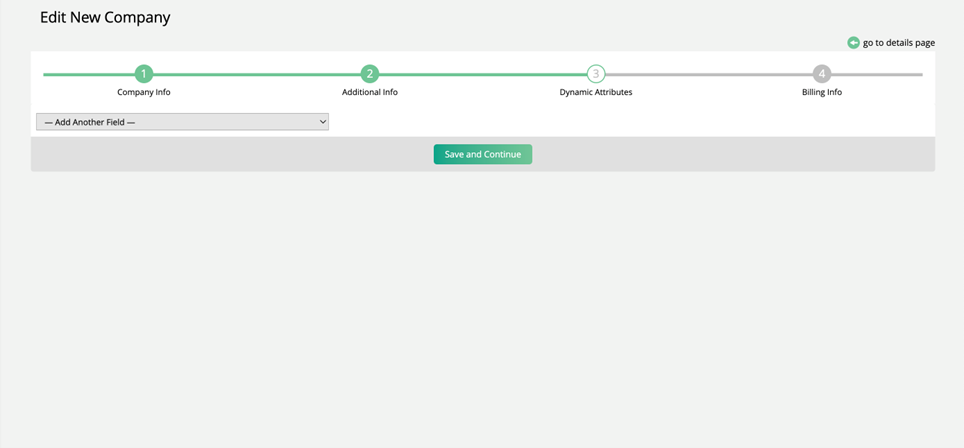
You may or may not see step three, Dynamic Attributes, depending on whether or not your system has any company level dynamic attributes created. There are quite a few company fields to take advantage of, but you may need to expand what you want to keep track of on your company records, which is why we have dynamic attributes. You can learn more about dynamic attributes here Dynamic Attributes.

Any non-required attributes will appear in Step 3. But if the field is required, you must enter it in Step 1.
Some attributes only show up based on the Publisher tied to the company. If you don’t see the dynamic attributes you expected to see, check to see if it is enabled or assigned to a different Publisher.
The final step of company creation is the Billing Info for the company. This section is often restricted to some users and only accessible by the finance team or administration. If you don't see this step, it means you don't have the ability to modify a company's financial settings. This section allows you to change fields such as the company currency, credit status, payment terms, and preferred payment method.

You can set default payment terms for all companies. There are additional payment terms settings if you set the company to pre-pay or due on receipt; a company with those settings can require a credit card or ACH payment on order approval. You can disable this requirement on a company-by-company basis.
The Days After Invoice Threshold and Days After Invoice Discount Amount fields work in combination with each other to set a Company Payment Term Discount. The Company Payment Term Discount allows a customer to receive a discount on their invoice if they pay within a set number of days after the invoice date. The discount settings are applied on each company record, which means the discounts can vary based on the customer. Every invoice for that customer will have the discount applied, as long as it fits the discount’s setting. For more detailed information about this discount type, click here.
The Barter Types dropdown lets you select which barter types can be used when adding trade deposits for the company.
The following yes/no options allow you to change how the system treats the company.
Do not require Payment Method: The payment method requirement is based on what publication(s) are on an order. By default, this option is set to ‘no’, which means a payment method will be required if a publication is on the order that requires a payment method. If you change the setting to ‘yes’, every order for the company will disregard the publication level payment method requirement.
New Account: Can affect commission kickers and some reports. New is the default for all just entered companies. The system will mark them old after an order is created in your new account threshold setting. All new companies require their first order to go through financial approval.
Special Billing: Setting this to 'yes' will force a user to enter a special billing note on the company and make the note appear during invoicing and on invoice reports.
Write Off: Write off should only be used if you don't plan on ever receiving payments from the company for past due invoices. All their invoices will move from aging into a write-off bucket. You should consider disabling a written off company or changing the company type so no one can enter an order for the company again.
In Collections: Companies can go into collections automatically if they don't pay invoices on time. However, you can manually override the setting. Companies in collections can't have new orders, and their print ad tickets will show as in collections in MagBuilder.
PO Required: Set to 'Yes' if you want to require a purchase order number on all orders. You can set this as the default to yes in the system configurations.
Allow Pre-Pay: Allow users to add an order pre-pay discount on the company's order.
Invoice & Payment Reminders: You can send out automated invoice and payment reminders, such as payments are due. You can disable the reminders at the company level or unsubscribe contacts from all automated notifications. This is common for agencies.
Disable Invoice Auto Fees: You can automatically apply late fees to a company's invoices if they are past due. This setting allows you to prevent some companies from receiving automated fees. This is common for agencies.
Exempt from Surcharge Fees: Only applicable if surcharges are enabled in your system, and only visible if you have the User Permission ‘Can Exempt Surcharge Fees’, this setting allows you to disable or re-enable surcharges for this specific company. If set to ‘Yes’, the company will never be charged surcharge fees, even if surcharges are enabled in your system and they are paying with a credit card.
The special billing notes section will appear in areas of the site if the special billing flag is set to 'yes.' Otherwise, it is here for reference.
Updated 3/31/2025