SAML Authentication
SAML (Security Assertion Markup Language) authentication allows for SSO (single sign-in) to Ad Orbit. When enabled in your site, users will login through your SAML connection, rather than directly through the Ad Orbit login form. Ad Orbit will receive SAML requests to login existing users, and create new user accounts.
Setup
The Ad Orbit team will need to enable the SAML module for you. If you wish to turn on SAML authentication, please reach out to the support team. Once enabled, read the steps below to finish the setup process.
To configure your SAML connection, go to Settings > Integrations > SAML. You need the user permission ‘SAML’ to access this page. On the SAML Setup page, you’ll see various sections of settings where you can configure and connect the application.
Note
In this document, we will be walking you through how to set up SAML for Microsoft Azure, which is the most commonly used option. If you are using a different platform, the directions for the setup may vary.
Settings
The Settings section of this page determines how SAML will act once connected to your site. For example, if you wish to enable Debugging or to allow users to change their passwords within Ad Orbit or not.
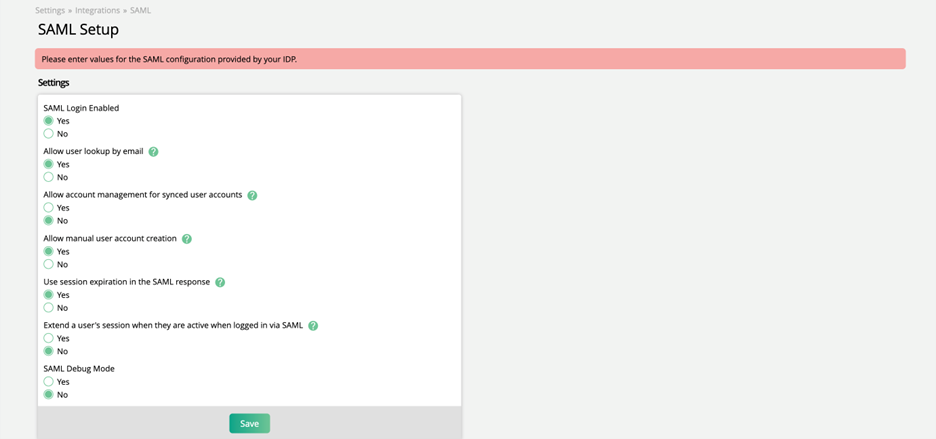
SAML Login Enabled – Allow users to login using SAML authentication.
Allow user lookup by email – Allows a user to be found by email address, if no match is found by id, when logging in through SAML.
Allow account management for synced user accounts – This setting determines whether users can login through the normal Ad Orbit email and password fields in addition to using SSO. It also determines whether or not users can change their emails and passwords from within Ad Orbit.
Allow manual user account creation – Determines whether or not new users can be created manually from within Ad Orbit, or if they can only be created through SSO.
Use session expiration in the SAML response – Use this setting to choose whether the Ad Orbit User Session Expiration is used, or if the SAML response timestamp will be used to log users out.
Extend a user’s session when they are active when logged in via SAML – Extend a user’s session by the session expiration if the user is active. If set to no, the session will expire based on the initial login time.
SAML Debug Mode – When turned on, you will see the data being sent to Ad Orbit and include the mapping fields. If turned off and there is an issue with the login, you will receive a general error message.
SP Details
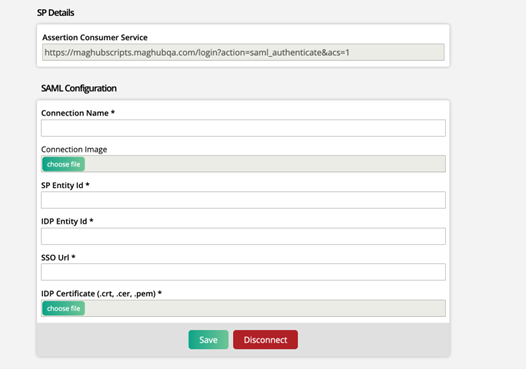
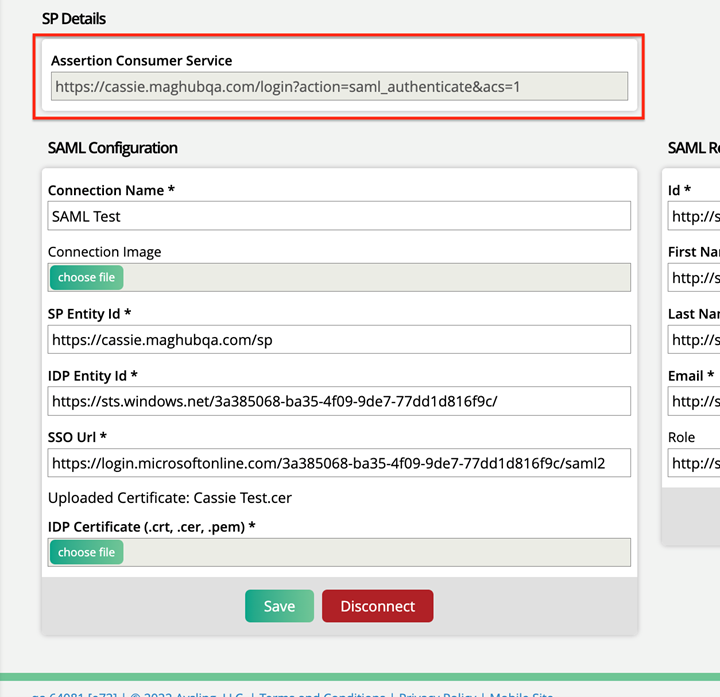
This field will be automatically populated based on your Ad Orbit instance. It will be used later on within Microsoft Azure to make the connection.
SAML Configuration
The SAML Configuration fields are what connects SAML to your Ad Orbit site. For this section, we will walk through how to create the SAML application within Microsoft Azure, and show where to find the corresponding fields within Azure that will need to be entered here in Ad Orbit.
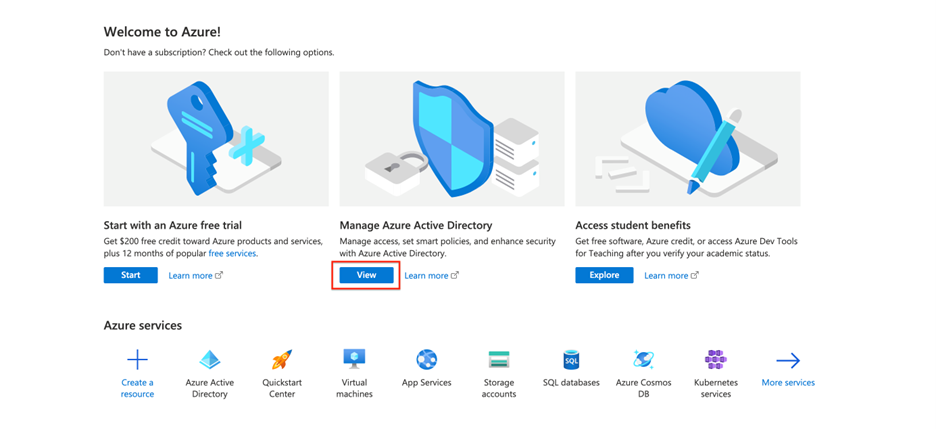
Go to portal.azure.com, and click on ‘view’ under ‘Manage Azure Active Directory’.
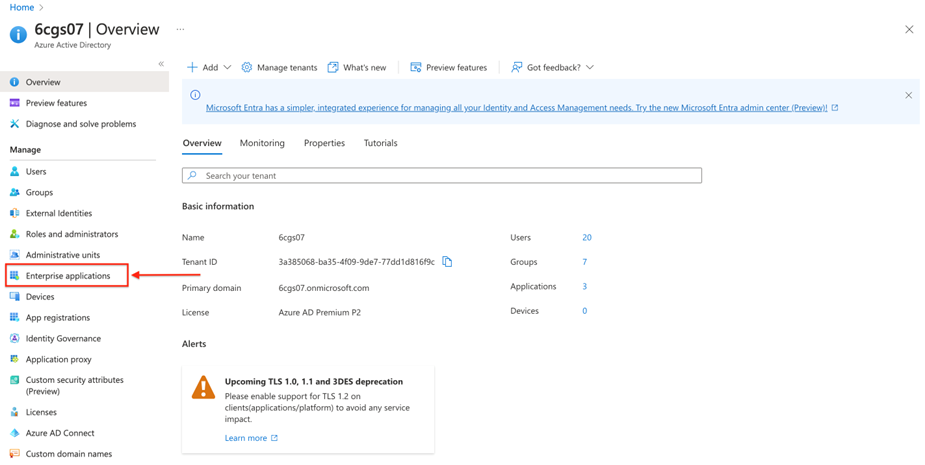
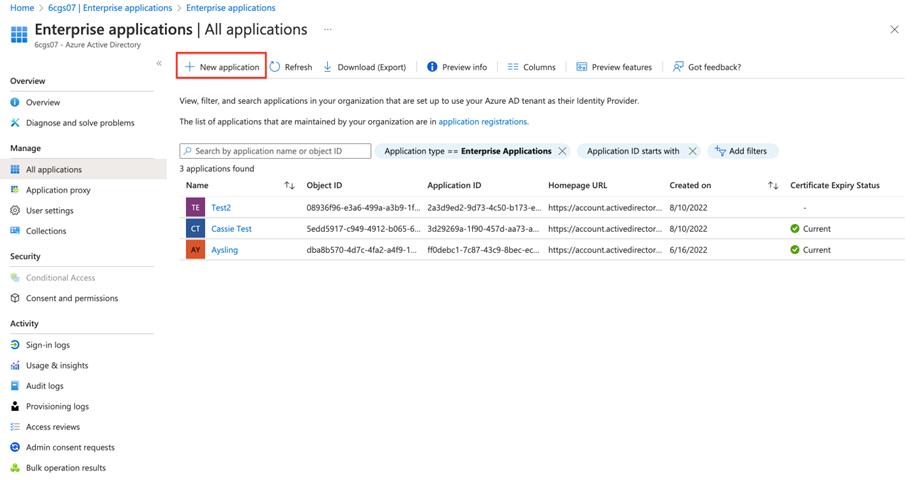
Click on ‘Enterprise Applications’ in the left menu.
Click on ‘+ New Application’ at the top of the page, then select ‘+ Create your own application’.
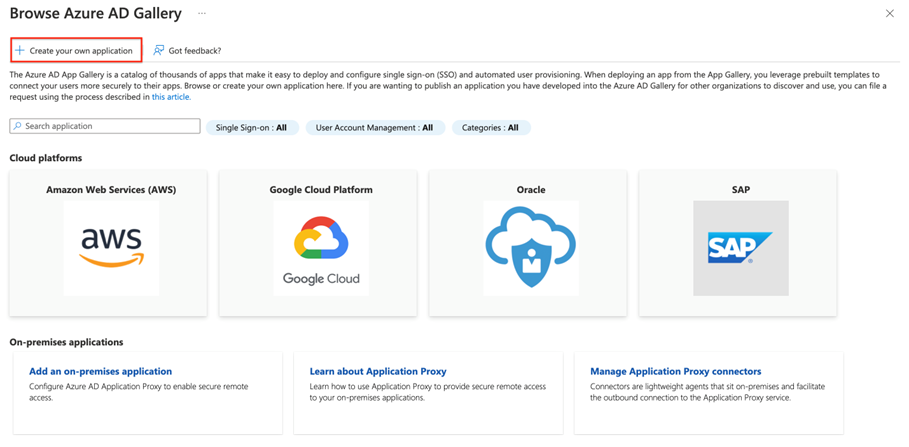
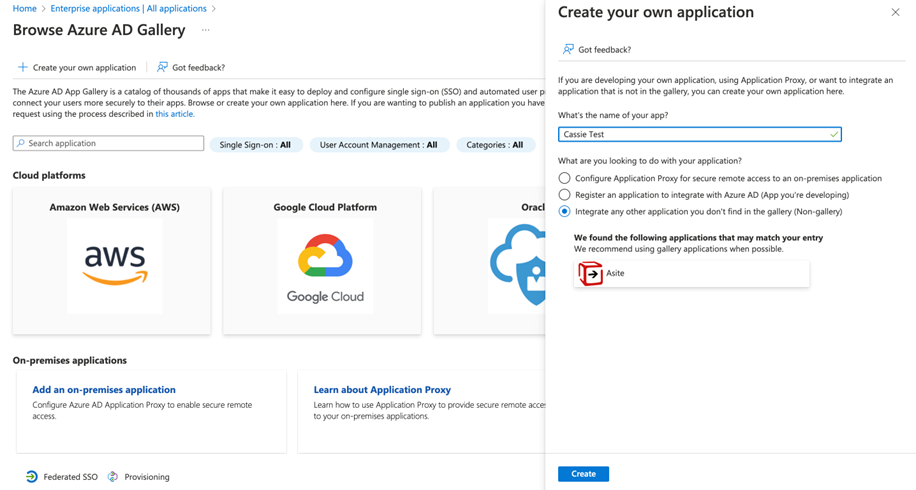
In the Create your own application popup, enter the name of your app, and select the ‘Integrate any other application you don’t find in the gallery’ option. Then click Create.
Note
For more information about connecting to SAML through Azure, check out Microsoft’s help center resources:https://docs.microsoft.com/en-us/azure/active-directory/app-proxy/application-proxy-configure-single-sign-on-on-premises-apps
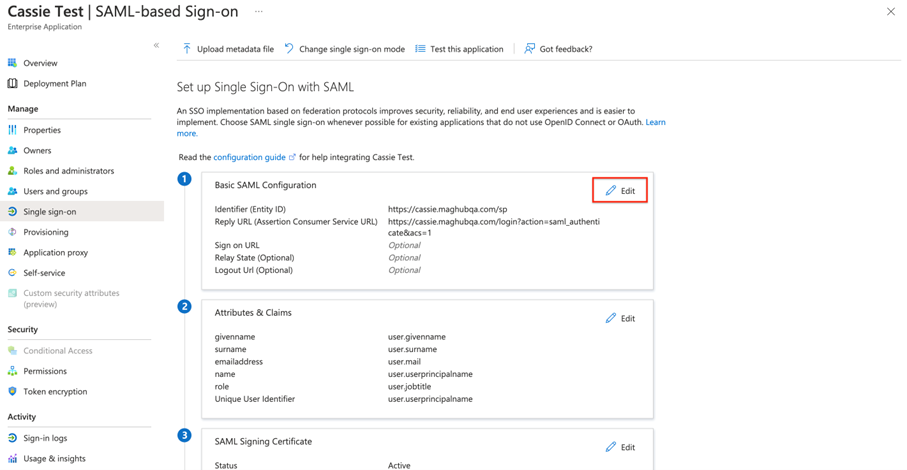
Once created, you’ll see your application on the Enterprise Applications page. Click on the name of your application to view its settings. Once you are viewing your app, click ‘Single sign-on' on the left menu. This will open a page where you can set up SAML based SSO.
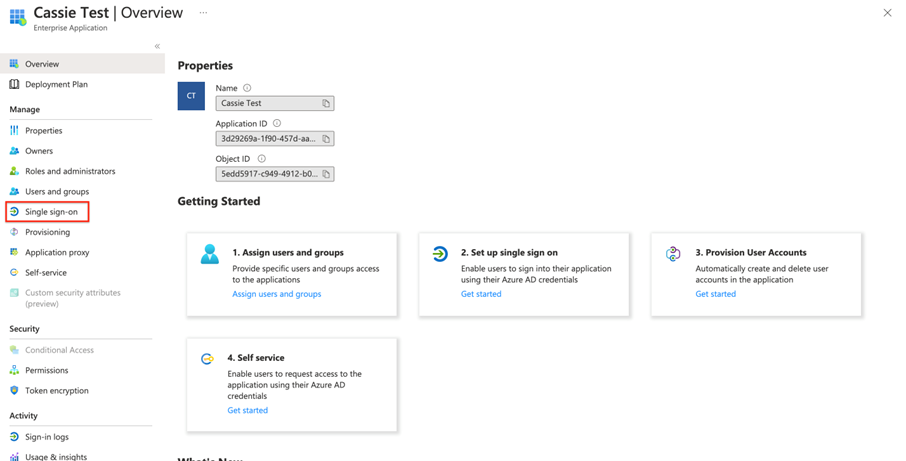
Click the edit icon in the Basic SAML Configuration box.
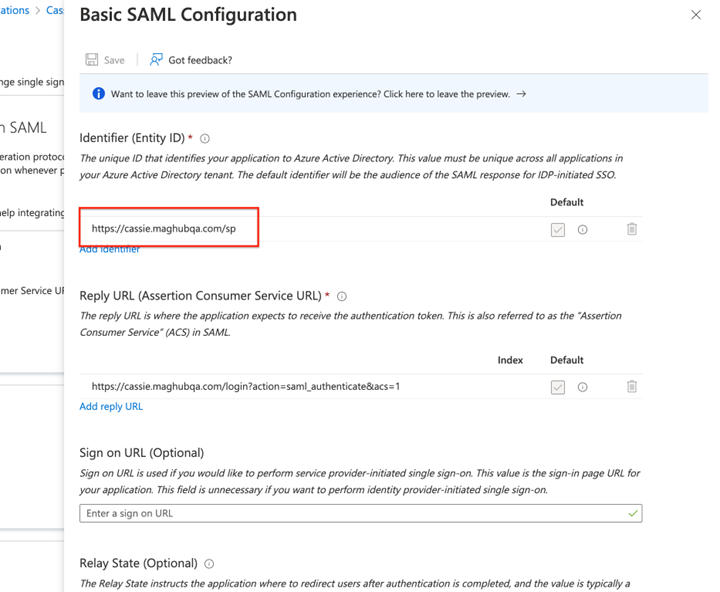
In the configurations, there are two required fields. The first is for ‘Identifier (Entity ID)’. This can be whatever you want, but it must be the same in Azure and Ad Orbit.
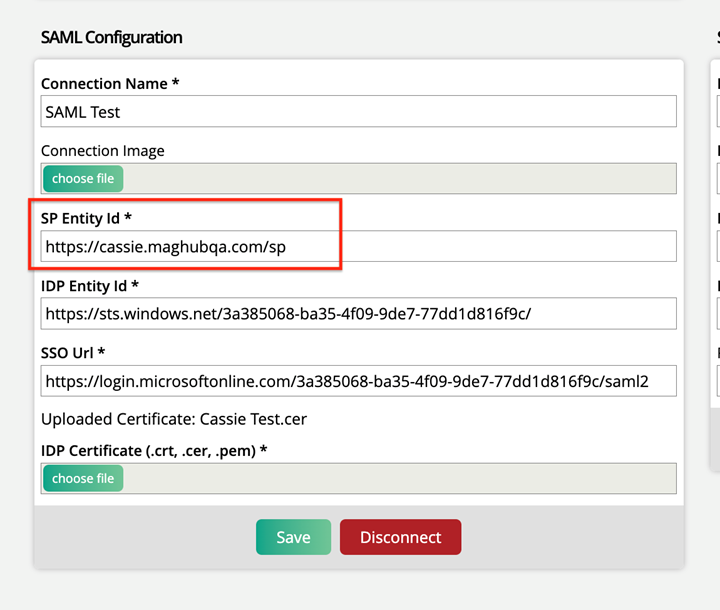
Enter your Identifier, then copy and paste it into the SP Identity Id field on the Ad Orbit SAML Setup page.
The second required field is ‘Reply URL (Assertion Customer Service URL)’. Copy and paste the link from your Ad Orbit SAML Setup page under ‘Assertion Customer Service’ into this field in Azure.
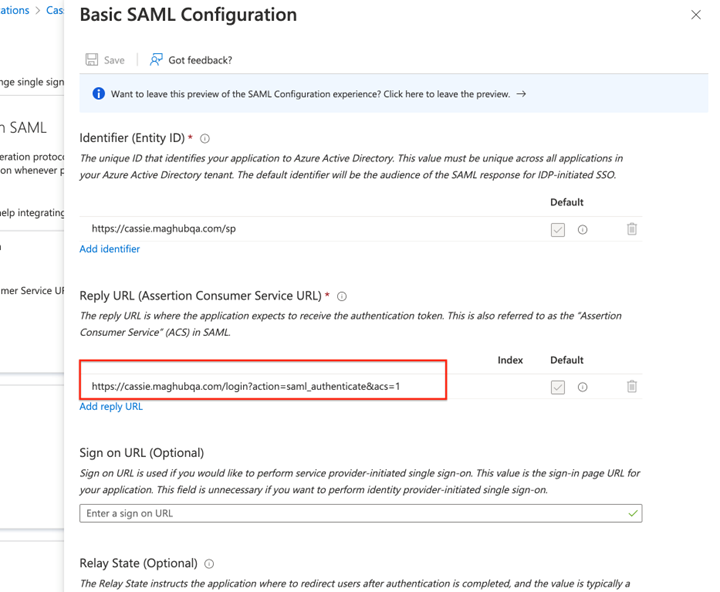
Save your changes before exiting out of the SAML Configurations in Azure.
The next step is to find your IDP Entity Id and SSO Urls within Azure to be entered into Ad Orbit. In Azure, you should still be on the SAML setup page. Scroll down until you see the box labeled ‘Set up (your app name here)’.
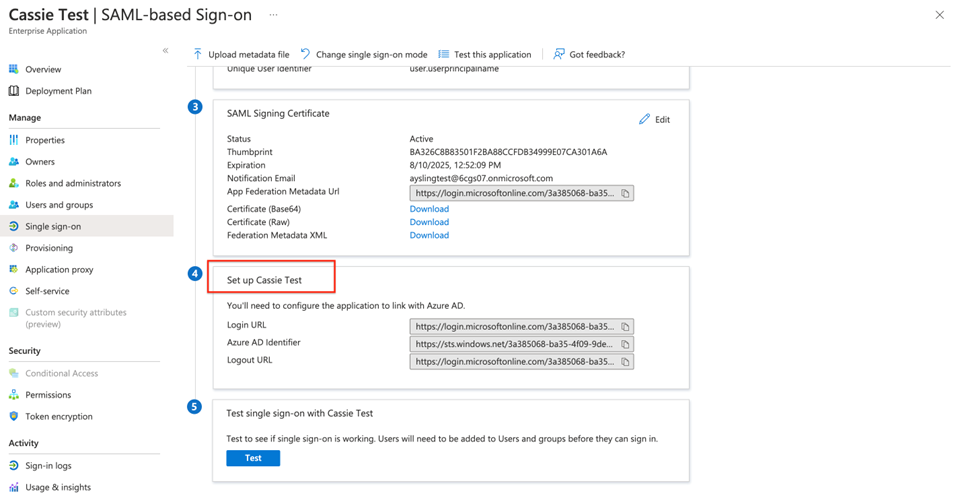
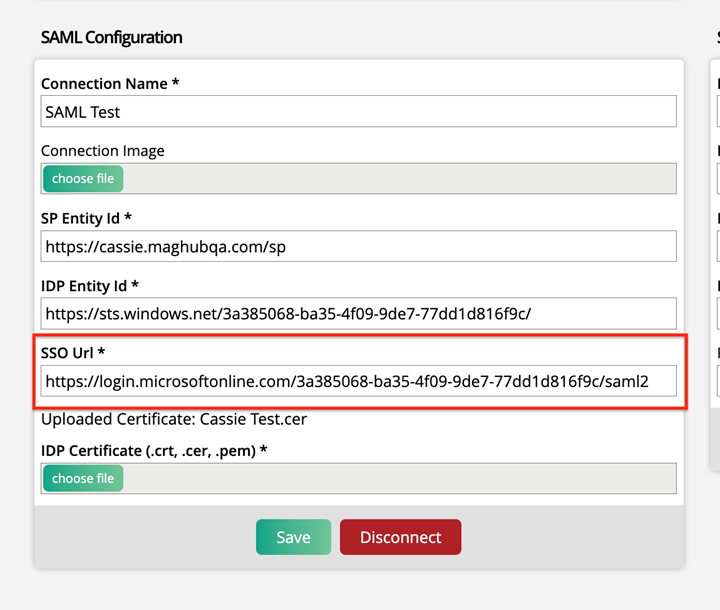
Copy the Login URL, and paste it into the SSO Url field in Ad Orbit.

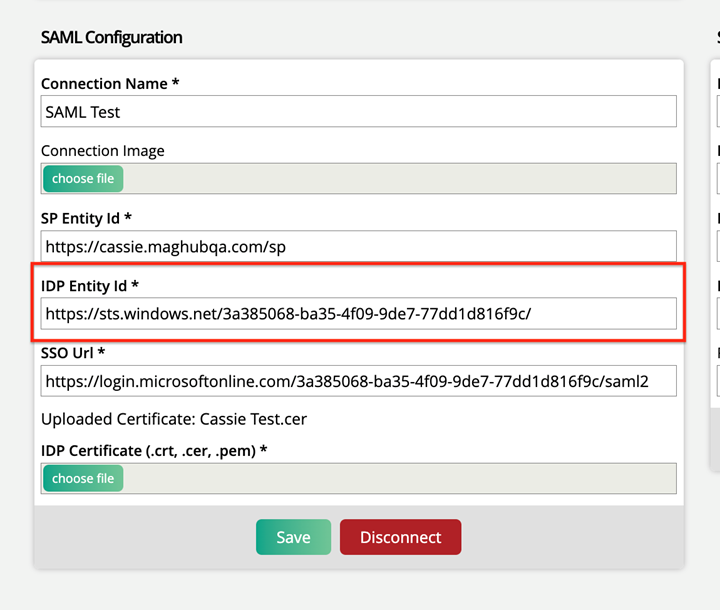
Copy the Azure AD Identifier and paste it into the IDP Entity Id field in Ad Orbit.

The next step is to download a certificate from Azure, and upload that certificate to Ad Orbit. In Azure, on the SAML setup page, find the SAML Signing Certificate box. Click on download for ‘Certificate (Base64)’.
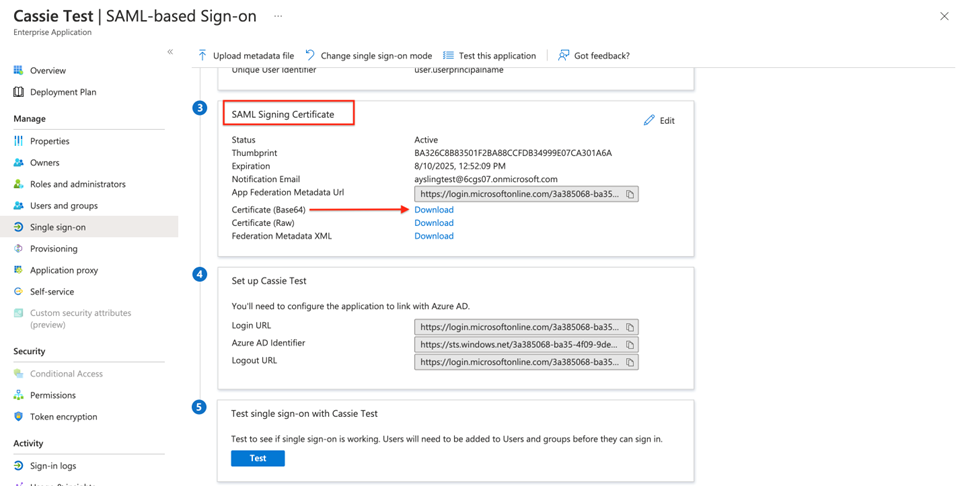
Navigate back to Ad Orbit, and upload that file to the IDP Certificate field. This certificate makes the connection secure.
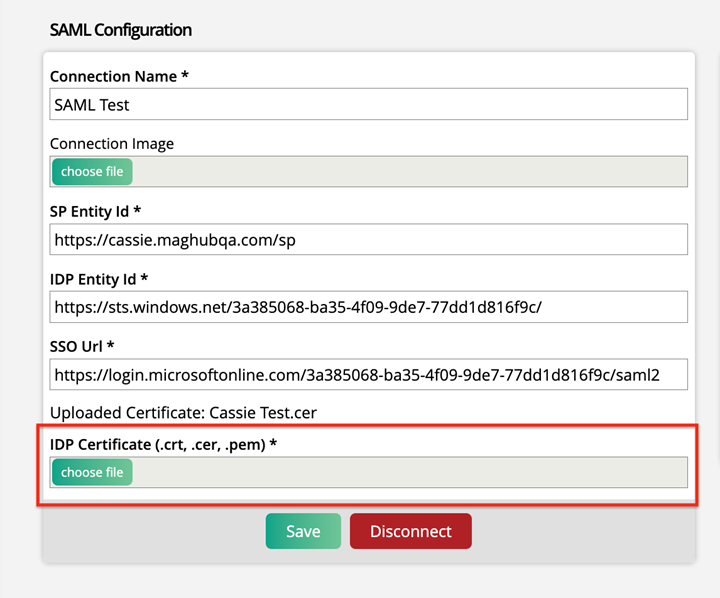
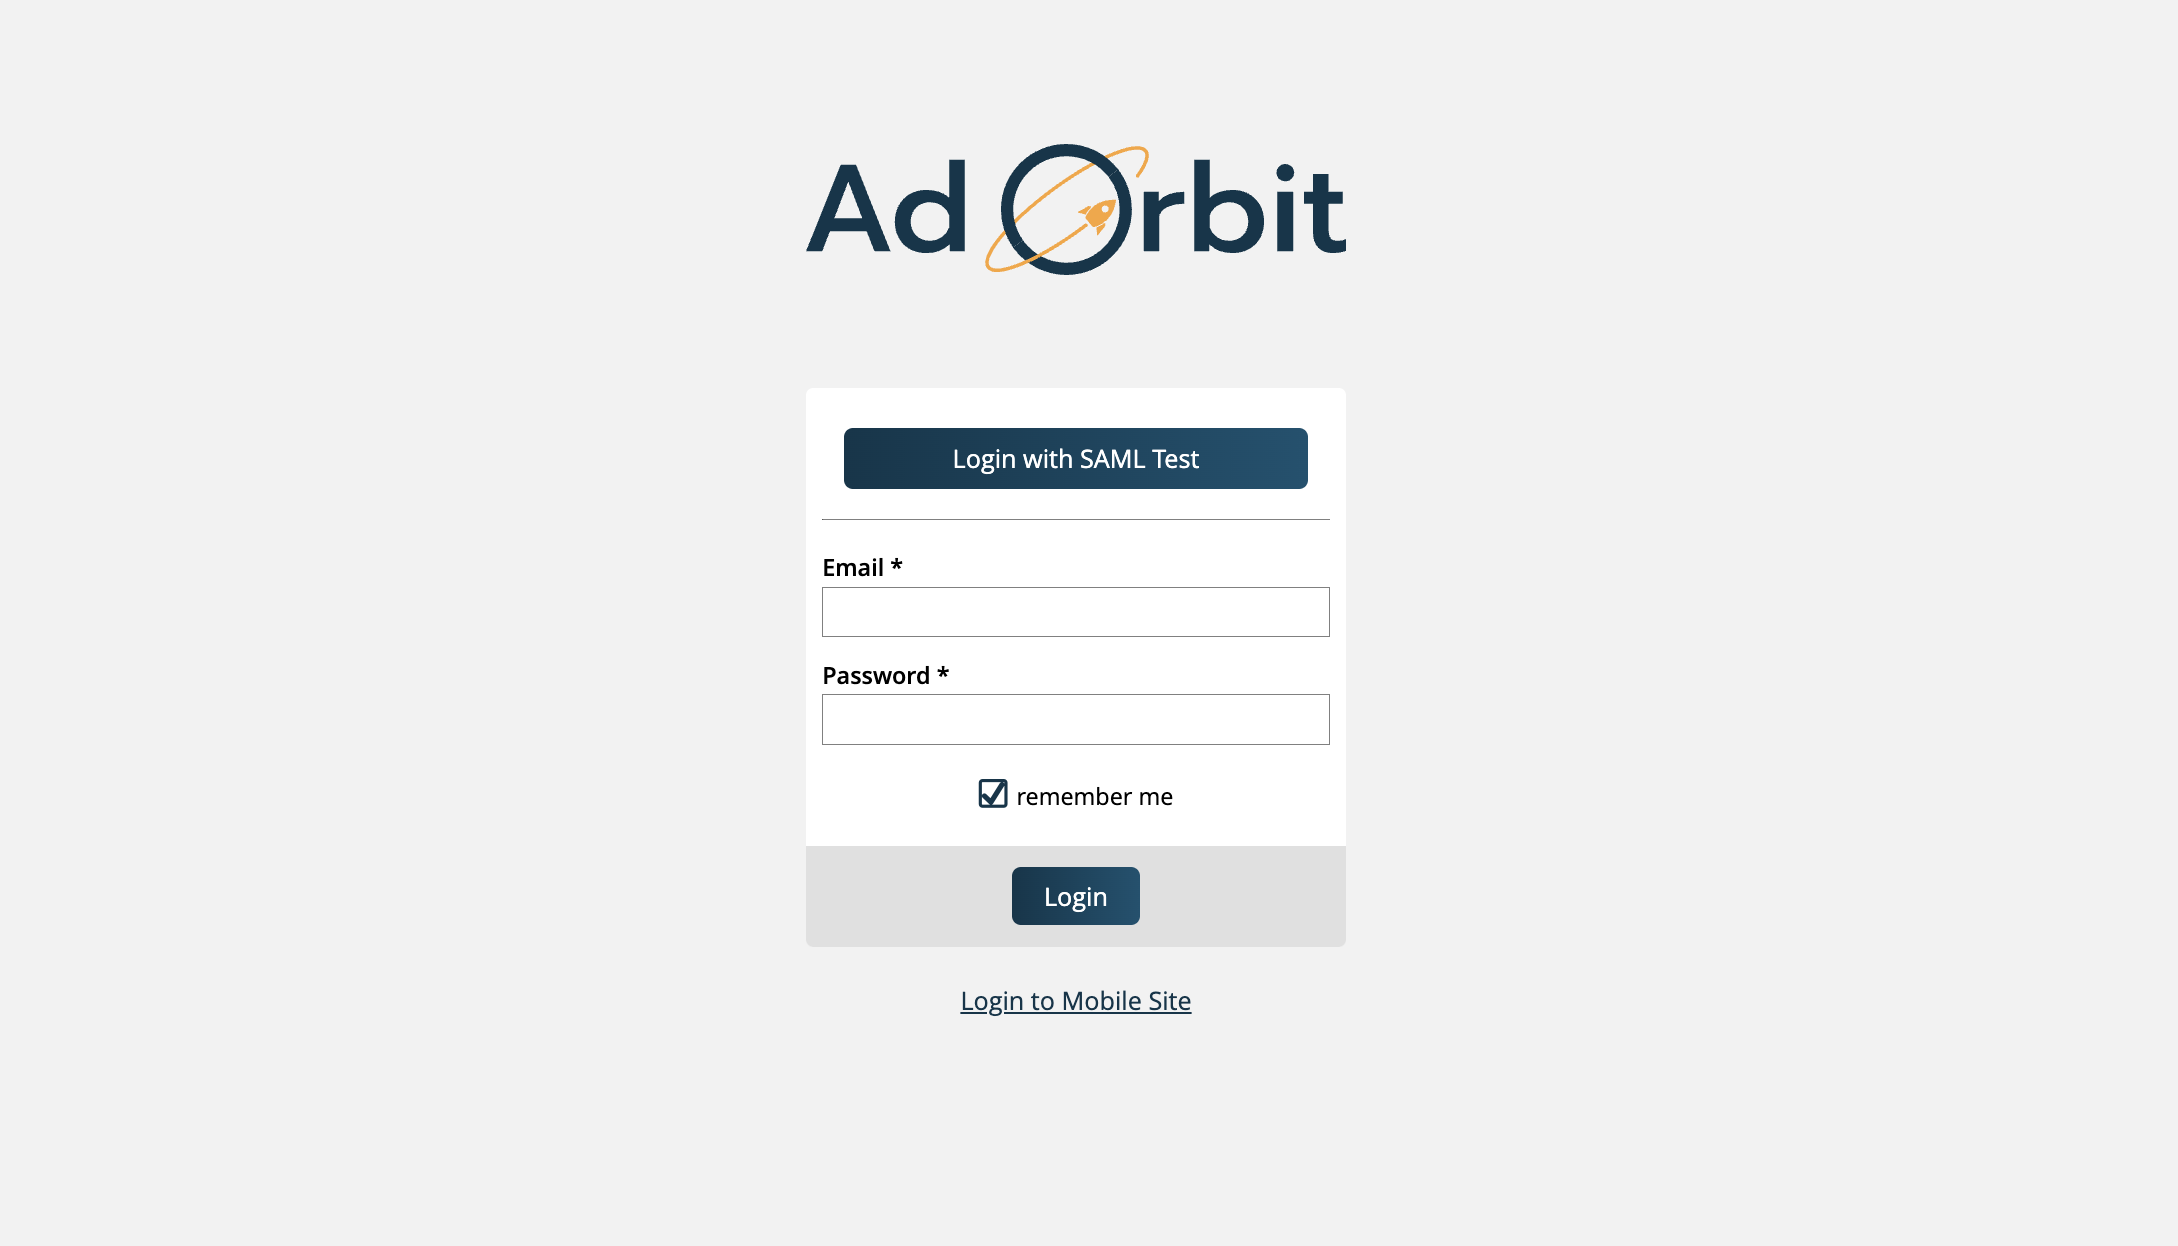
You should now have all of your Ids and Urls entered in Ad Orbit. The next step is to enter a Connection Name, which will display on the Ad Orbit login page (this can be entered before or after the above steps). You can also choose to enter an image that will display with the name if you wish.
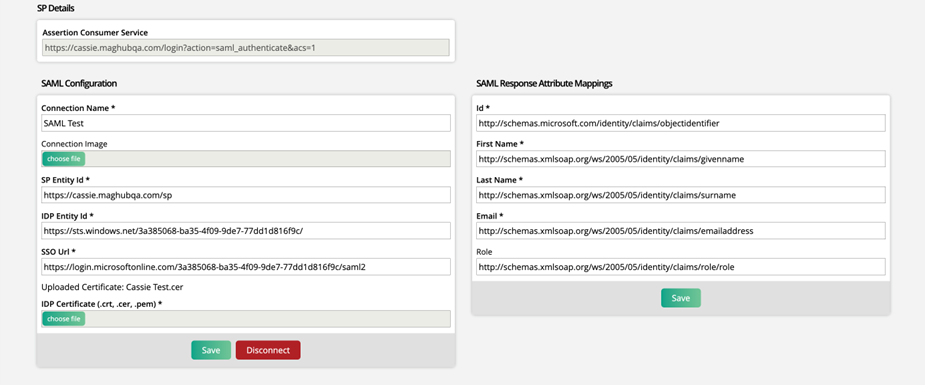
Make sure to save the information you’ve entered in your SAML Configurations in Ad Orbit. Once the account is connected, you’ll see an additional setup section labeled SAML Response Attribute Mappings. We will now go through where to find those within Azure to add them to your Ad Orbit setup. When logging in through SSO, these fields send Ad Orbit data about the user. It identifies if the user already exists, and if not, it uses the information to create a new user.
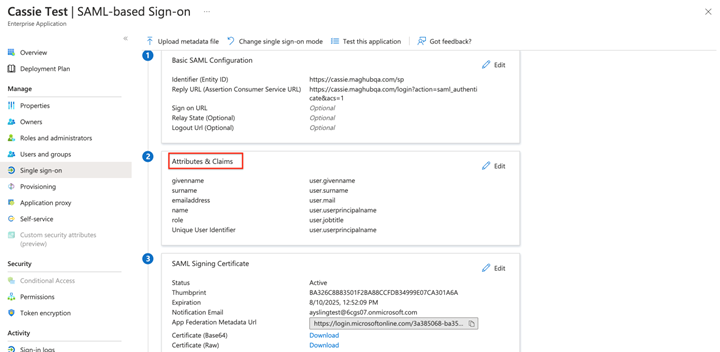
In Azure, on the SAML setup page, find the ‘Attributes > Claims’ box, and click the edit icon. This will open a new page.
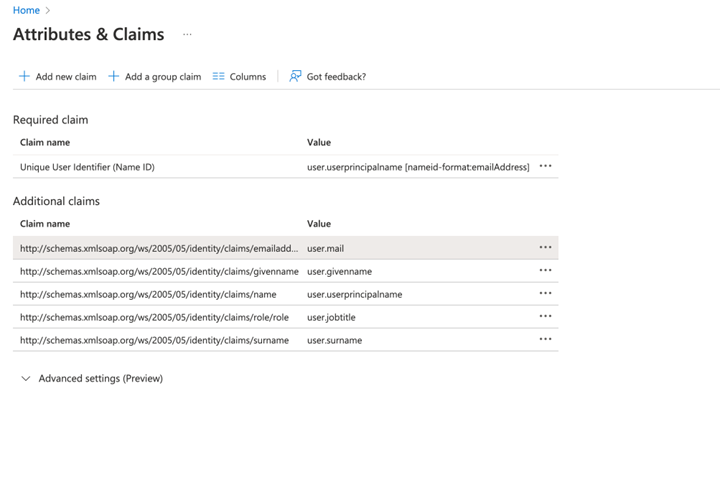
On the Attributes & Claims page, you will need to copy and paste the ‘Claim names’ from Azure into the corresponding fields in Ad Orbit.
user.givenname in Azure should be pasted into First Name in Ad Orbit
user.surname in Azure should be pasted into Last Name in Ad Orbit
user.mail in Azure should be pasted into Email in Ad Orbit
If you wish to map a Ad Orbit role to a Microsoft job title, click Add New Claim. Enter a name for the mapping, then use ‘user.jobtitle’ for the Source Attribute. Once created, this claim can then be pasted into the Role field in Ad Orbit.
This mapping is not required. It can be used if you wish to auto-assign user roles upon creation.
The one field that will not show up on this page is the Id. If using Microsoft Azure, the Id field should always be: http://schemas.microsoft.com/identity/claims/objectidentifier
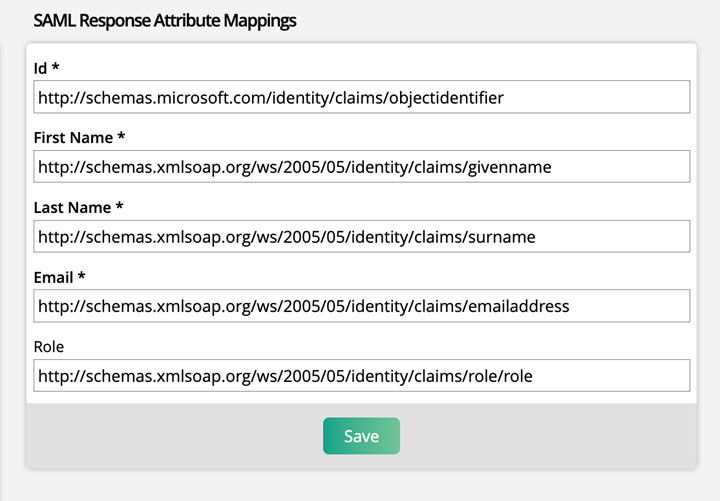
Click save once you have entered the attribute mappings.
Now that your SAML setup has been completed, you will need to review your User Roles. Go to Settings > Users > User Roles. You need the user permission ‘User Roles’ to access this page.
With SAML enabled, you’ll see two additional fields on User Roles – Default, and SAML Name.
If a role is provided for a new user, the system will attempt to find a user role based on SAML Name. If the system cannot match a SAML Name, it will use the role marked as the default. The system is set up this way so that new users get assigned permissions automatically, based on user role.
The User Roles page will have some additional information, including a default user role, as well as a field for SAML role so that roles can be mapped between systems. When Ad Orbit users are created, if no role can be mapped, it will use the default role.
Logging In
New User
When a user uses the link that initiates account creation, they will automatically be logged into Ad Orbit and have a Ad Orbit account created for them. Their first names, last names, email addresses, roles, and external profile IDs will be automatically set.
Existing User
To login to Ad Orbit if you already have an account created, go to the Ad Orbit login page, and click on your app name, rather than entering your email address and password. This will automatically log you in to the system.
Other Items to Note
When SAML is enabled, there are a few places within the system that will function differently than if SAML is turned off.
Depending on how the SAML connection is configured, users may not be able to reset their passwords or email addresses from within Ad Orbit. You’ll see this change both on the User Setup pages, and on the My Preferences page.
Users may not be able to login directly through the Ad Orbit login form. They’ll need to use the SAML button instead.
If a user gets logged out of Ad Orbit because the session expired, when they log back in they will be brought to the page they were previously on, rather than the Dashboard.