January Spring Intake Form
Ad Orbit can pseudo-integrate with the January Spring campaign intake form through an automated notification process. This process will automatically send an email notification to the January Spring intake form if a January Spring product is on an order that becomes 100% approved, or when a final asset is uploaded to the Ad Orbit ticket.
To set up the integration, read through the steps below.
Configure your Products
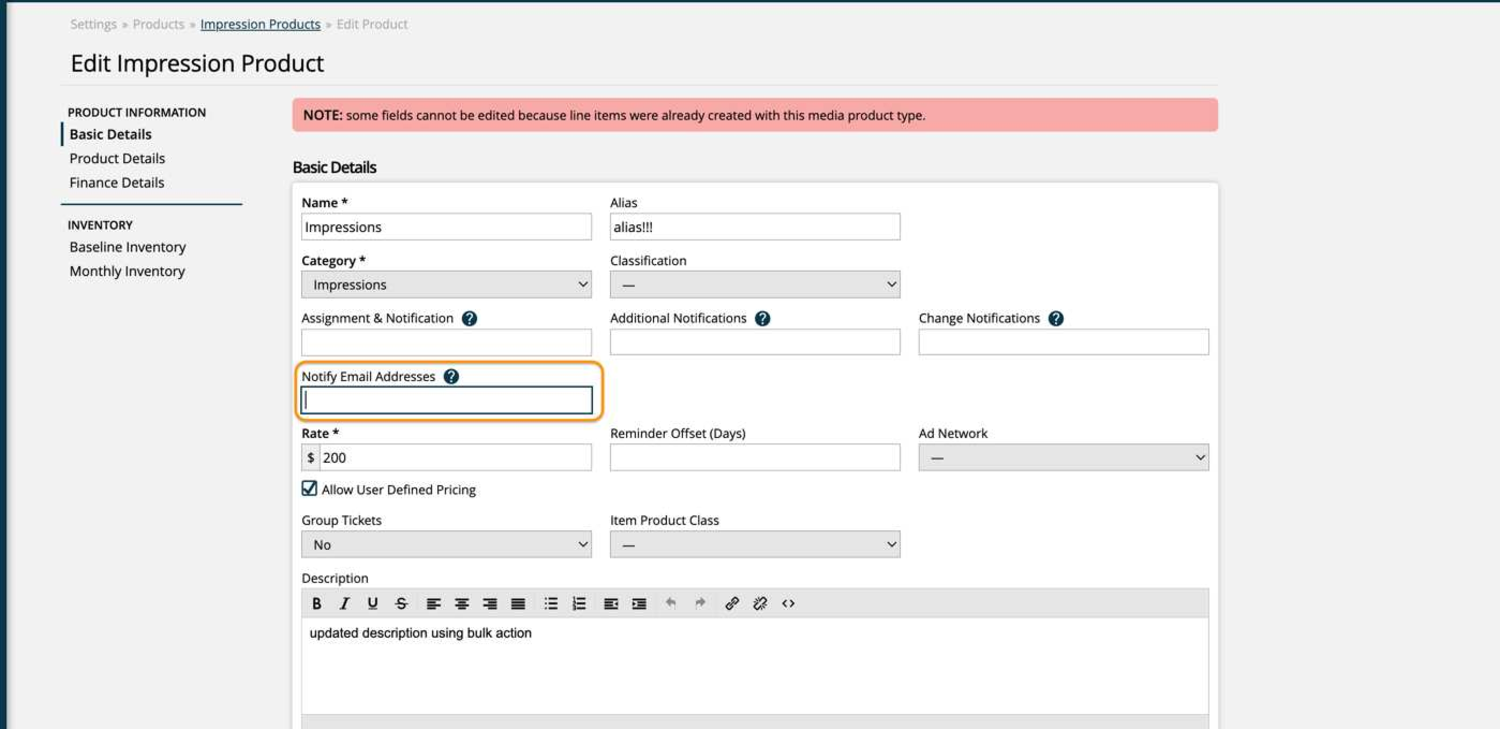
This integration is only supported with Digital Media products. When you create or edit a Digital Media Product, you have the option to add one or more “Notify Email Addresses”.
In Ad Orbit, go to Settings > Products, then select from Impression Products, Targeted Display Products, Slot Products, or Reserved Products depending on which type you want to set up. Add a new product, or edit an existing one.
Enter support@januaryspring.com into the ‘Notify Email Addresses’ field, and make sure to save the product. Repeat this process for any product you are passing to January Spring for delivery.

Set up Line Item Dynamic Attributes
Most of the fields required by January Spring already exist within Ad Orbit, and can be added directly to the email template that you will set up in the next step. However, there are a few fields that you will first need to set up as a dynamic attribute. Read below to learn how to do so.
Go to Settings > System Design & Info > Dynamic Attributes, and click on the Tickets tab. There are four attributes you will need to set up: Destination URL, Primary Zip Codes for Targeting, Ad Creative URL, and Additional Info Text Area.
Click Add Dynamic Ticket Attribute.
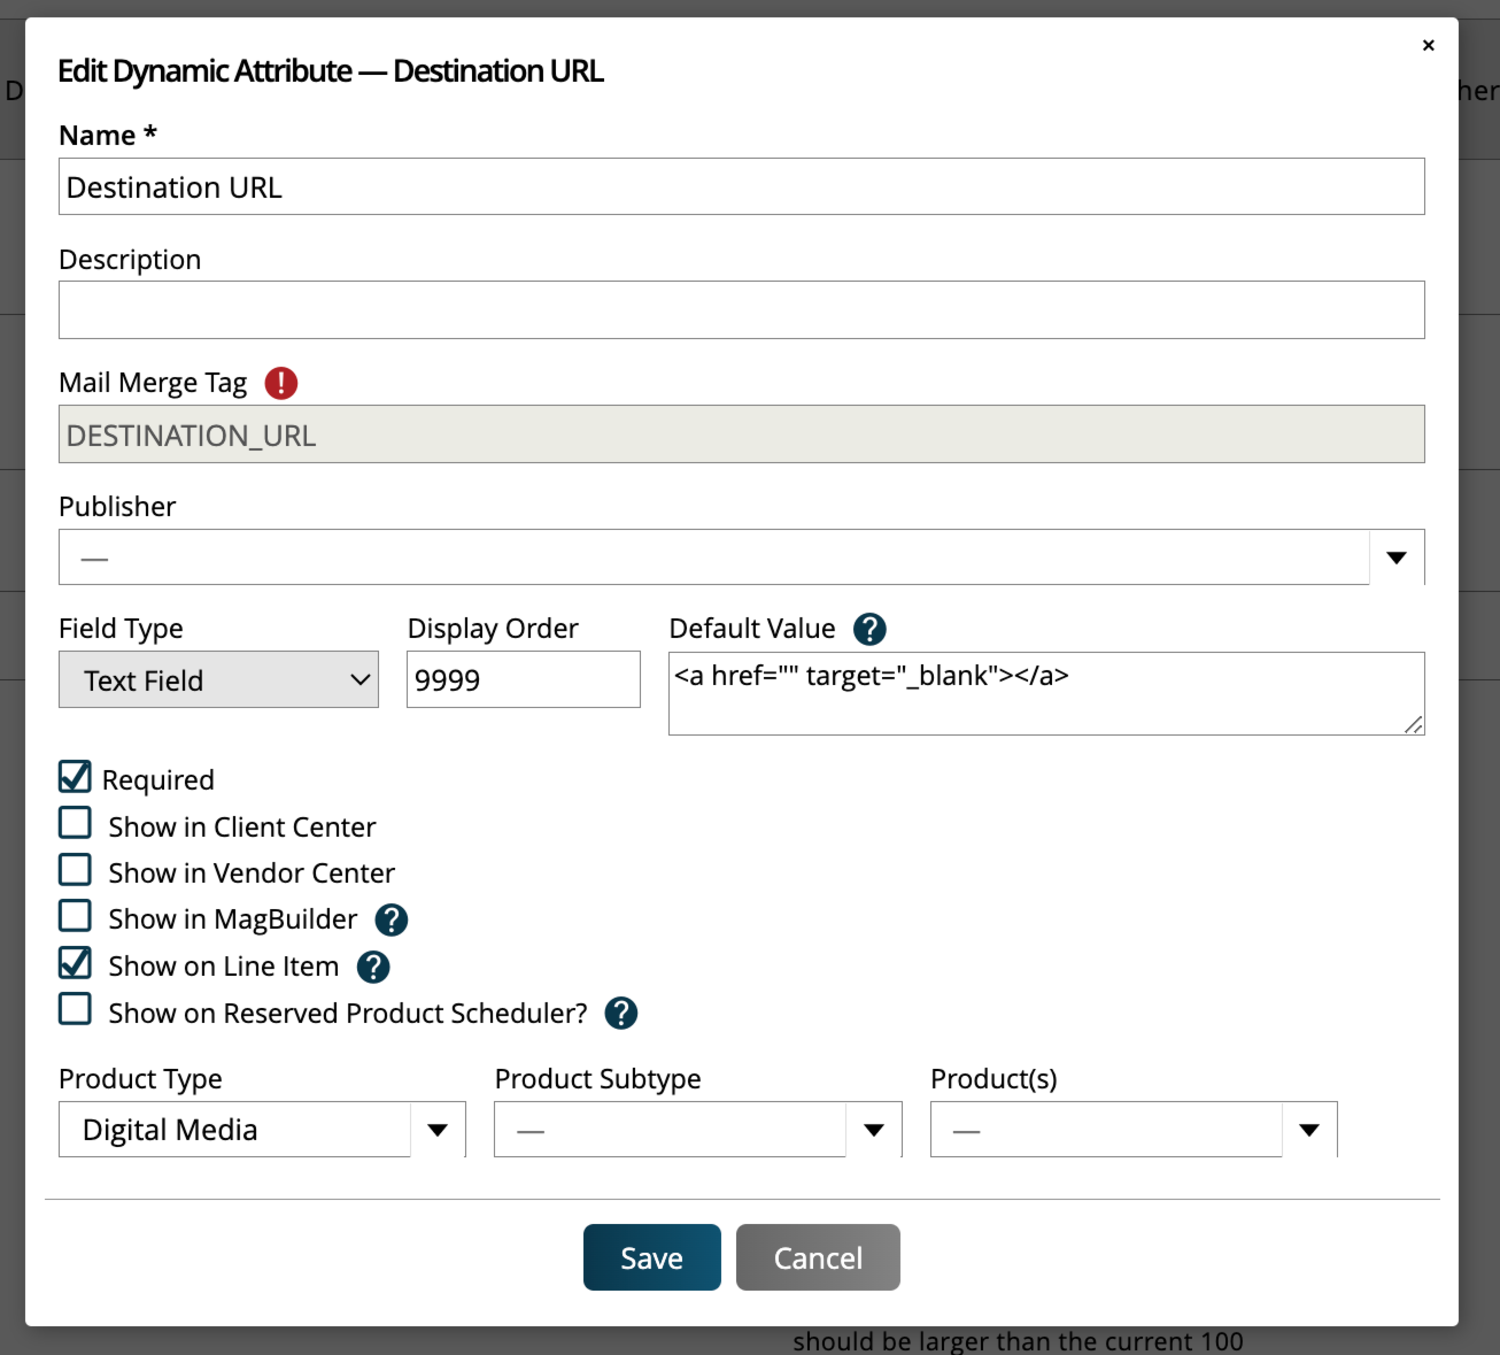
In the popup, give your attribute a name, and optional description.
Add text to the Mail Merge Tag field. This can be the same as the attribute’s name. Once you save the attribute, it will be automatically converted to the correct format for mail merge tags.
Check the option to ‘Show on Line Item’. When showing on line items, you can also restrict them by product type, so you could choose to display the attributes only on your digital media items, if desired.
We highly recommend you set up these attributes as ‘Required’.
Below is an example of what the ‘Destination URL’ attribute will look like. Remember, you will need to repeat this process with the other three required attributes.

Configure your email template
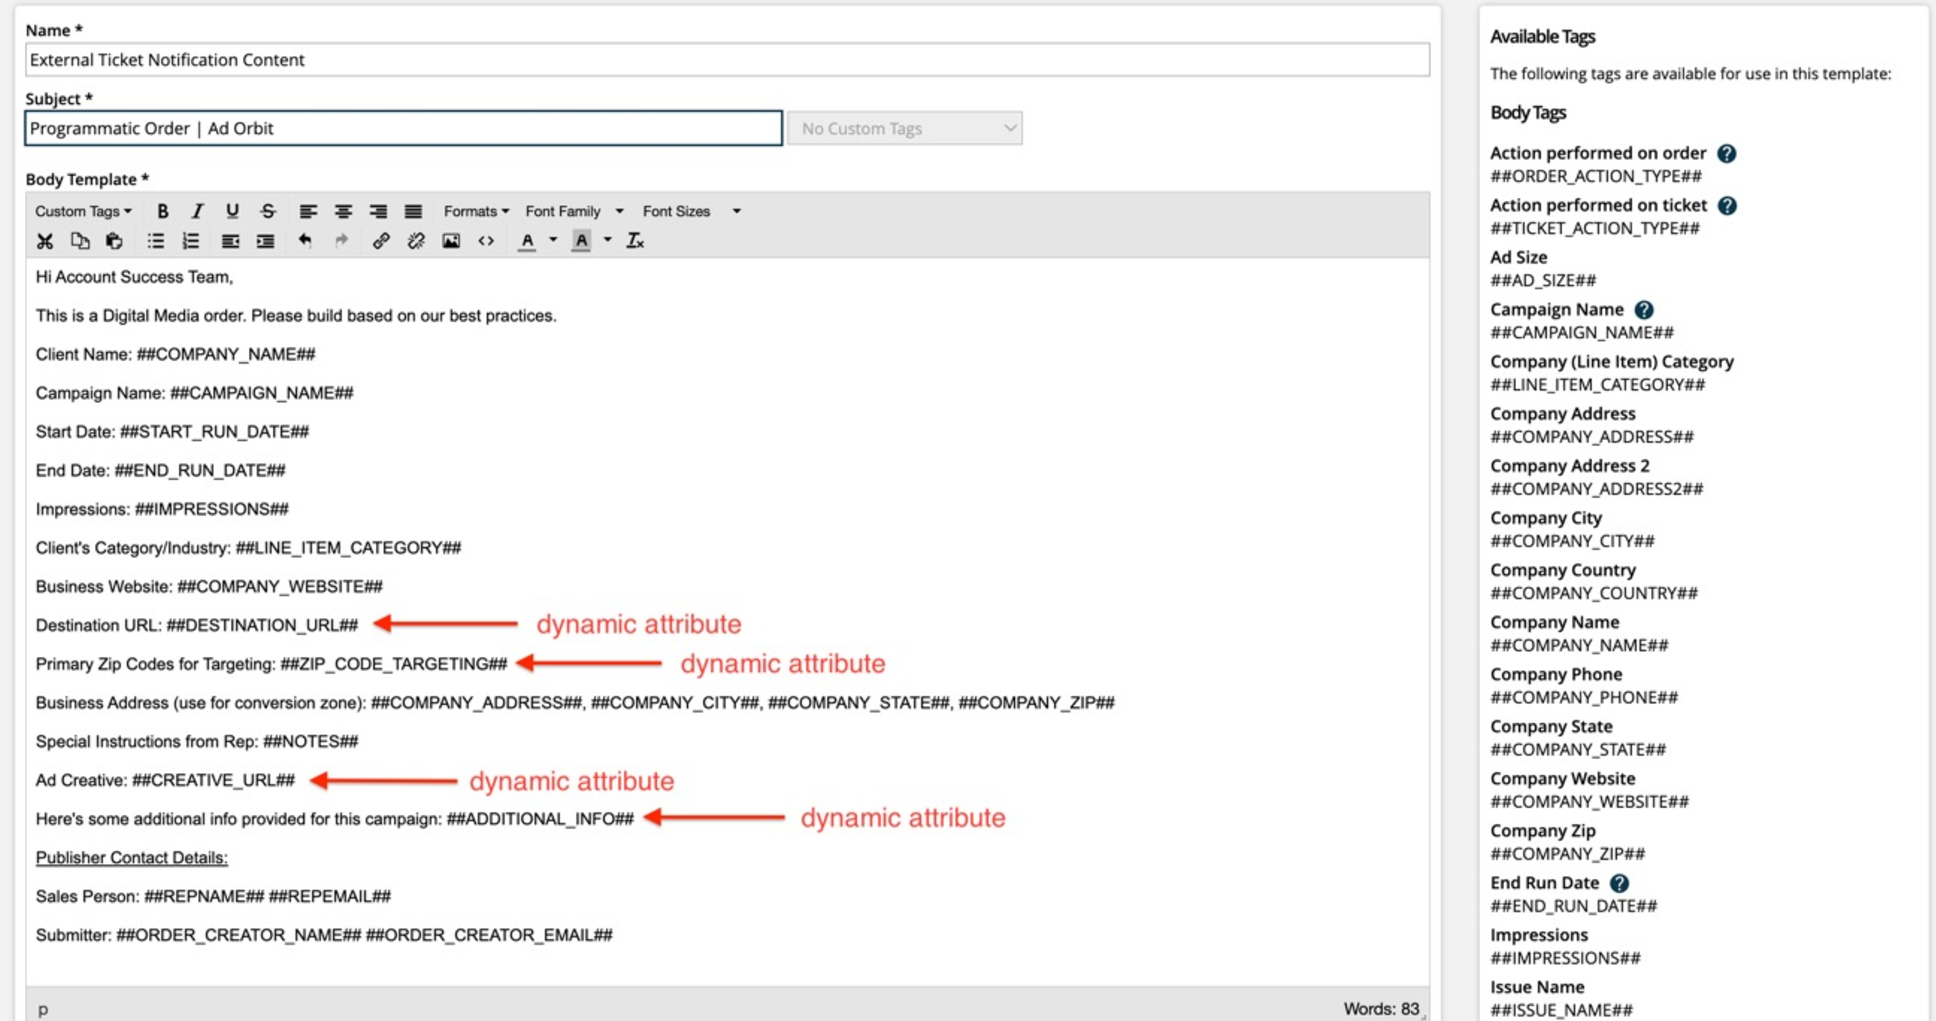
For this integration to work, the ‘External Ticket Notification Content’ email template must be used. Once you’ve finished setting up your digital media products and dynamic attributes, navigate to Settings > Templates > System Emails and click on the Subtemplate link for “External Ticket Notification Content”. Add a subtemplate and use the following information to design the template structure.
IMPORTANT: The following fields must be added as merge tags to your email template in order for the item to properly be sent to January Spring.
Company Name (##COMPANY_NAME##)
Campaign Name (##CAMPAIGN_NAME##)
Start Run Date (##START_RUN_DATE##)
End Run Date (##END_RUN_DATE##)
Impressions (##IMPRESSIONS##)
Company (Line Item) Category (##LINE_ITEM_CATEGORY##)
Company Website (##COMPANY_WEBSITE##)
Company Address (COMPANY_ADDRESS##)
Line Item Notes (##NOTES##)
Sales Rep Name (##REPNAME##)
Sales Rep Email (##REPEMAIL##)
User who created the Order (##ORDER_CREATOR_NAME##)
User who created the Order’s Email (##ORDER_CREATOR_EMAIL##)
Destination URL
This field must be set up as a dynamic attribute (see setup step 2 for more information.)
Primary Zip Codes for Targeting
This field must be set up as a dynamic attribute
Ad Creative URL
This field must be set up as a dynamic attribute
Additional Info Text Area
This field must be set up as a dynamic attribute
You may use the screenshot provided below to recreate the template or may customize it however you like, as long as all of the above required fields are included.

Save the Email Template and push "Publish".
Determine When to Send the Notification
The January Spring notification can either be sent when the ticket is initially created within Ad Orbit, or it can be sent when a final asset is uploaded to the ticket. Use the System Configuration Send External Ticket Notification with Final Asset to determine when to send your notification. If set to No, the notification will be sent when the ticket is created. If set to Yes, the notification will be sent once an asset is marked 'final' on a print or digital ad ticket, or as 'ready to deliver' on digital media tickets, and the notification will include the final asset as an attachment.
Typically, January Spring will require assets along with your other ticket information, so for most workflows we recommend sending the notification when the assets are marked as final. Please speak with your January Spring team to see what information they will need from you.
Notify January Spring and create a test order
Once this is complete, it’s time to let January Spring know that you’ll be submitting a test order. Create your order, send your notification, and wait for confirmation from the January Spring team.
Updated 05/10/2024