Recording Time on Tickets
There are various ways to record time. You can enter hours on your timesheet or take advantage of the dock timer. If you want to keep track of the hours spent on tickets, you can also record time worked on specific support and service tickets.
To record time on service and support tickets, you will need to set the system configuration Enable Tracking of Time Worked on Tickets to yes. When this is enabled, on your support and service tickets, you will see a ticket timer under the column ‘Hours Worked’. Currently, the ticket timer functionality is supported on all service tickets – both tied to projects and not – and support tickets. The timer will work somewhat differently, depending on which type of ticket you are recording time on.
Service Tickets Not Tied to a Project
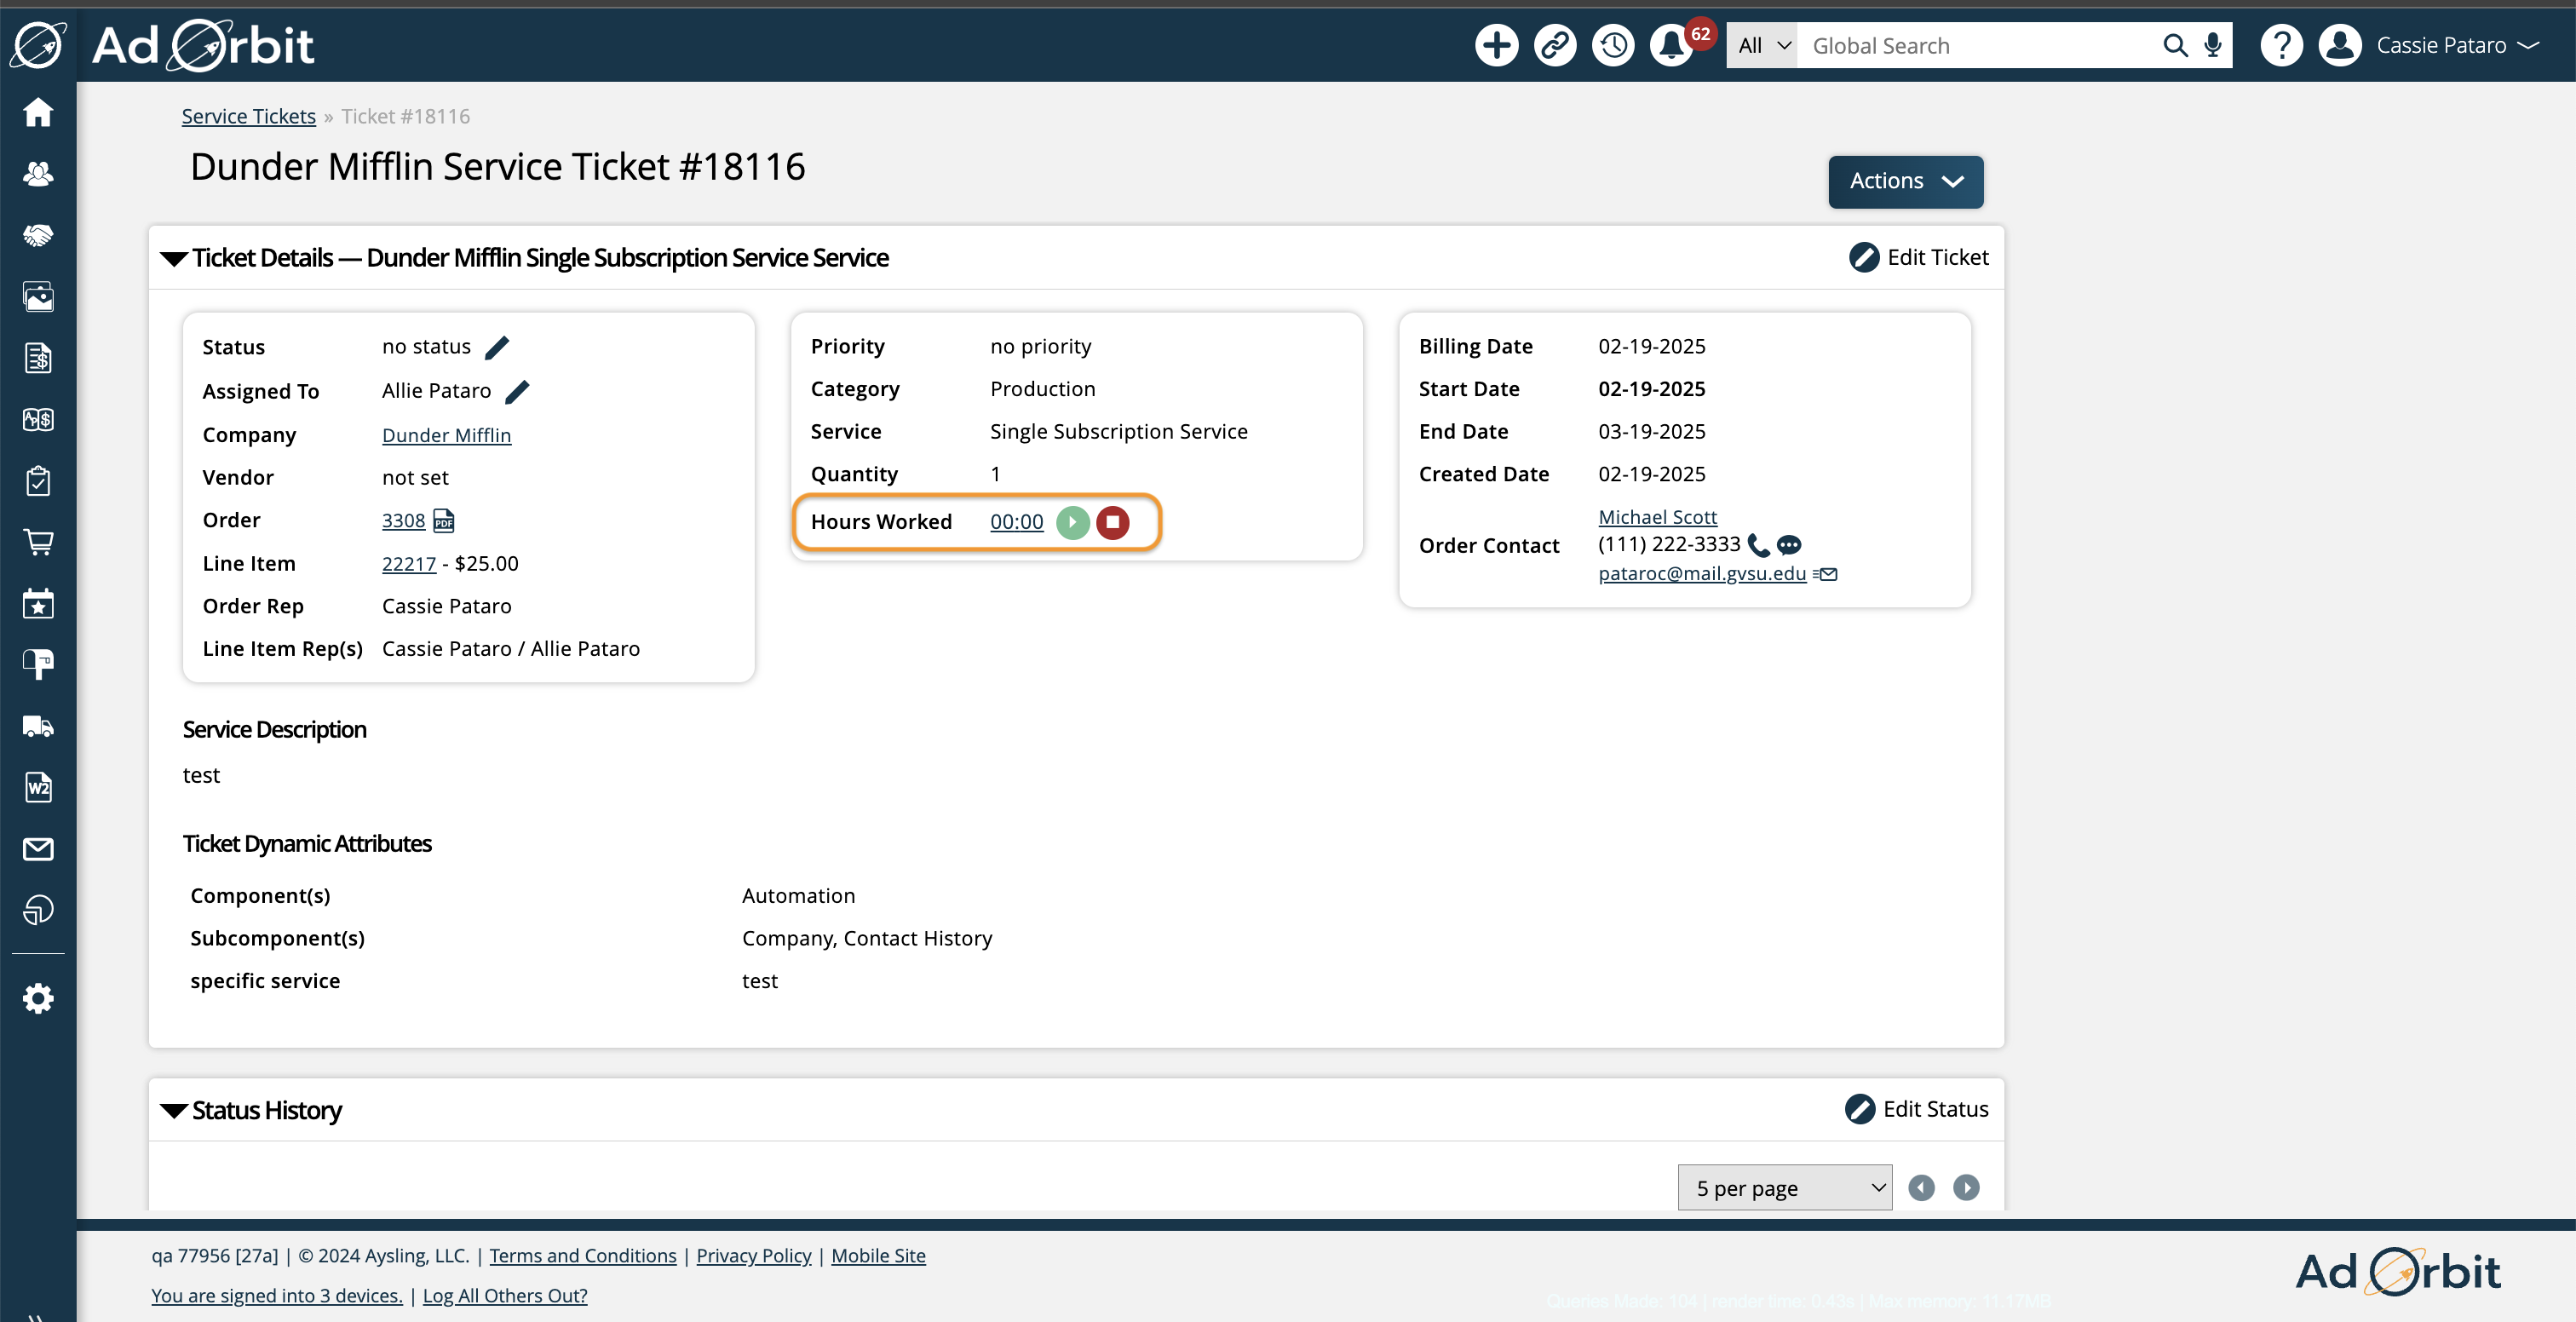
To record time worked on a service ticket, begin by simply navigating to a service ticket in the system. At the top of the ticket, you will see the field ‘Hours Worked’. In this field, there will be a timer with start and stop icons.

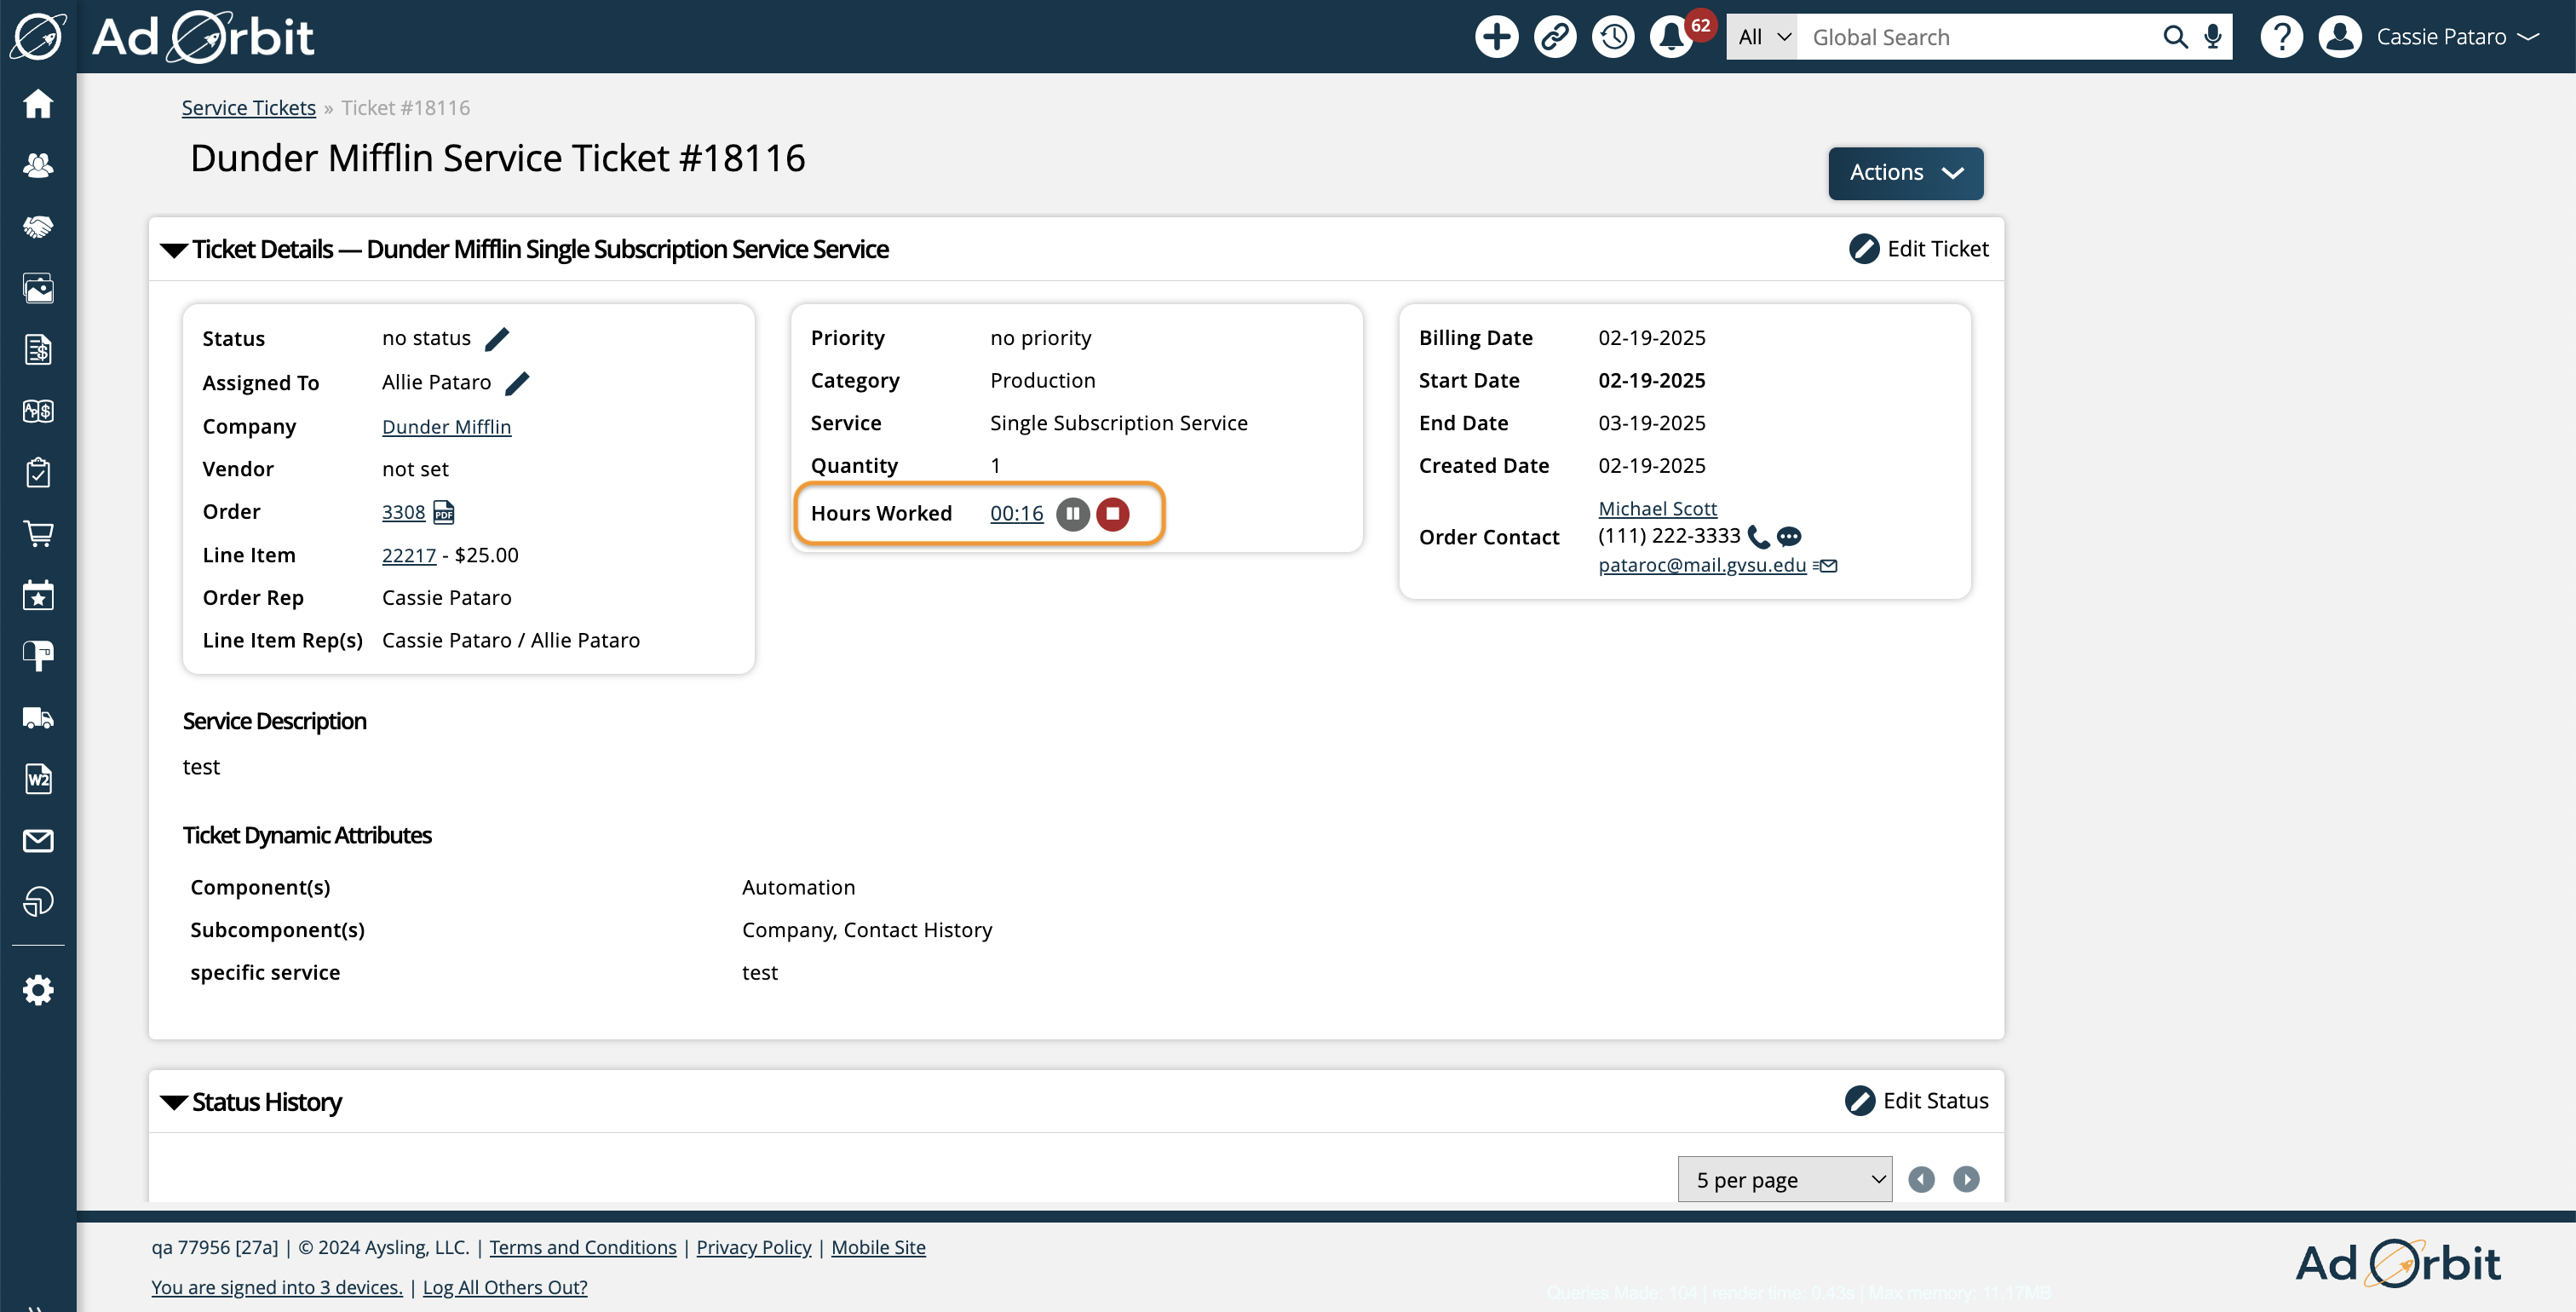
Click on the Play icon to start recording your time. Once you have clicked Play, you have the option to either Pause your timer, or Stop your timer.

Pausing your timer will stop the clock, but you will not be prompted to enter your time on your timesheet. Using the Pause button is a good option if you are taking a short break and want to continue working on the ticket afterwards.
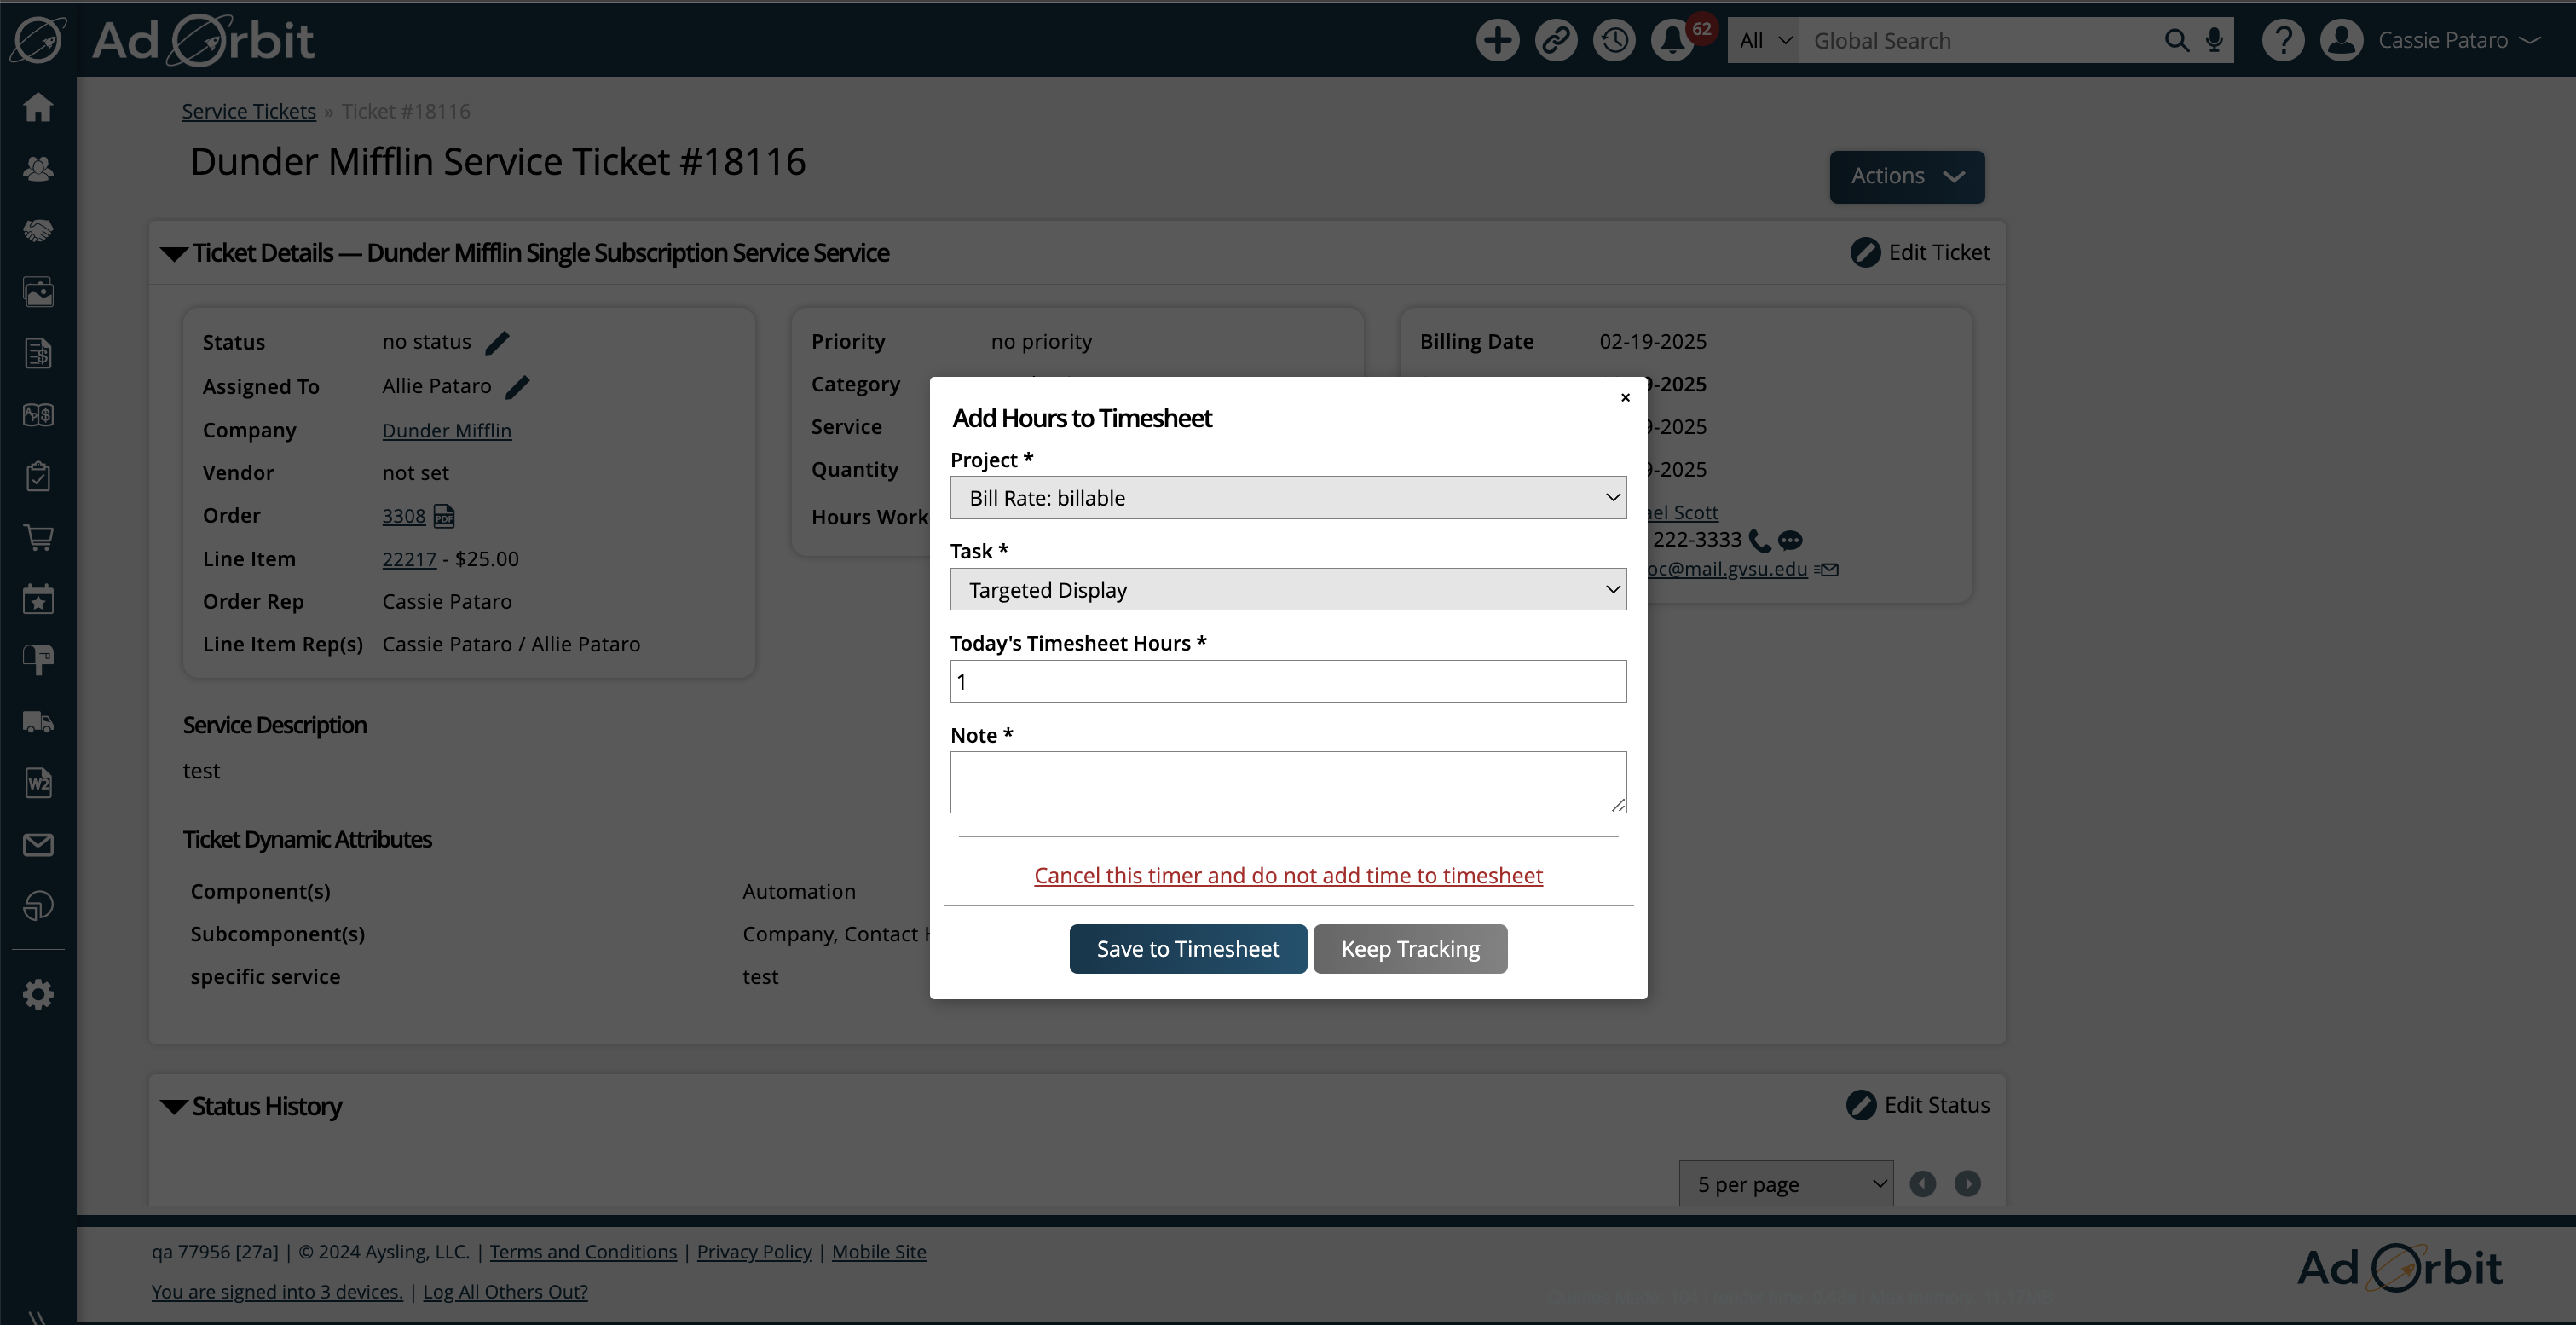
Stopping your timer will prompt an 'Add Hours to Timesheet’ popup. In the popup, you will see a few fields that need to be entered, including Project, Task, and Hours. For service tickets that are not tied to a project or task, in this popup, you will be able to choose from all your active projects and tasks, similar to how your timesheet works.

Enter the project and task you would like to add your recorded hours to and enter any relevant notes. The hours will be estimated based on the amount of time recorded. For example, if you recorded 30 minutes on a ticket, in the popup you will see 0.5 hours. This field can be edited if needed.
Once the necessary information has been entered, click ‘Save to Timesheet’. The hours will show up on your timesheet for the project and task you selected in the popup. If the project and task were not already on your current week's timesheet, they will be added along with the hours.
If you stopped the timer by mistake, you could click ‘Keep Tracking’ which will close the popup and the timer will continue.
There is also the option to cancel your time and not add it to your timesheet. If you click this option, the time will not be saved, and the clock will be reverted to zero.
Note
If a ticket’s page is left open while the timer is running but there has been no activity on the page for 30 minutes, then the timer will automatically pause. When you navigate back to the page you can stop the timer or continue it. If the ticket page is closed while the timer is running, then the timer will record an additional five minutes, and then stop the timer.
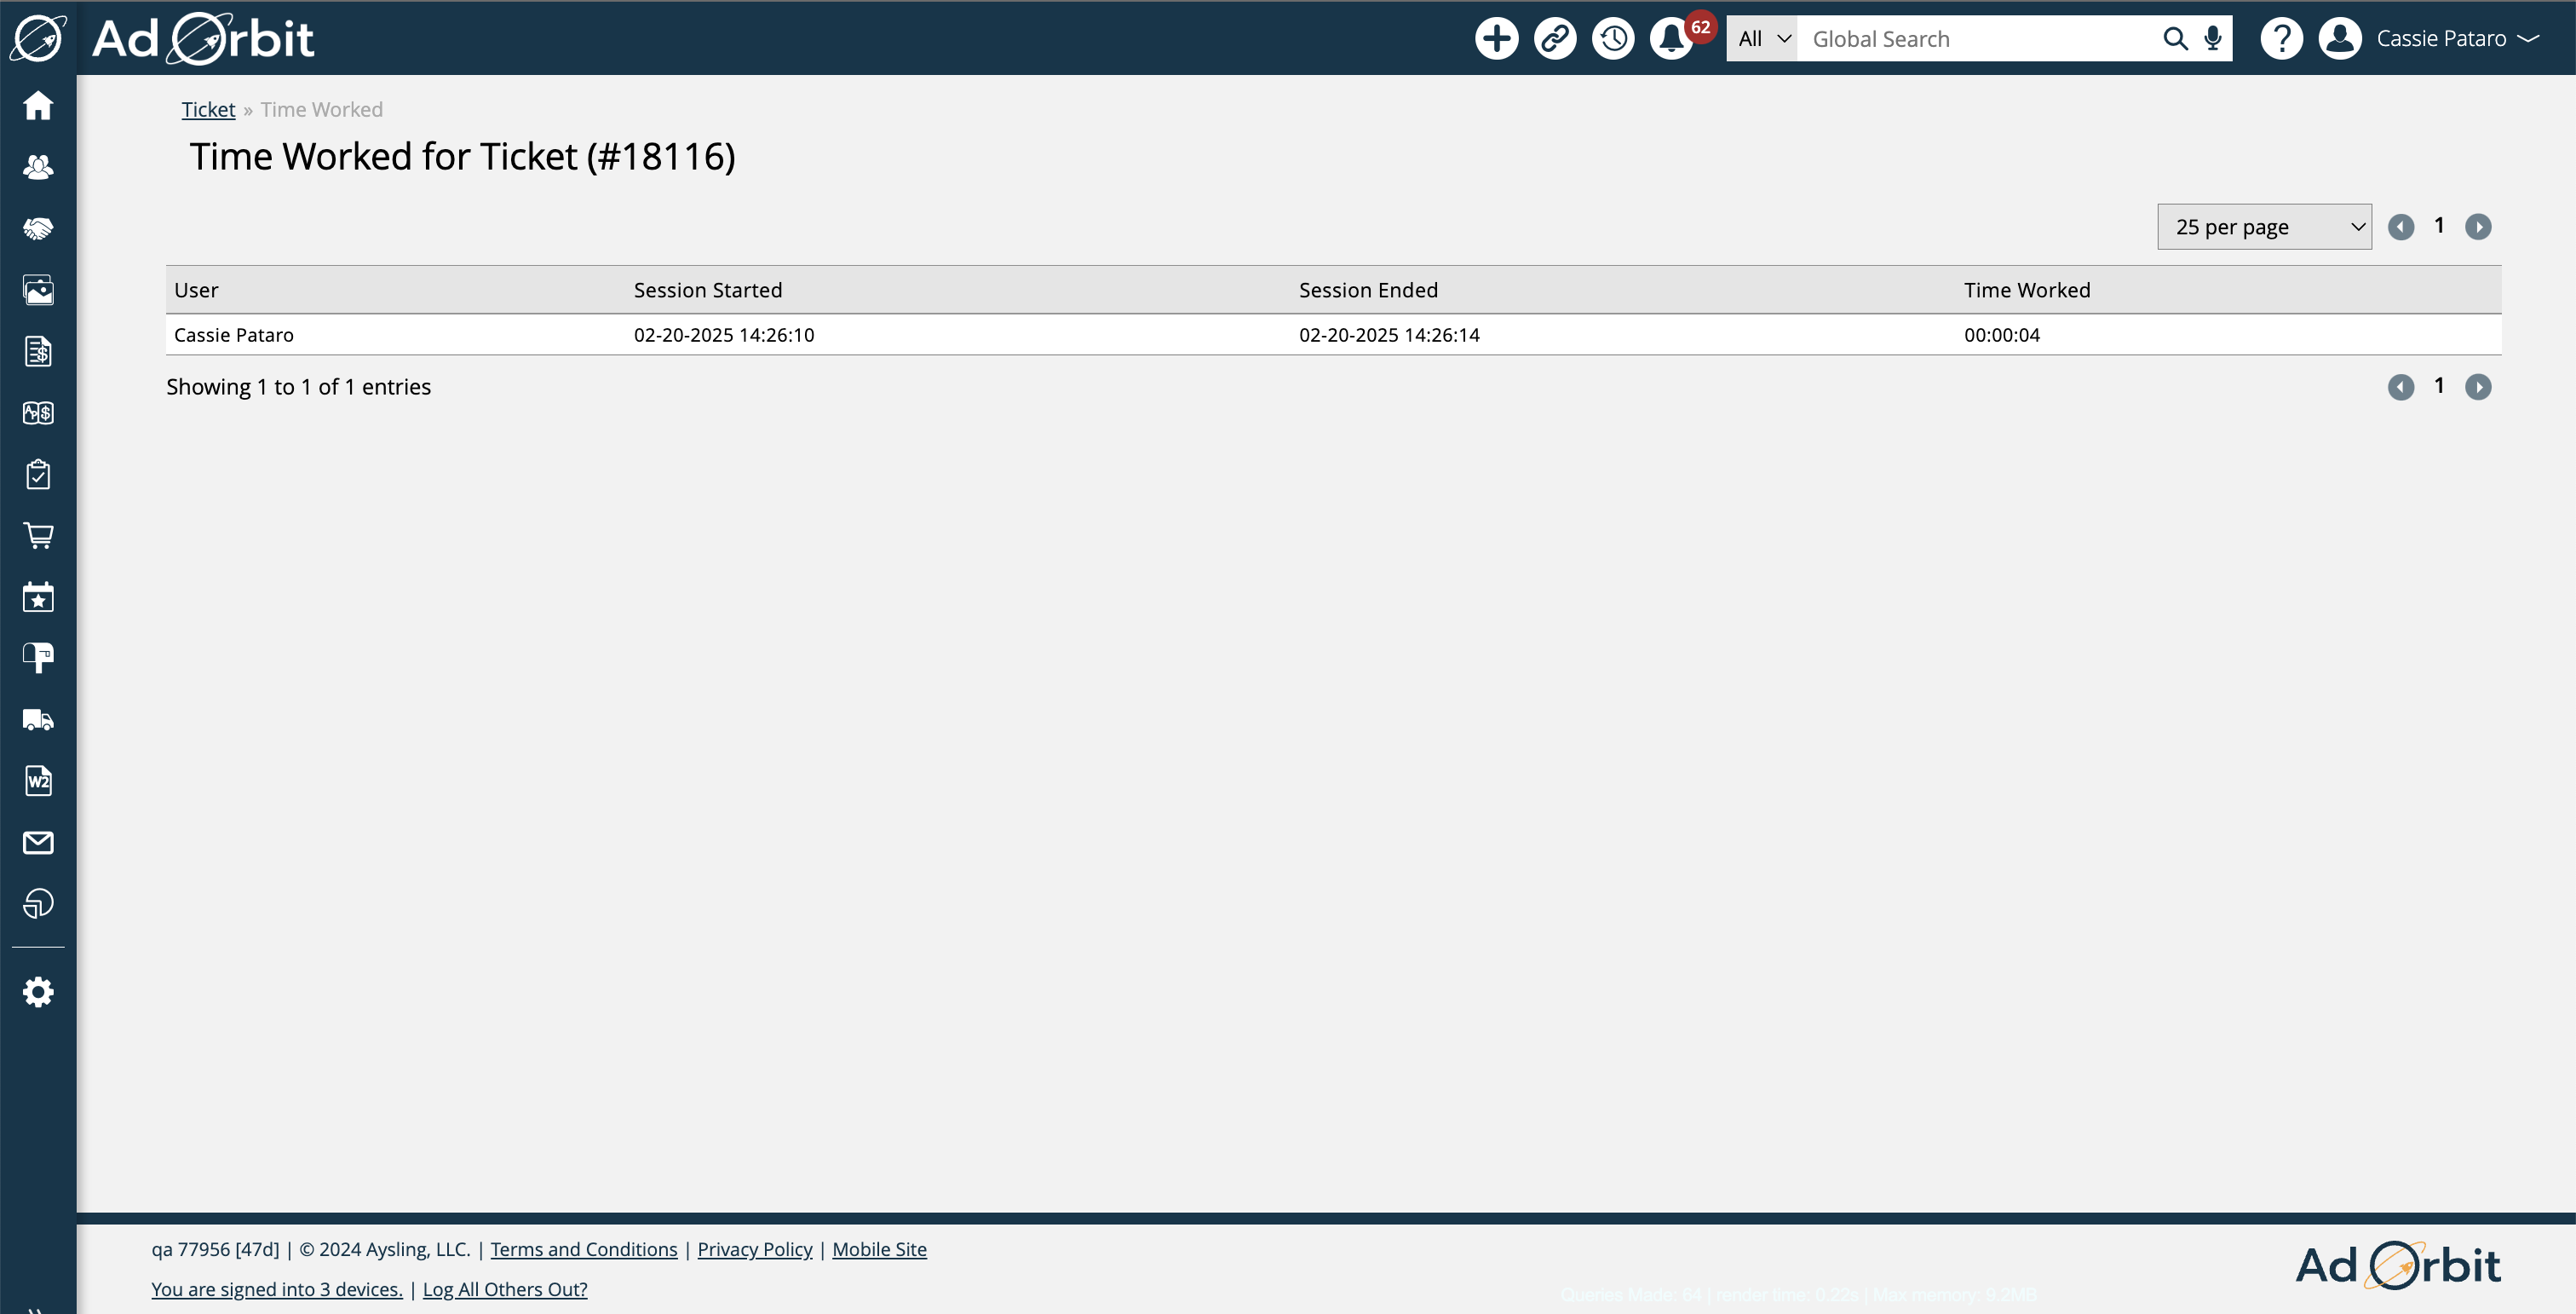
The timer itself is a quick link, which when clicked on will open the ‘Time Worked for Ticket’ page. This page is a log of all the time recorded on the ticket, with data about each recording. The table shows the user who recorded the time, the date and time of when they began and ended the clock, as well as how much time was recorded. You can refer to this page to see which users have recorded time on the ticket as well as how much time they have each put in.

Service Tickets Tied to a Project
To record time worked on a service ticket that is associated with a project and task, begin by simply navigating to the service ticket in the system. At the top of the ticket, you will see the field ‘Hours Worked’. In this field, there will be a timer with start and stop icons.
Click on the Play icon to start recording your time. Once you have clicked Play, you have the option to either Pause your timer, or Stop your timer.
Pausing your timer will stop the clock, but you will not be prompted to enter your time on your timesheet. Using the Pause button is a good option if you are taking a short break and want to continue working on the ticket afterwards.
Stopping your timer will prompt an 'Add Hours to Timesheet’ popup. In the popup, you will see a few fields that need to be entered, including Project, Task, and Hours. For service tickets that are tied to a project and task, the popup will automatically select the project and task that the time will be recorded to.
The hours will be estimated based on the amount of time recorded. For example, if you recorded 30 minutes on a ticket, in the popup you will see 0.5 hours. This field can be edited if needed, and you have the option of adding any relevant notes to the entry.
Once the necessary information has been entered, click ‘Save to Timesheet’. The hours will show up on your timesheet for the project and task. If the project and task were not already on your current week's timesheet, they will be added along with the hours.
If you stopped the timer by mistake, you could click ‘Keep Tracking’ which will close the popup and the timer will continue.
There is also the option to cancel your time and not add it to your timesheet. If you click this option, the time will not be saved, and the clock will be reverted to zero.
You can click the View Project Milestone link to quickly navigate to the ticket’s project to view more details.
Note
If a ticket’s page is left open while the timer is running but there has been no activity on the page for 30 minutes, then the timer will automatically pause. When you navigate back to the page you can stop the timer or continue it. If the ticket page is closed while the timer is running, then the timer will record an additional five minutes, and then stop the timer.
The timer itself is a quick link, which when clicked on will open the ‘Time Worked for Ticket’ page. This page is a log of all the time recorded on the ticket, with data about each recording. The table shows the user who recorded the time, the date and time of when they began and ended the clock, as well as how much time was recorded. You can refer to this page to see which users have recorded time on the ticket as well as how much time they have each put in.
Support Tickets
To record time worked on a support ticket, begin by simply navigating to a support ticket in the system. At the top of the ticket under the Ticket Details section, you will see the column ‘Hours Worked’. In this column, there will be a timer with start and stop icons.
Click on the Play icon to start recording your time. Once you have clicked Play, you have the option to either Pause your timer, or Stop your timer.
Pausing your timer will stop the clock, but you will not be prompted to enter your time on your timesheet. Using the Pause button is a good option if you are taking a short break and want to continue working on the ticket afterwards.
Stopping your timer will prompt an 'Add Hours to Timesheet’ popup. In the popup, you will see a few fields that need to be entered, including Project, Task, and Hours. For support tickets, in this popup, you will be able to choose from all your active projects and tasks, similar to how your timesheet works.
Enter the project and task you would like to add your recorded hours to and enter any relevant notes if you wish. The hours will be estimated based on the amount of time recorded. For example, if you recorded 30 minutes on a ticket, in the popup you will see 0.5 hours. This field can be edited if needed.
Once the necessary information has been entered, click ‘Save to Timesheet’. The hours will show up on your timesheet for the project and task you selected in the popup. If the project and task were not already on your current week's timesheet, they will be added along with the hours.
If you stopped the timer by mistake, you could click ‘Keep Tracking’ which will close the popup and the timer will continue.
There is also the option to cancel your time and not add it to your timesheet. If you click this option, the time will not be saved, and the clock will be reverted to zero.
EXAMPLE: An example workflow would be if your organization has an internal project created for support work. Your employees can record time to various support related tasks such as trainings, and support tickets. With the ticket timer, a user could work on a specific support ticket, then when they are finished, they can add their time to their timesheet for their ‘support ticket’ task, directly from the ticket’s page.
The timer itself is a quick link, which when clicked on will open the ‘Time Worked for Ticket’ page. This page is a log of all the time recorded on the ticket, with data about each recording. The table shows the user who recorded the time, the date and time of when they began and ended the clock, as well as how much time was recorded. You can refer to this page to see which users have recorded time on the ticket as well as how much time they have each put in.
Note
If a ticket’s page is left open while the timer is running but there has been no activity on the page for 30 minutes, then the timer will automatically pause. When you navigate back to the page you can stop the timer or continue it. If the ticket page is closed while the timer is running, then the timer will record an additional five minutes, and then stop the timer.
Updated 2/20/2025