Add a New Subscriber
If you have subscription webforms configured in your system, many of your subscriber contacts will likely be auto-generated in the system. However, you may need to manually enter a subscriber contact from time-to-time. The process for creating a subscriber is very similar to the process of creating any other contact in the system. Simply follow the steps below.
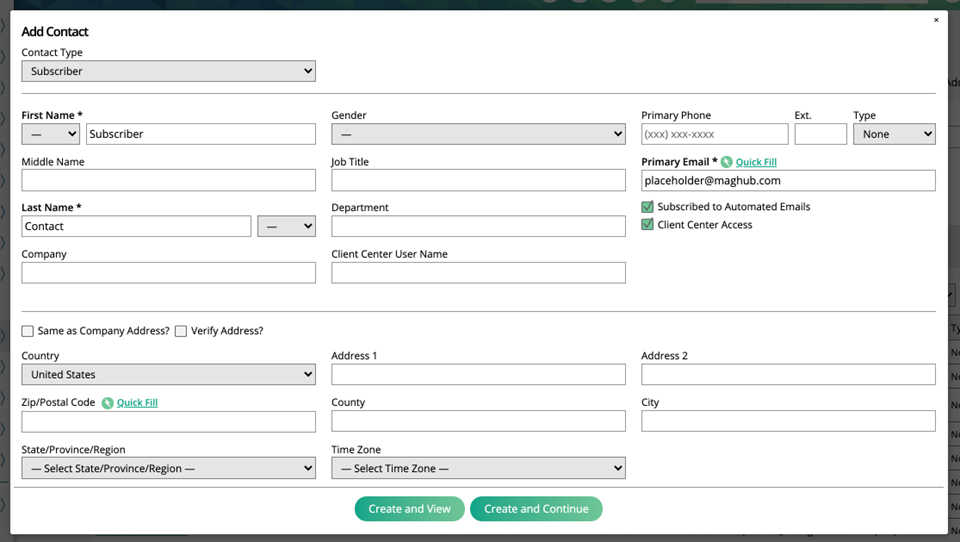
A new subscriber can be added to your system by going to the + icon on the top menu and select Add Subscriber under the Distribution section or Navigate to the Subscriptions > Subscribers page, and click Add Subscriber.
All of these options will bring you to the same contact creation page, where you will be required to enter a first name, last name, and email address. Make sure the Contact Type field is set to Subscriber. You can also configure your system to require other fields, including contact dynamic attributes.
If the Subscribe to Automated Emails box is checked, that means your contact will receive system generated emails. If a contact requests you stop sending automated email, you can update the contact and remove the setting.
Important
A subscriber will not be able to purchase a print subscription unless they have an address entered in the system. Having address verification enabled will help prevent invalid addresses being entered for your subscribers.

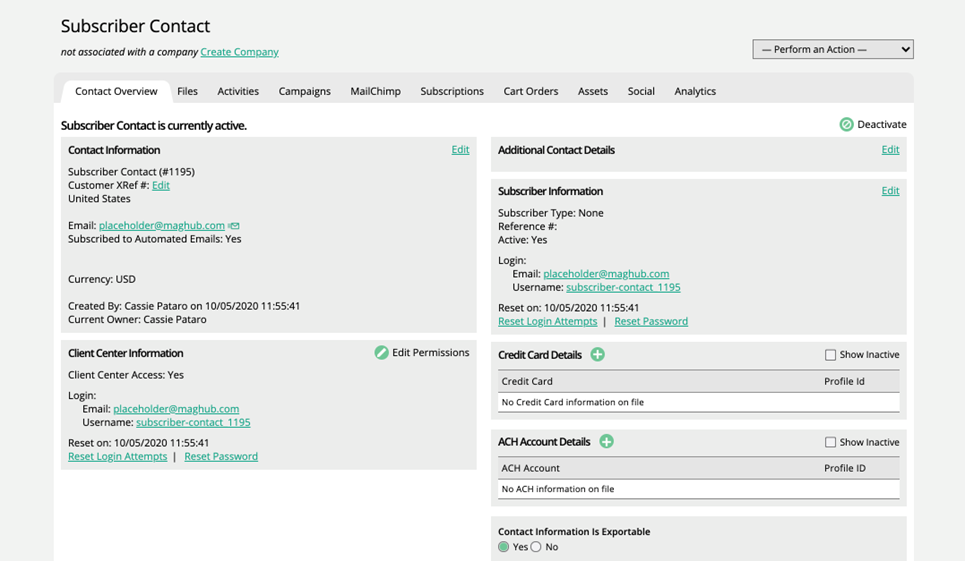
Once you complete the first step of the process, your subscriber has been created in the system. If you click Create and View, you will see the subscriber’s contact page. If you click Create and Continue, you can add more information to the subscriber.
On the Additional Info page, you can set the subscriber's lead source and status. Both of these fields can be used in automation workflows and the lead status report. You can set up new statuses and sources under Settings > Contacts. You can also add additional emails and phone number records. When BCCing an email in the system, the system will use any of the additional emails to add to the record.
Continuing to the Dynamic Attributes edit page allows you to add any non-required dynamic attributes to the contact. These attributes will show up on the main page of the contact. You can use these attributes in searches and automation campaigns or just for reference.
The last step is the Subscriber Info page, where you can add additional addresses and choose a subscriber type, such as individual or non-profit. You can edit or add subscriber types by navigating to Settings > Contacts > Subscriber Types.
If you continue editing, you can always click on Go to Details Page to navigate back to the subscriber’s contact page.
On the subscriber’s contact page, you will be able to see and interact with information about the subscriber. You can see a contact overview, with their basic contact and payment information, or you can change tabs to see information about their activities, files, campaigns, subscriptions, and more.

Note
All subscribers will have access to the Subscriber Portal. For more information about the Subscriber Portal, view the help center Portals > Subscribers page.
Updated 3/6/2023